> ## Documentation Index
> Fetch the complete documentation index at: https://docs.runorion.com/llms.txt
> Use this file to discover all available pages before exploring further.
# Groups
> Organize users into groups with shared access to projects, data, and knowledge
Groups let you organize users into cohorts that share access to the same set of [projects](/core-concepts/projects), [data sources](/configuration/data-sources), [Knowledge Base](/core-concepts/knowledge-base) pages, and [Integrations](/knowledge-base/wiki-integrations). Use them to model teams, departments, end customers, or any other grouping that maps to a set of people who should see the same resources.
## When to use Groups
Sales, Marketing, Finance, and Operations each get their own group with the
projects, data sources, and Knowledge Base pages relevant to their work.
Agencies and consultancies can give each end customer their own group,
keeping their projects and data isolated from other customers in the same
tenant.
A user can belong to several groups at once — for example, an executive who
needs visibility into Sales, Marketing, and Operations.
If you don't create any groups, Orion behaves exactly as before. Groups are an
additive feature — your existing users, projects, and permissions are
unaffected until you opt in by creating a group.
## Accessing Groups
Group management lives alongside user management in **Settings → Manage Users**. The page has two tabs: **Users** and **Groups**.
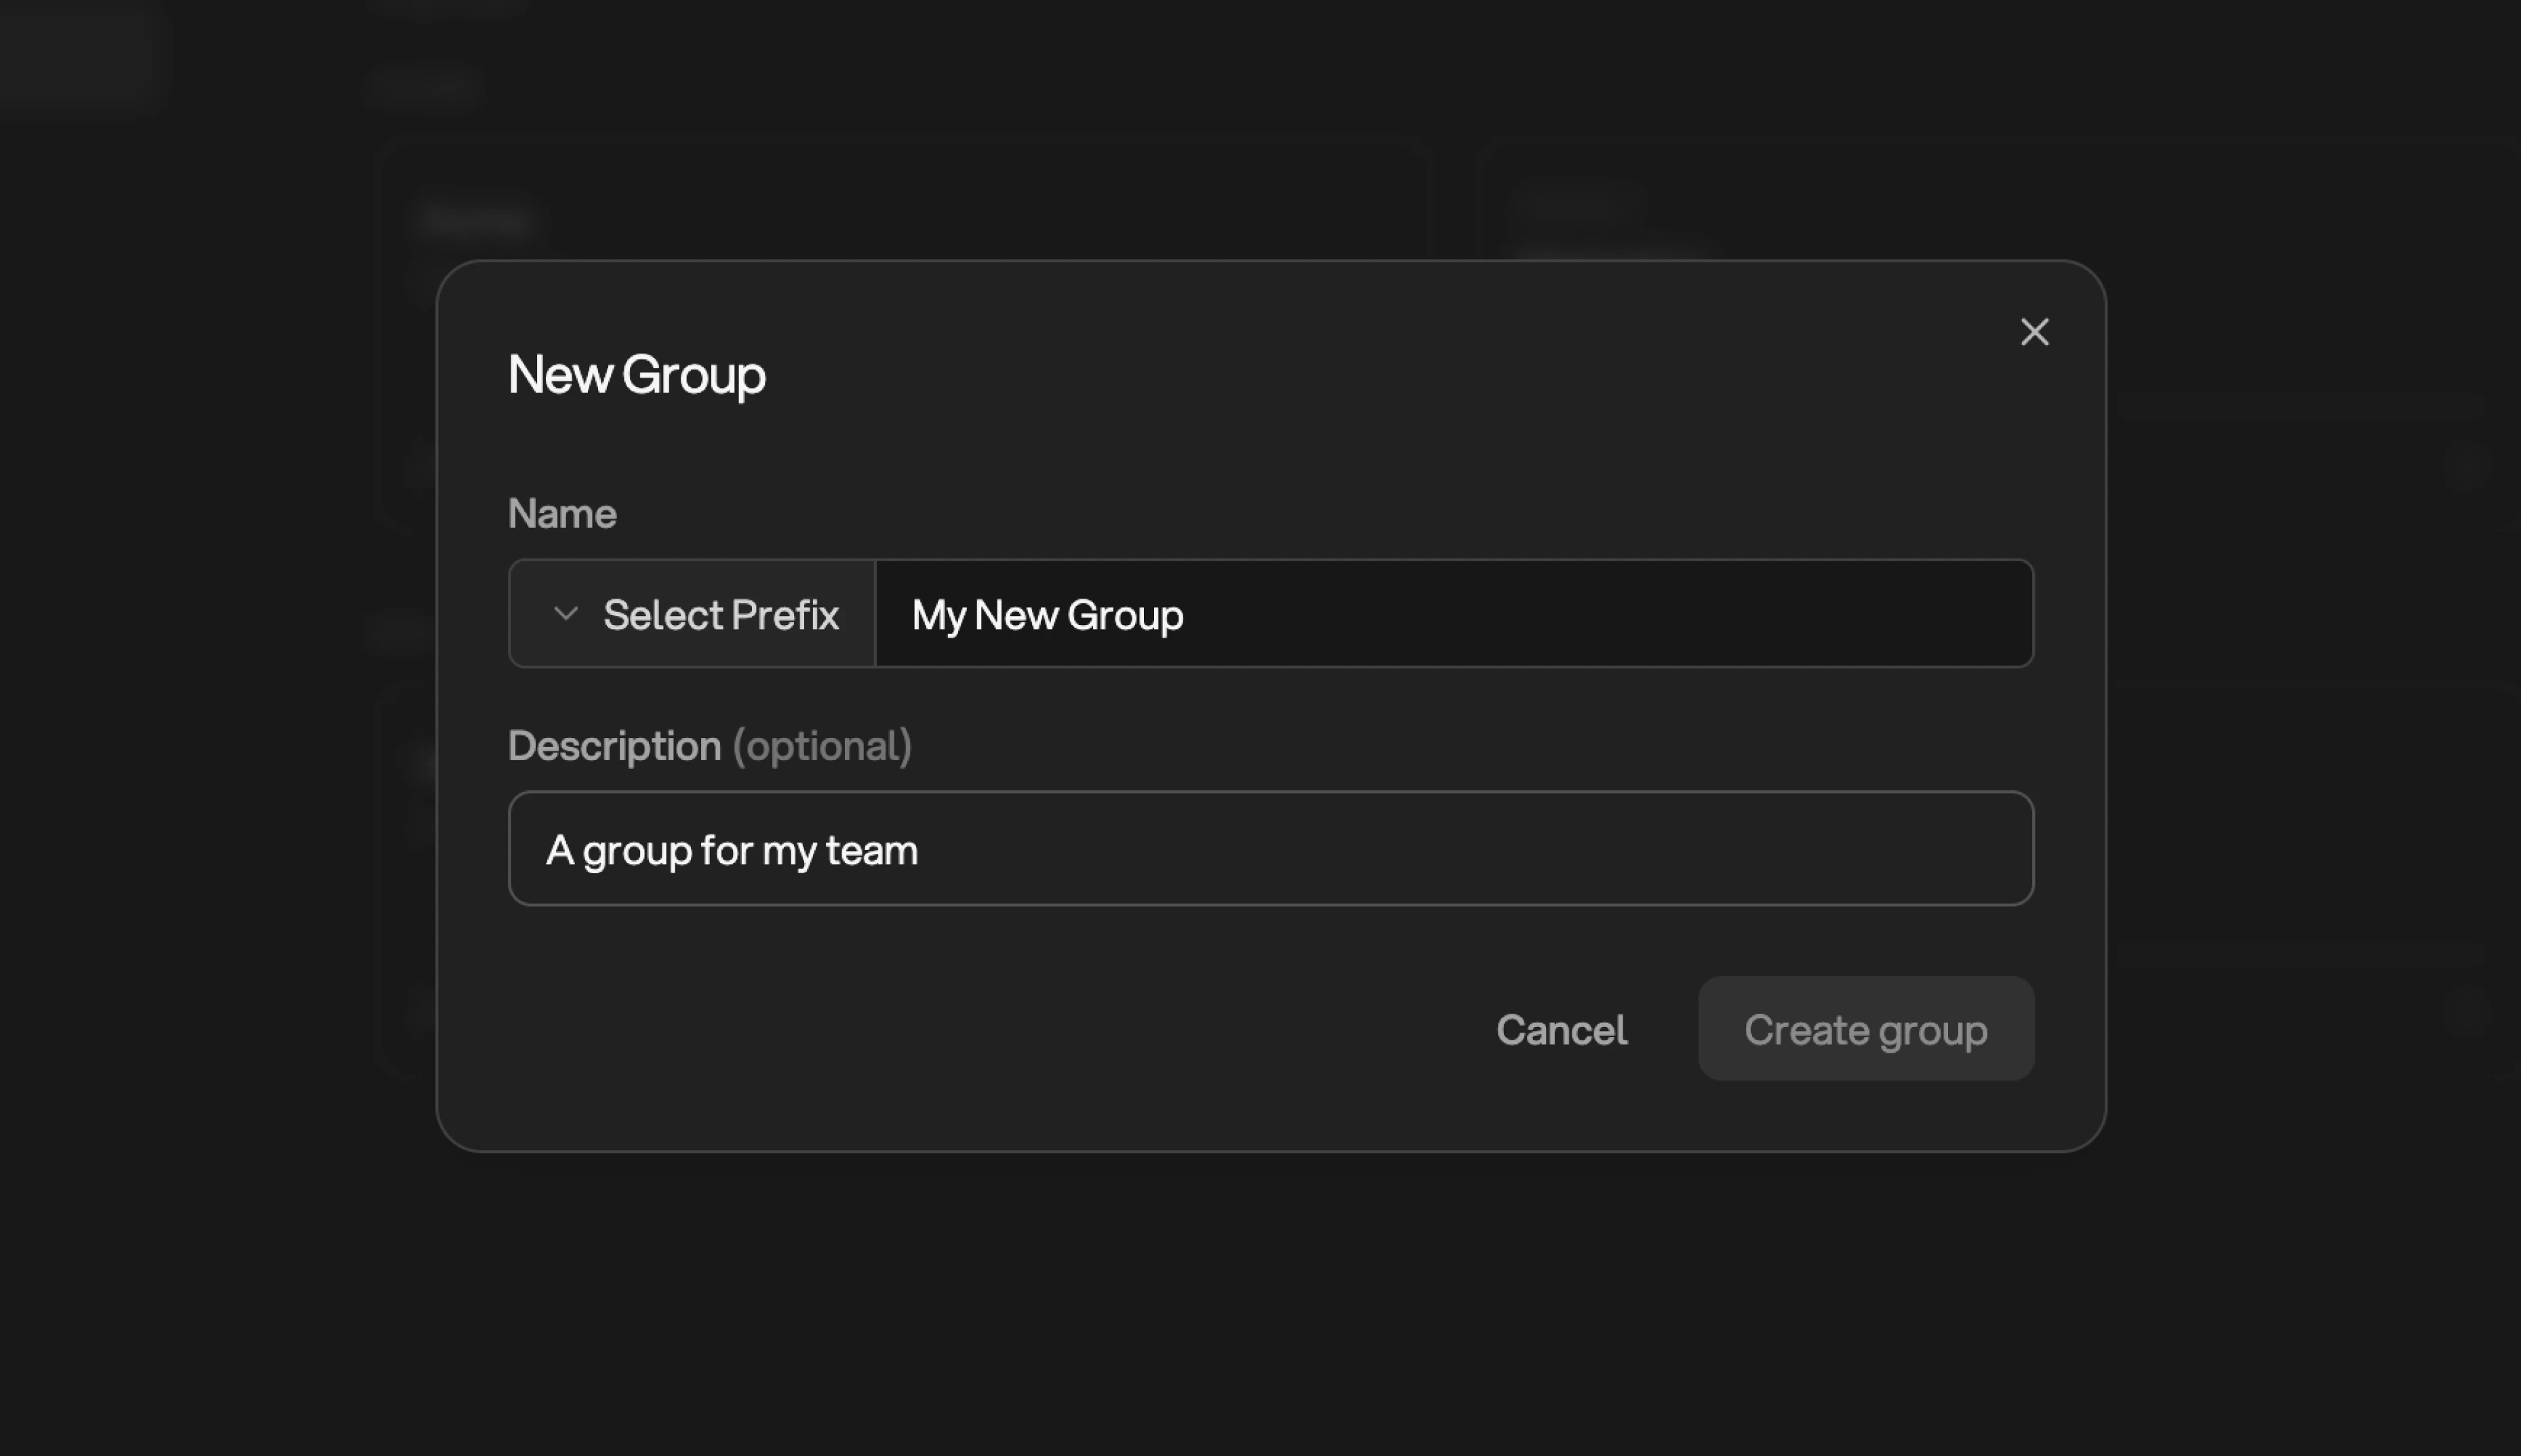
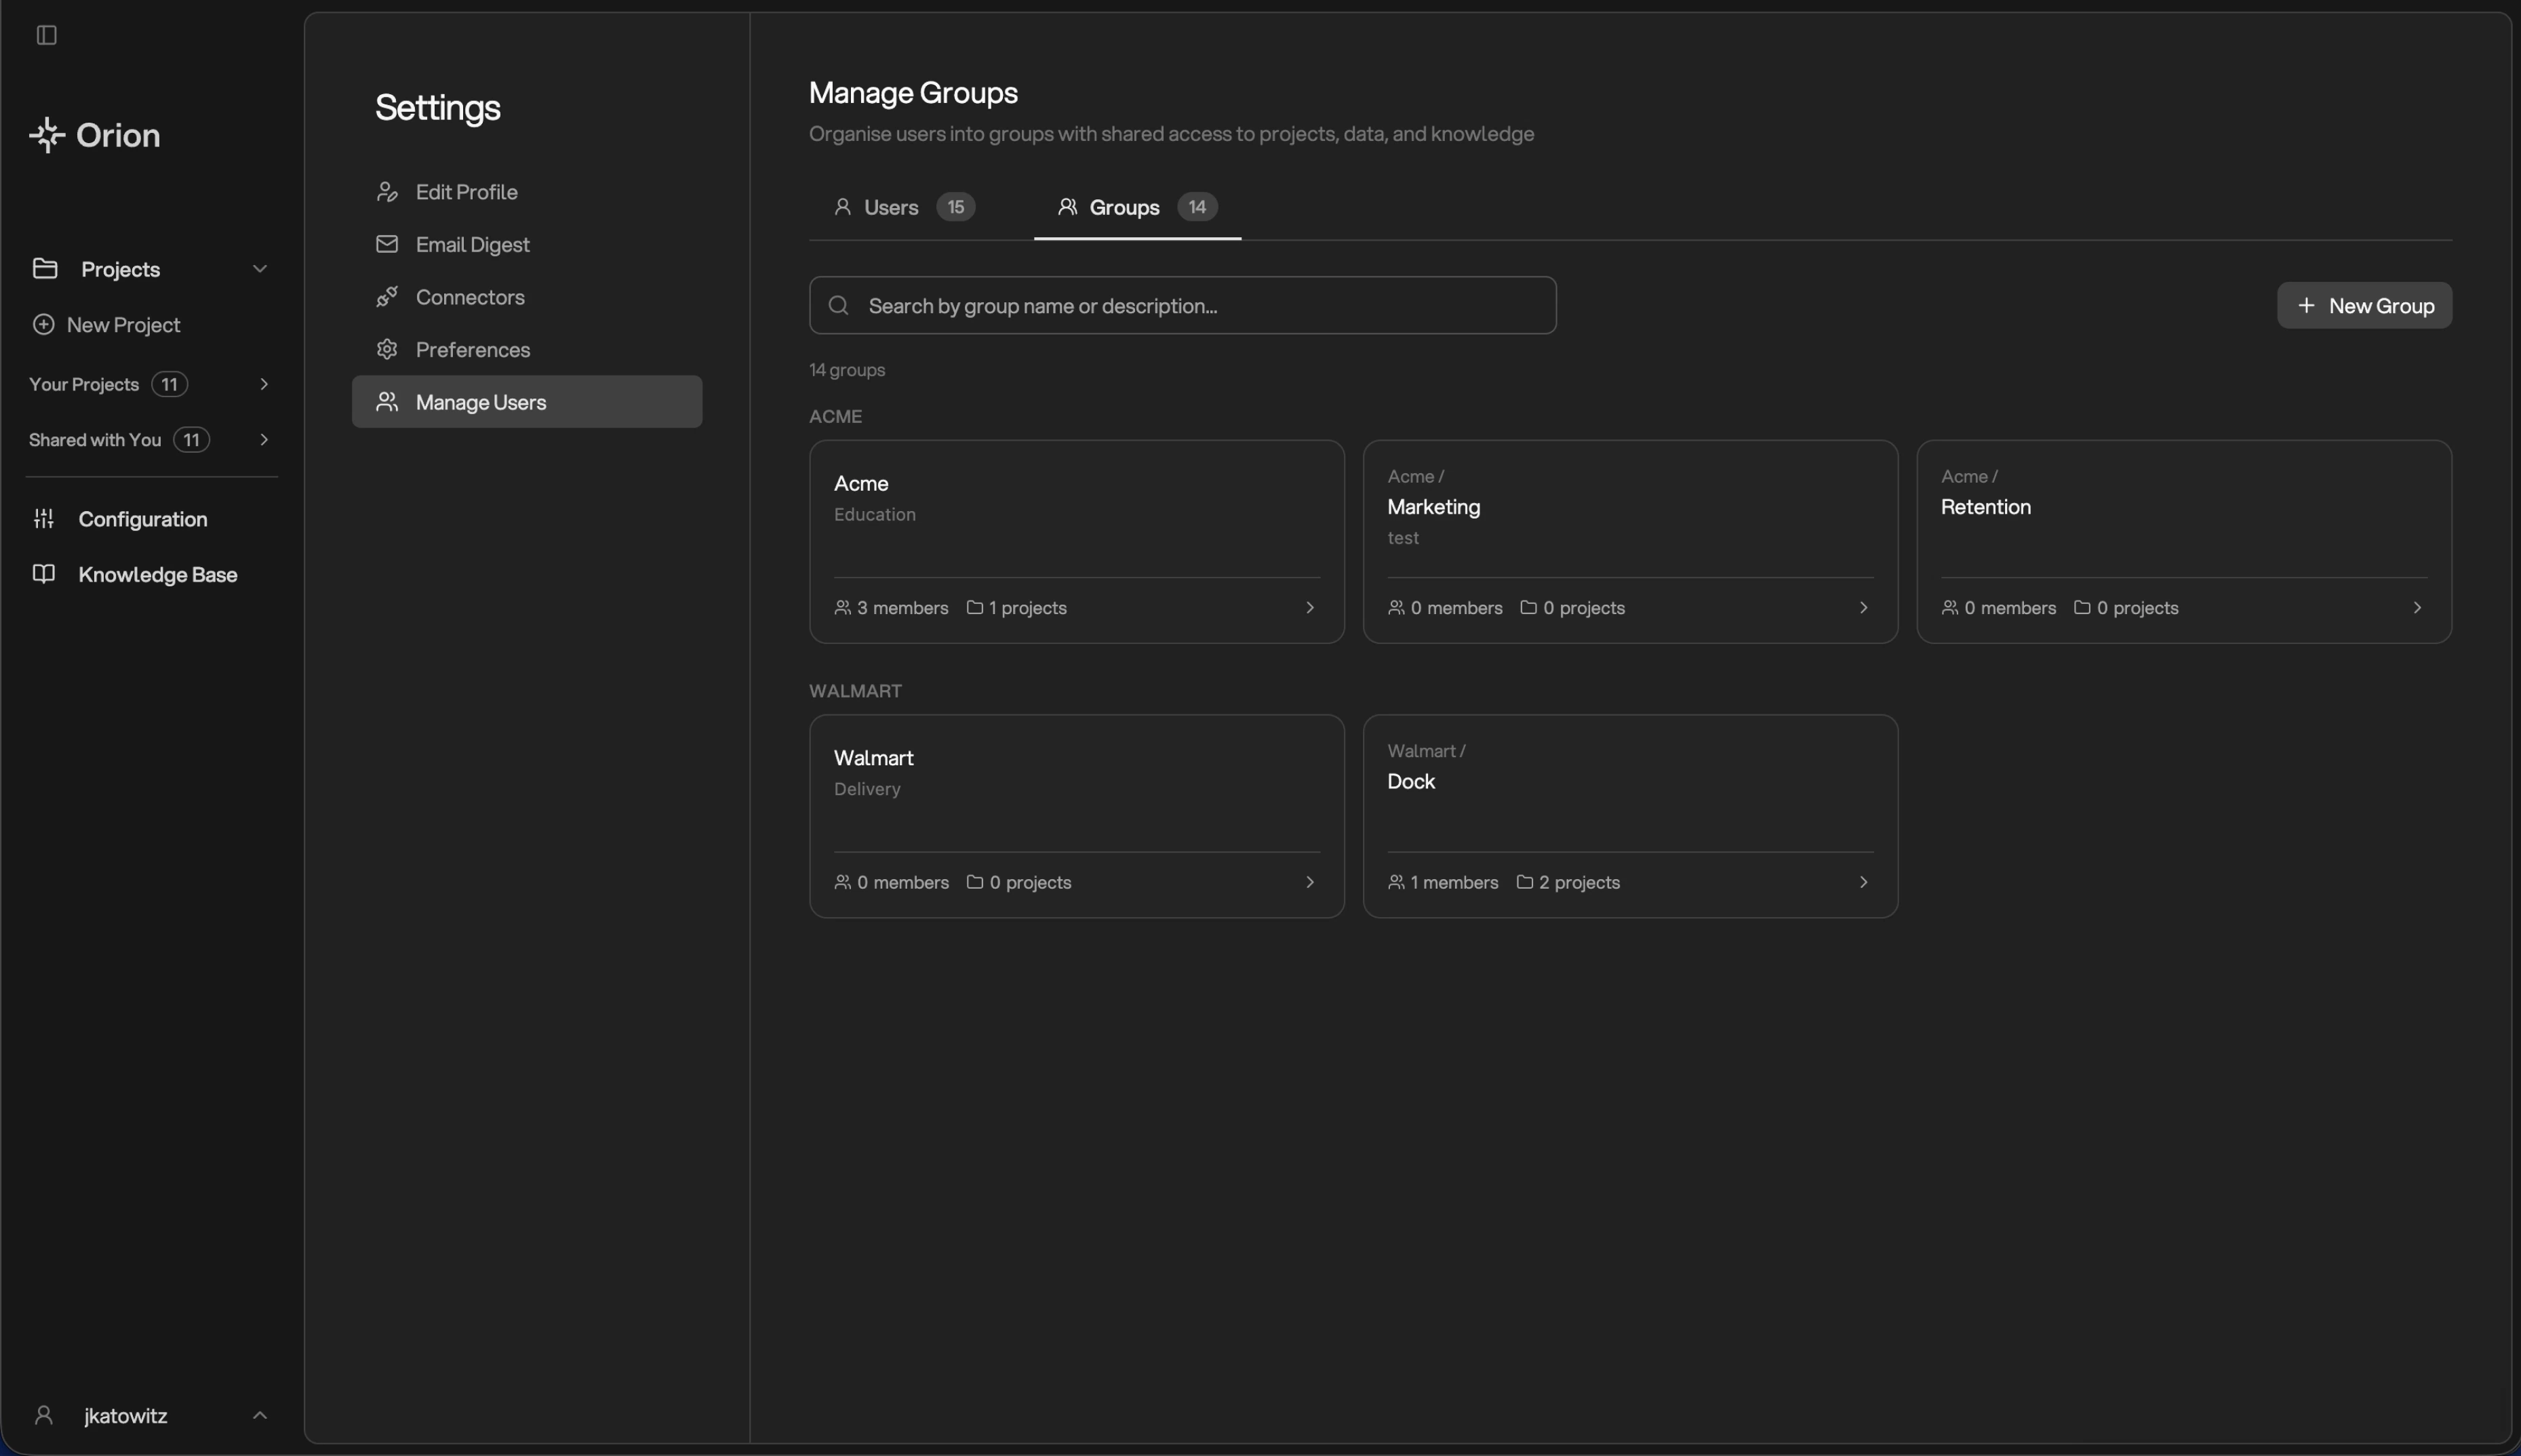 ## Creating a Group
From the Groups tab, click **+ New Group**. Give the group a clear name and an optional description.
## Creating a Group
From the Groups tab, click **+ New Group**. Give the group a clear name and an optional description.
 If a non-admin user creates a group, they automatically become its first Group Admin. Tenant Admins who create groups manage them via their tenant role and are not added as members.
### Naming Groups with Prefixes
When creating a group, the modal offers the option to select a **prefix** or choose no prefix. Prefixes are a purely organizational label — they make related groups sort and display together, but confer no shared access or functional relationship between groups. A group named `Verizon — Sales` and one named `Verizon — Marketing` are completely independent; the prefix just keeps them visually adjacent.
The first group you create under a prefix acts as the **catch-all group** for that prefix — a landing zone you can add users to before their specific sub-group is ready. For example, you might create `Verizon` first, add new users there while you're still setting up sub-groups, then move them into `Verizon — Sales` or `Verizon — Marketing` once those are configured.
Use prefixes consistently from the start. It is significantly harder to
reorganize groups after members and projects have been added. A naming
convention like `[Customer] — [Team]` or `[Department] — [Sub-team]` works
well for most organizations.
## Group Roles
Each user has a role **within each group they belong to**. A group role only controls what someone can do inside that group — it is separate from and independent of their tenant role.
Manage everything in the group: add and remove members, add projects, data
sources, Knowledge Base pages, and integrations, and delete the group.
Full working access to everything in the group. Can create new projects and
share them with others. Can also create new groups and automatically becomes
the Admin of any group they create.
Read-only access to the group's projects, data, Knowledge Base pages, and
integrations. Cannot manage group settings or data source configuration,
and can query data only where a project owner allows it.
### Roles at a Glance
The table below covers all six roles across both levels — tenant and group. Tenant roles apply across the entire Orion instance; group roles apply only within the specific group.
| Capability | Admin | Analyst | Viewer | Group Admin | Group Analyst | Group Viewer |
| -------------------------------------------- | :--------------------------------------: | :--------------------------------------: | :--------------------------------------: | :---------------------------------------: | :---------------------------------------: | :--------------------------------------: |
| **Scope** | Full tenant | Projects they belong to | Approved projects | Own group(s) only | Own group(s) only | Group projects only |
| Invite users to tenant | ✓ | — | — | ✓³ | — | — |
| Manage tenant-wide settings & data sources | ✓ | — | — | — | — | — |
| See all users, groups & projects | ✓ | — | — | — | — | — |
| Create groups | ✓ | — | — | ✓ | ✓¹ | — |
| Manage group members | ✓ | — | — | ✓ | — | — |
| Manage group data sources, KB & integrations | ✓ | — | — | ✓ | — | — |
| Delete a group | ✓ | — | — | ✓ | — | — |
| Create & share projects | ✓ | ✓ | — | ✓ | ✓ | — |
| Run analyses & chat | ✓ | ✓ | — | ✓ | ✓ | — |
| View accessible projects | ✓ | ✓ | ✓ | ✓ | ✓ | ✓ |
| Query data sources | ✓ | ✓ | Per-project² | ✓ | ✓ | Per-project² |
1. A Group Analyst automatically becomes Group Admin of any group they create.
2. Project owners can extend Viewer access to allow data queries on a per-project basis in Project Settings.
3. Group Admins can invite new users to the tenant through the group's **Invite by email** flow, but not through Settings directly.
**Tenant roles and group roles are independent.** A tenant Viewer can be a
Group Admin. A tenant Analyst can be a Group Viewer in one group and a Group
Admin in another. Orion always evaluates the role that applies to the specific
resource someone is trying to access — so what a user can do in chat, sharing,
and editing may differ from one project to the next.
### Users with roles across multiple groups
Tenant Admins always have full visibility across every group. For everyone else — tenant Analysts and Viewers — group roles can vary between groups. A user can simultaneously be:
* A **Group Admin** in a group they created or were promoted in
* A **Group Analyst** in a colleague's group they were invited to contribute to
* A **Group Viewer** in a third group where they only need read access
This means two users with the same tenant role may have very different effective access depending on which groups they belong to and what roles they hold there. When troubleshooting unexpected access, check both the user's tenant role and their role within each relevant group.
## Onboarding new users
Whether you're adding an internal teammate or one of your customers, the safest default is the same: invite them as a tenant **Viewer**, then layer their real access on top through groups.
A tenant Viewer is a blank canvas — they cannot see any projects, data sources, or Knowledge Base pages by default. From there, add them to the right group(s) with a group role that matches what they need to do:
* **Group Viewer** — read-only access to the group's projects, data, Knowledge Base, and integrations
* **Group Analyst** — full working access; can create and share projects within the group
* **Group Admin** — full administrative control of the group, including adding members
This keeps tenant-wide settings and any unrelated projects off-limits while giving the user everything they need inside their group. The pattern works equally well for an internal employee joining a single team and for a customer who should only see their own group's projects.
The [**Invite by email**](#inviting-new-users-directly-into-a-group) flow from inside a group is the fastest way to apply this pattern:
From the group's detail page, click **Add member**, then **Invite by email** at the bottom of the picker.
Choose **Viewer**. This is the user's baseline across the entire tenant and keeps everything outside their group off-limits.
Choose **Group Admin**, **Group Analyst**, or **Group Viewer** based on what they need to do inside this group.
The invitee receives an email and, on first login, lands in Orion with both roles applied automatically.
Reserve tenant **Admin** and **Analyst** roles for people who genuinely need
tenant-wide reach. For everyone else — internal or external — "tenant Viewer +
Group \[role]" is the safest default.
## Managing a Group
Click any group from the Groups tab to open its detail view. From here you can manage everything the group has access to using the tabs along the top.
If a non-admin user creates a group, they automatically become its first Group Admin. Tenant Admins who create groups manage them via their tenant role and are not added as members.
### Naming Groups with Prefixes
When creating a group, the modal offers the option to select a **prefix** or choose no prefix. Prefixes are a purely organizational label — they make related groups sort and display together, but confer no shared access or functional relationship between groups. A group named `Verizon — Sales` and one named `Verizon — Marketing` are completely independent; the prefix just keeps them visually adjacent.
The first group you create under a prefix acts as the **catch-all group** for that prefix — a landing zone you can add users to before their specific sub-group is ready. For example, you might create `Verizon` first, add new users there while you're still setting up sub-groups, then move them into `Verizon — Sales` or `Verizon — Marketing` once those are configured.
Use prefixes consistently from the start. It is significantly harder to
reorganize groups after members and projects have been added. A naming
convention like `[Customer] — [Team]` or `[Department] — [Sub-team]` works
well for most organizations.
## Group Roles
Each user has a role **within each group they belong to**. A group role only controls what someone can do inside that group — it is separate from and independent of their tenant role.
Manage everything in the group: add and remove members, add projects, data
sources, Knowledge Base pages, and integrations, and delete the group.
Full working access to everything in the group. Can create new projects and
share them with others. Can also create new groups and automatically becomes
the Admin of any group they create.
Read-only access to the group's projects, data, Knowledge Base pages, and
integrations. Cannot manage group settings or data source configuration,
and can query data only where a project owner allows it.
### Roles at a Glance
The table below covers all six roles across both levels — tenant and group. Tenant roles apply across the entire Orion instance; group roles apply only within the specific group.
| Capability | Admin | Analyst | Viewer | Group Admin | Group Analyst | Group Viewer |
| -------------------------------------------- | :--------------------------------------: | :--------------------------------------: | :--------------------------------------: | :---------------------------------------: | :---------------------------------------: | :--------------------------------------: |
| **Scope** | Full tenant | Projects they belong to | Approved projects | Own group(s) only | Own group(s) only | Group projects only |
| Invite users to tenant | ✓ | — | — | ✓³ | — | — |
| Manage tenant-wide settings & data sources | ✓ | — | — | — | — | — |
| See all users, groups & projects | ✓ | — | — | — | — | — |
| Create groups | ✓ | — | — | ✓ | ✓¹ | — |
| Manage group members | ✓ | — | — | ✓ | — | — |
| Manage group data sources, KB & integrations | ✓ | — | — | ✓ | — | — |
| Delete a group | ✓ | — | — | ✓ | — | — |
| Create & share projects | ✓ | ✓ | — | ✓ | ✓ | — |
| Run analyses & chat | ✓ | ✓ | — | ✓ | ✓ | — |
| View accessible projects | ✓ | ✓ | ✓ | ✓ | ✓ | ✓ |
| Query data sources | ✓ | ✓ | Per-project² | ✓ | ✓ | Per-project² |
1. A Group Analyst automatically becomes Group Admin of any group they create.
2. Project owners can extend Viewer access to allow data queries on a per-project basis in Project Settings.
3. Group Admins can invite new users to the tenant through the group's **Invite by email** flow, but not through Settings directly.
**Tenant roles and group roles are independent.** A tenant Viewer can be a
Group Admin. A tenant Analyst can be a Group Viewer in one group and a Group
Admin in another. Orion always evaluates the role that applies to the specific
resource someone is trying to access — so what a user can do in chat, sharing,
and editing may differ from one project to the next.
### Users with roles across multiple groups
Tenant Admins always have full visibility across every group. For everyone else — tenant Analysts and Viewers — group roles can vary between groups. A user can simultaneously be:
* A **Group Admin** in a group they created or were promoted in
* A **Group Analyst** in a colleague's group they were invited to contribute to
* A **Group Viewer** in a third group where they only need read access
This means two users with the same tenant role may have very different effective access depending on which groups they belong to and what roles they hold there. When troubleshooting unexpected access, check both the user's tenant role and their role within each relevant group.
## Onboarding new users
Whether you're adding an internal teammate or one of your customers, the safest default is the same: invite them as a tenant **Viewer**, then layer their real access on top through groups.
A tenant Viewer is a blank canvas — they cannot see any projects, data sources, or Knowledge Base pages by default. From there, add them to the right group(s) with a group role that matches what they need to do:
* **Group Viewer** — read-only access to the group's projects, data, Knowledge Base, and integrations
* **Group Analyst** — full working access; can create and share projects within the group
* **Group Admin** — full administrative control of the group, including adding members
This keeps tenant-wide settings and any unrelated projects off-limits while giving the user everything they need inside their group. The pattern works equally well for an internal employee joining a single team and for a customer who should only see their own group's projects.
The [**Invite by email**](#inviting-new-users-directly-into-a-group) flow from inside a group is the fastest way to apply this pattern:
From the group's detail page, click **Add member**, then **Invite by email** at the bottom of the picker.
Choose **Viewer**. This is the user's baseline across the entire tenant and keeps everything outside their group off-limits.
Choose **Group Admin**, **Group Analyst**, or **Group Viewer** based on what they need to do inside this group.
The invitee receives an email and, on first login, lands in Orion with both roles applied automatically.
Reserve tenant **Admin** and **Analyst** roles for people who genuinely need
tenant-wide reach. For everyone else — internal or external — "tenant Viewer +
Group \[role]" is the safest default.
## Managing a Group
Click any group from the Groups tab to open its detail view. From here you can manage everything the group has access to using the tabs along the top.
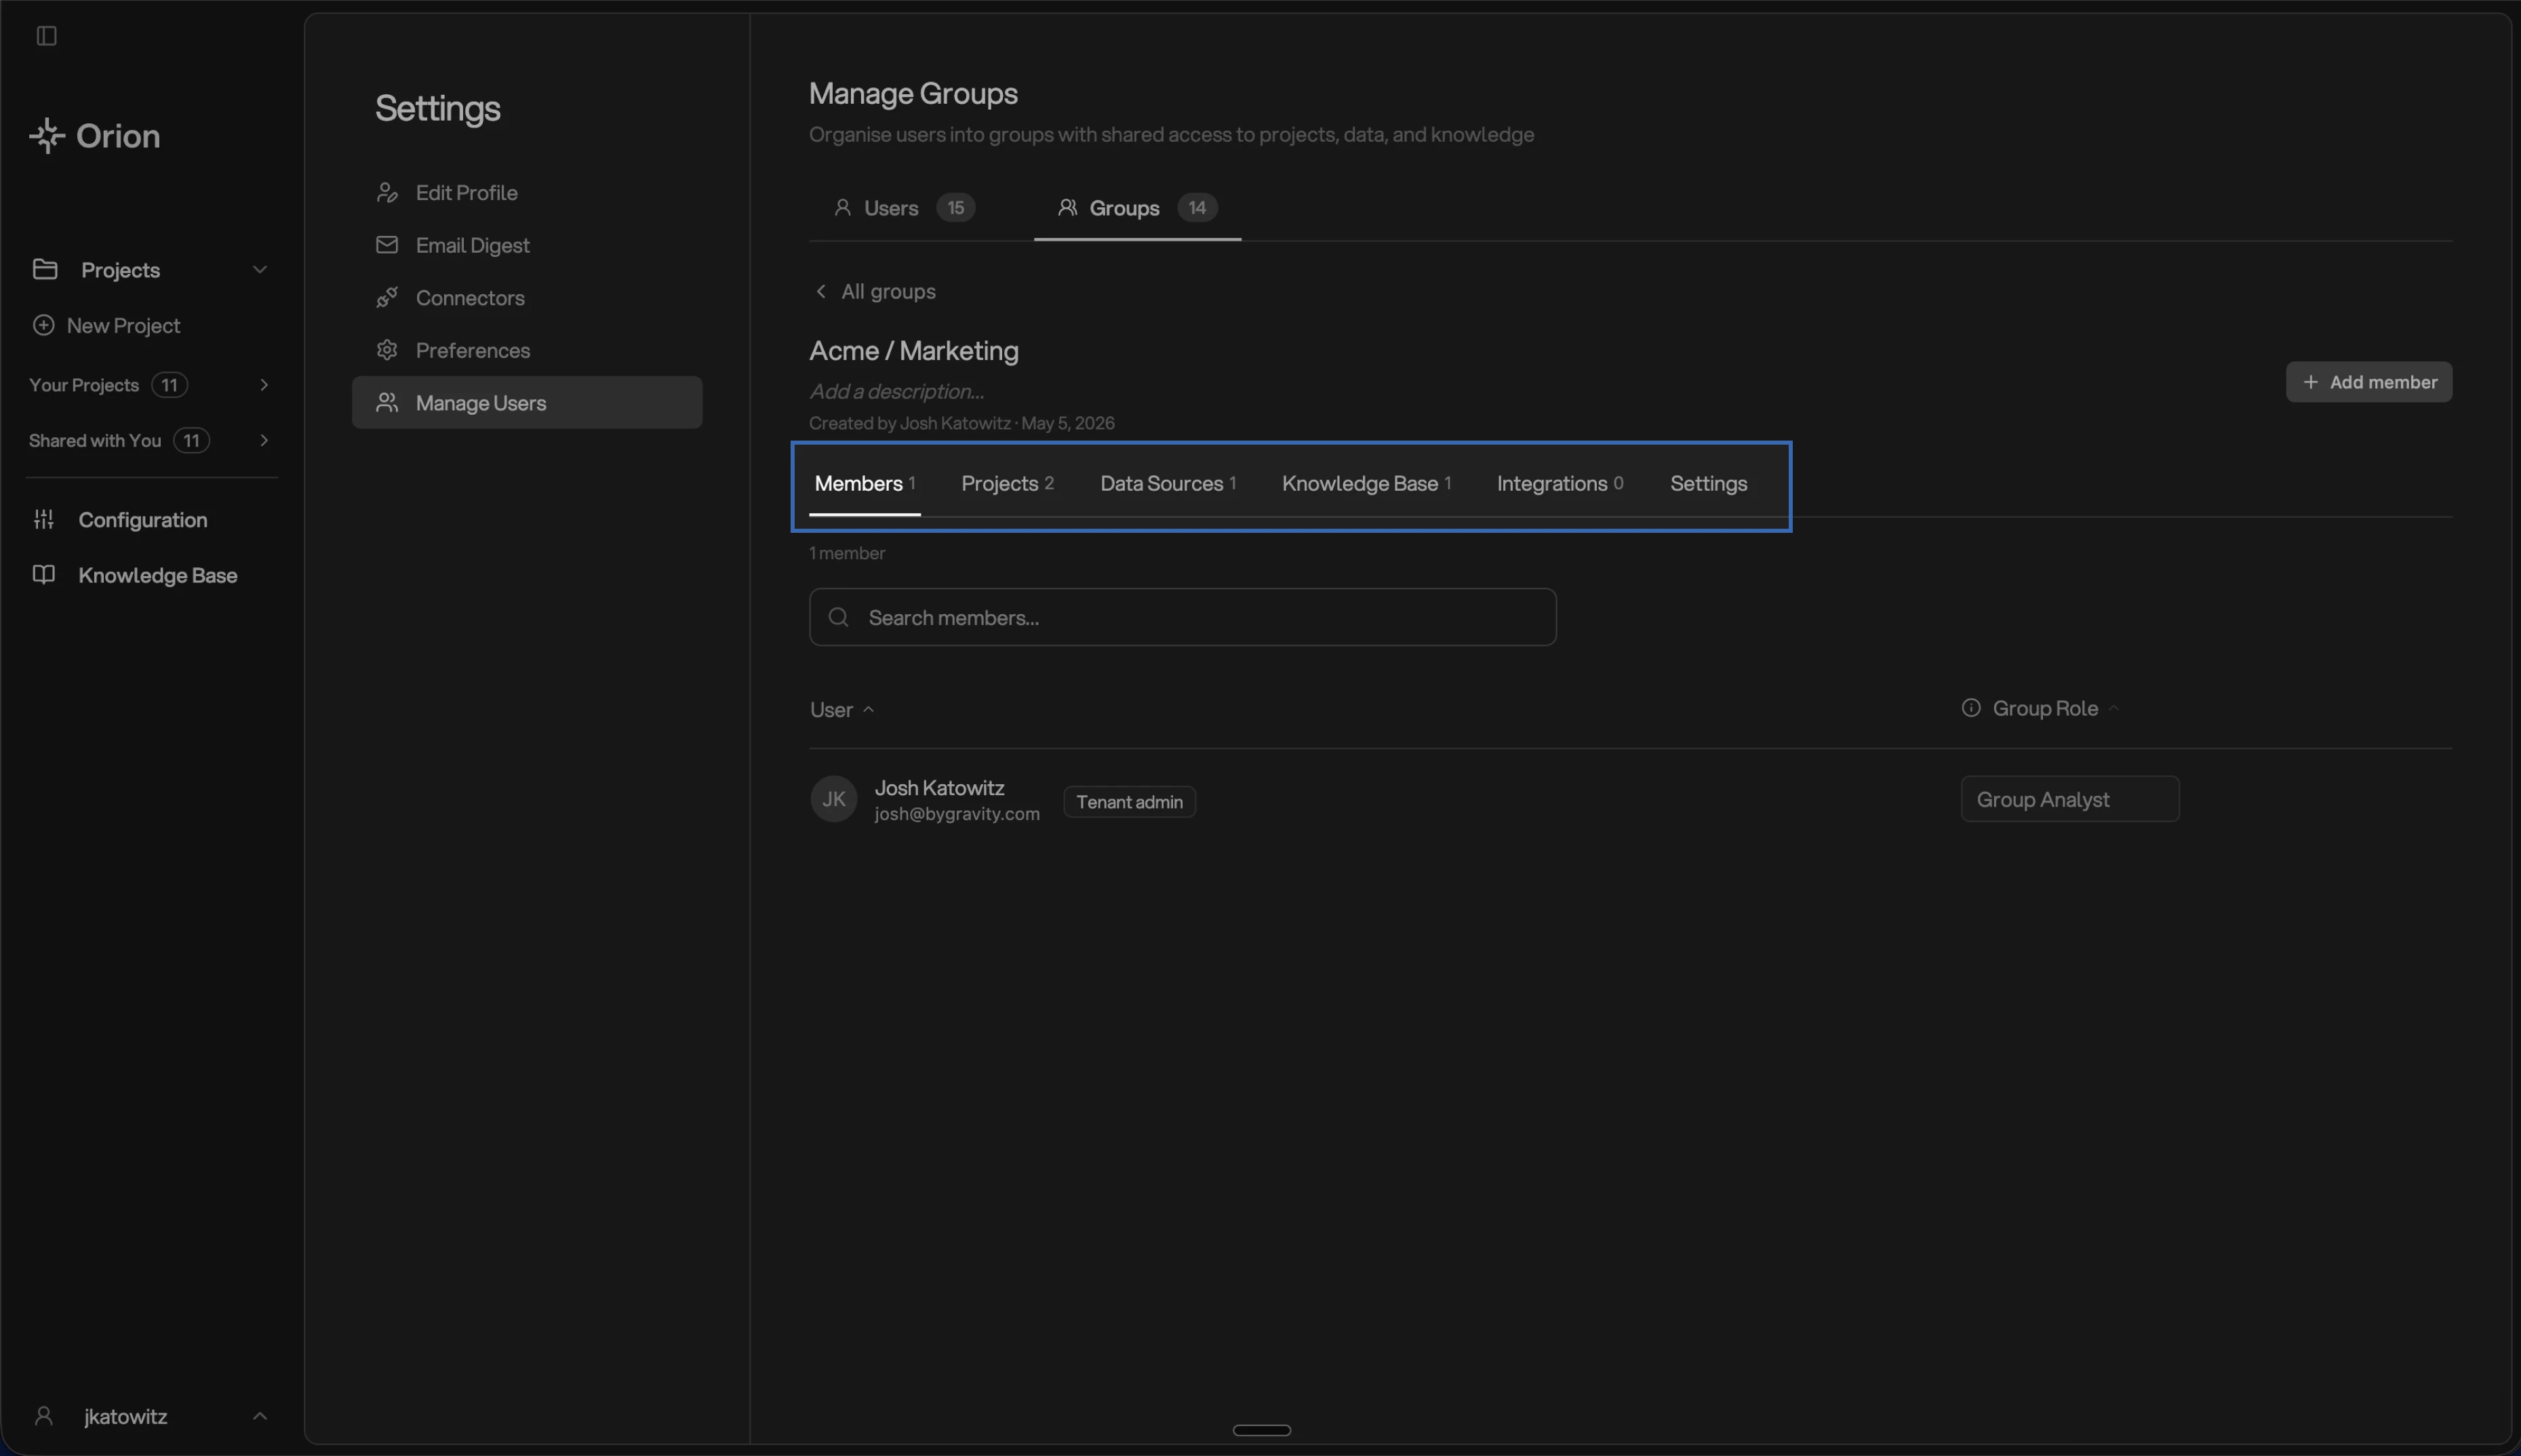 The header shows who created the group and when. Click the group name or description to edit them inline.
### Members
The Members tab lists everyone in the group along with their group role.
#### Adding existing users to a group
Click **Add member** to open the member picker. The list shows users from your tenant who aren't already in the group. Pick the role they should have within the group, then add them.
The header shows who created the group and when. Click the group name or description to edit them inline.
### Members
The Members tab lists everyone in the group along with their group role.
#### Adding existing users to a group
Click **Add member** to open the member picker. The list shows users from your tenant who aren't already in the group. Pick the role they should have within the group, then add them.
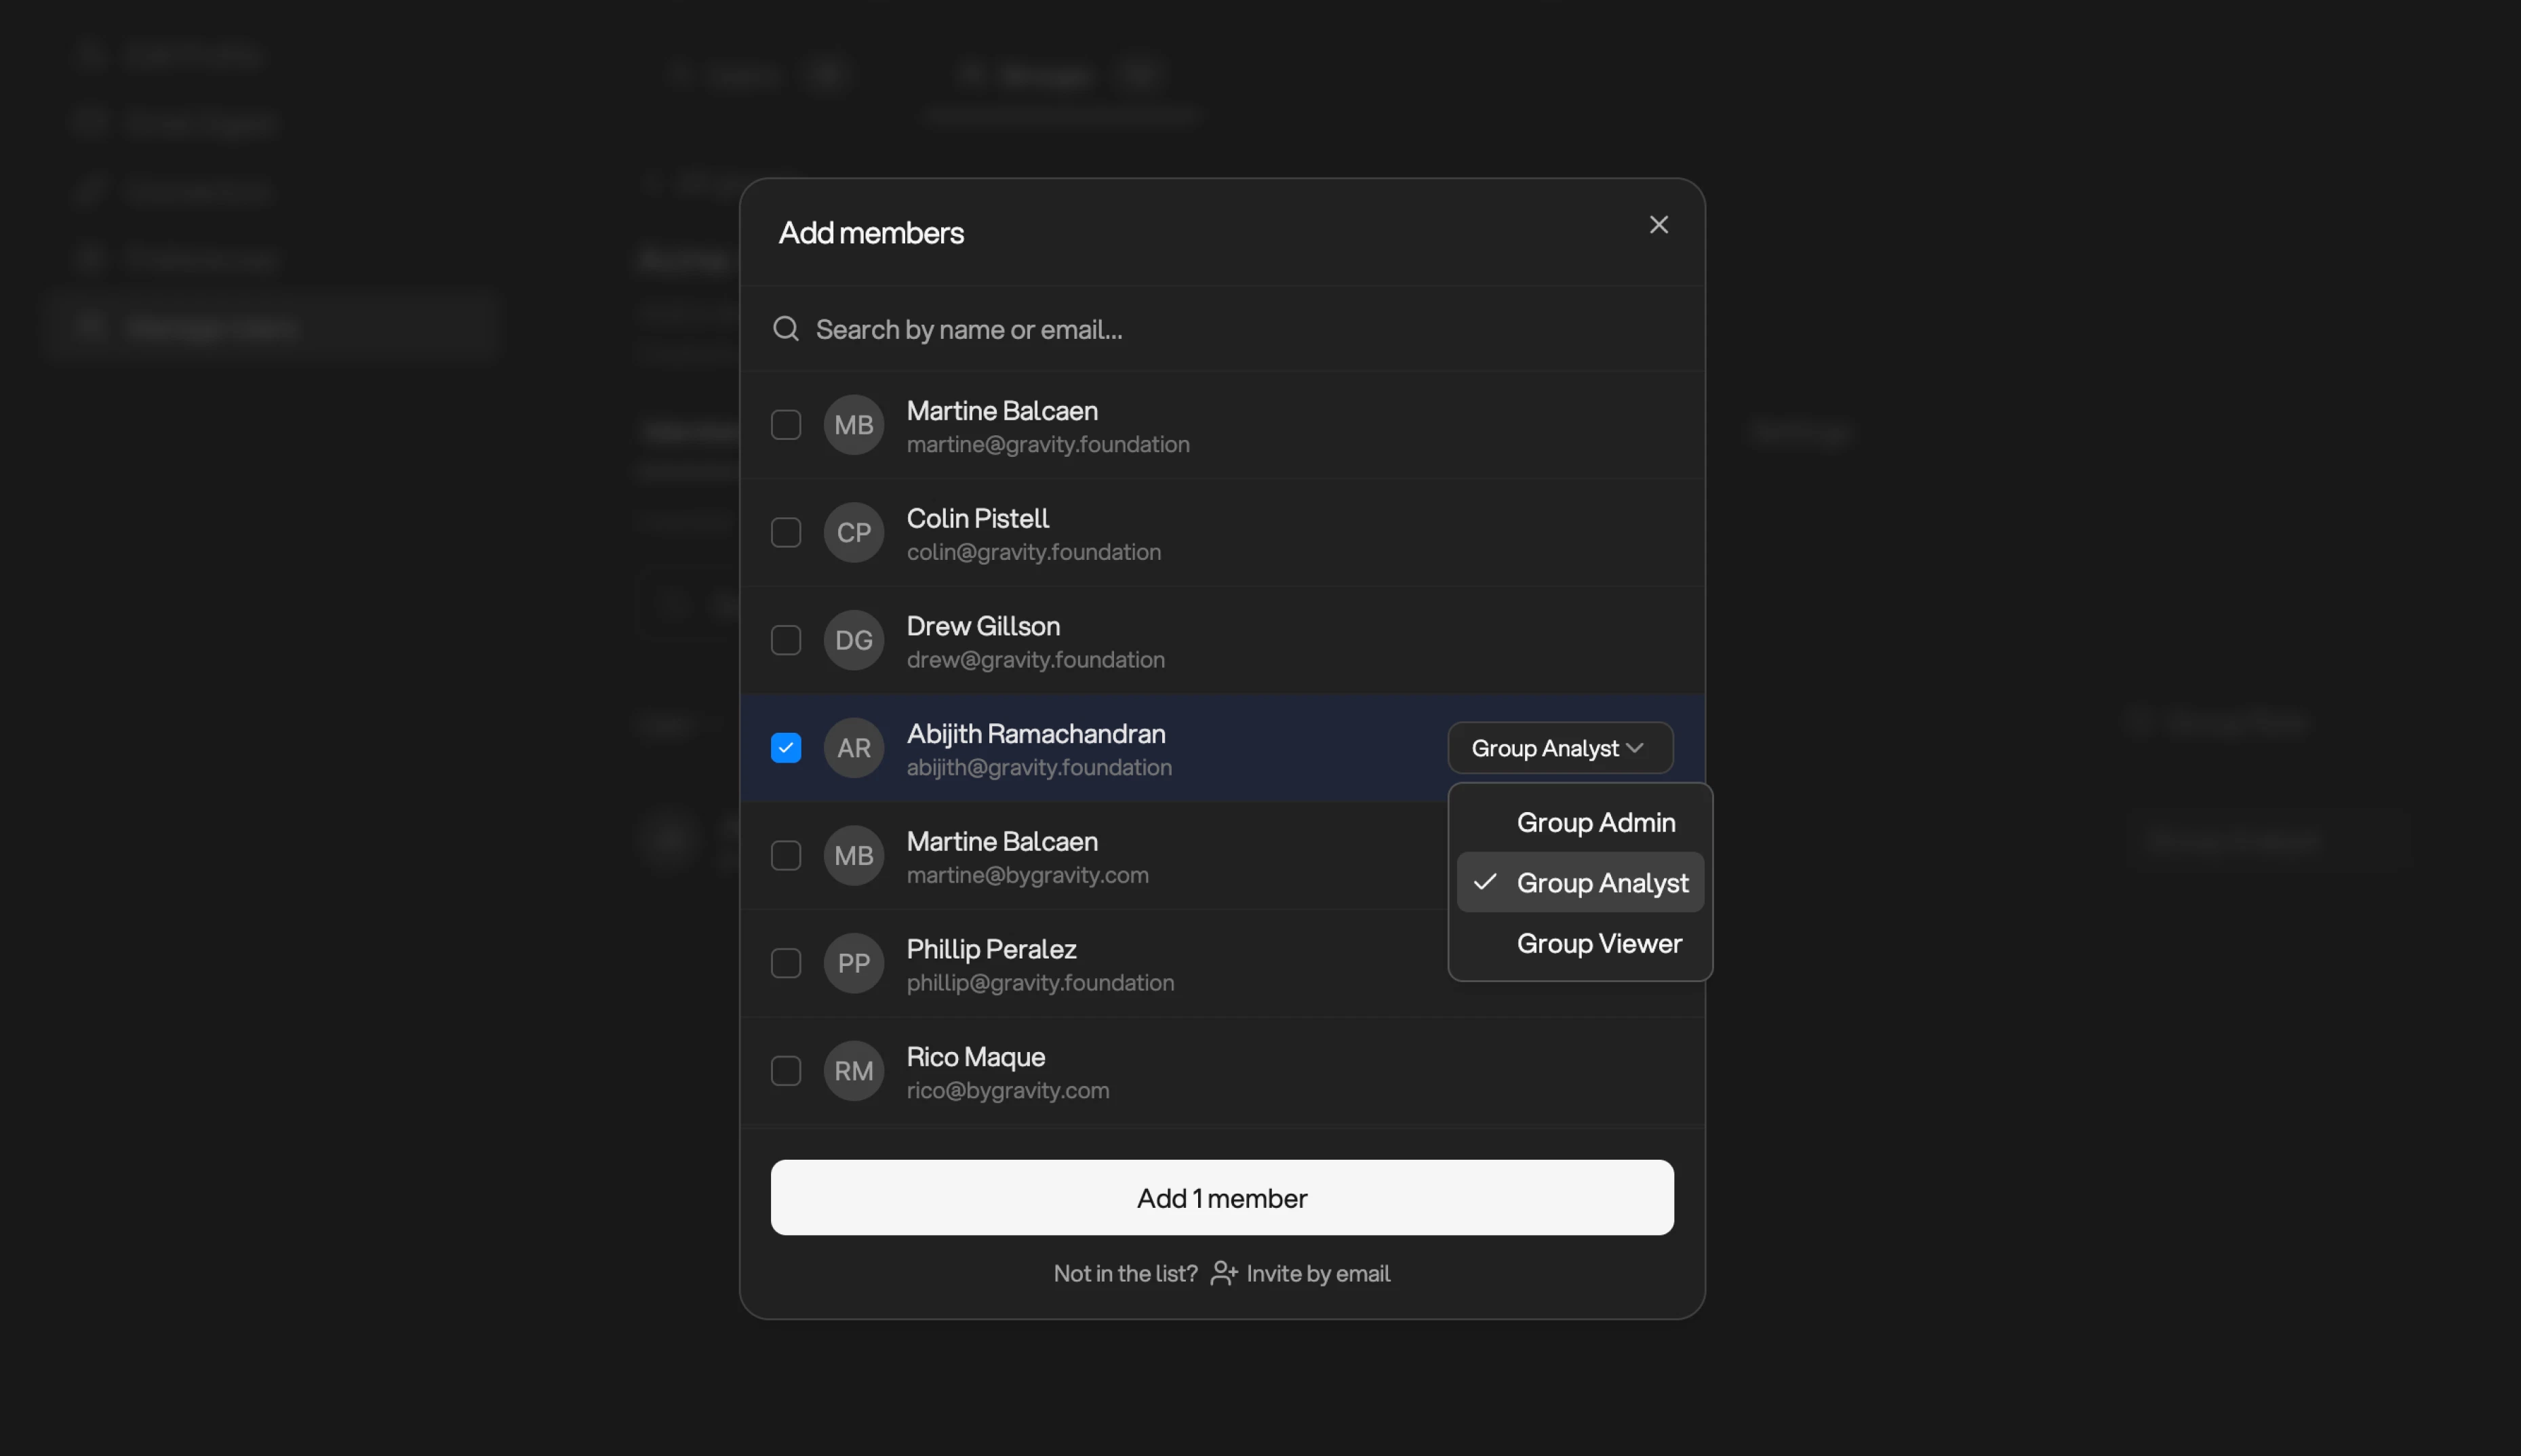 #### Inviting new users directly into a group
If the person you want to add isn't in your tenant yet, click **Invite by email** at the bottom of the picker. You'll select their tenant role first (Admin, Analyst, or Viewer), then their group role. The invitee will receive an invitation email and, on first login, lands in Orion with both roles applied.
Inviting users directly into a group is the fastest way to onboard a new team
or customer cohort. They land in Orion already configured with the right
access — no second step required.
### Projects
The Projects tab lists the group's projects. Everyone in the group can access them with permissions matching their group role.
#### Inviting new users directly into a group
If the person you want to add isn't in your tenant yet, click **Invite by email** at the bottom of the picker. You'll select their tenant role first (Admin, Analyst, or Viewer), then their group role. The invitee will receive an invitation email and, on first login, lands in Orion with both roles applied.
Inviting users directly into a group is the fastest way to onboard a new team
or customer cohort. They land in Orion already configured with the right
access — no second step required.
### Projects
The Projects tab lists the group's projects. Everyone in the group can access them with permissions matching their group role.
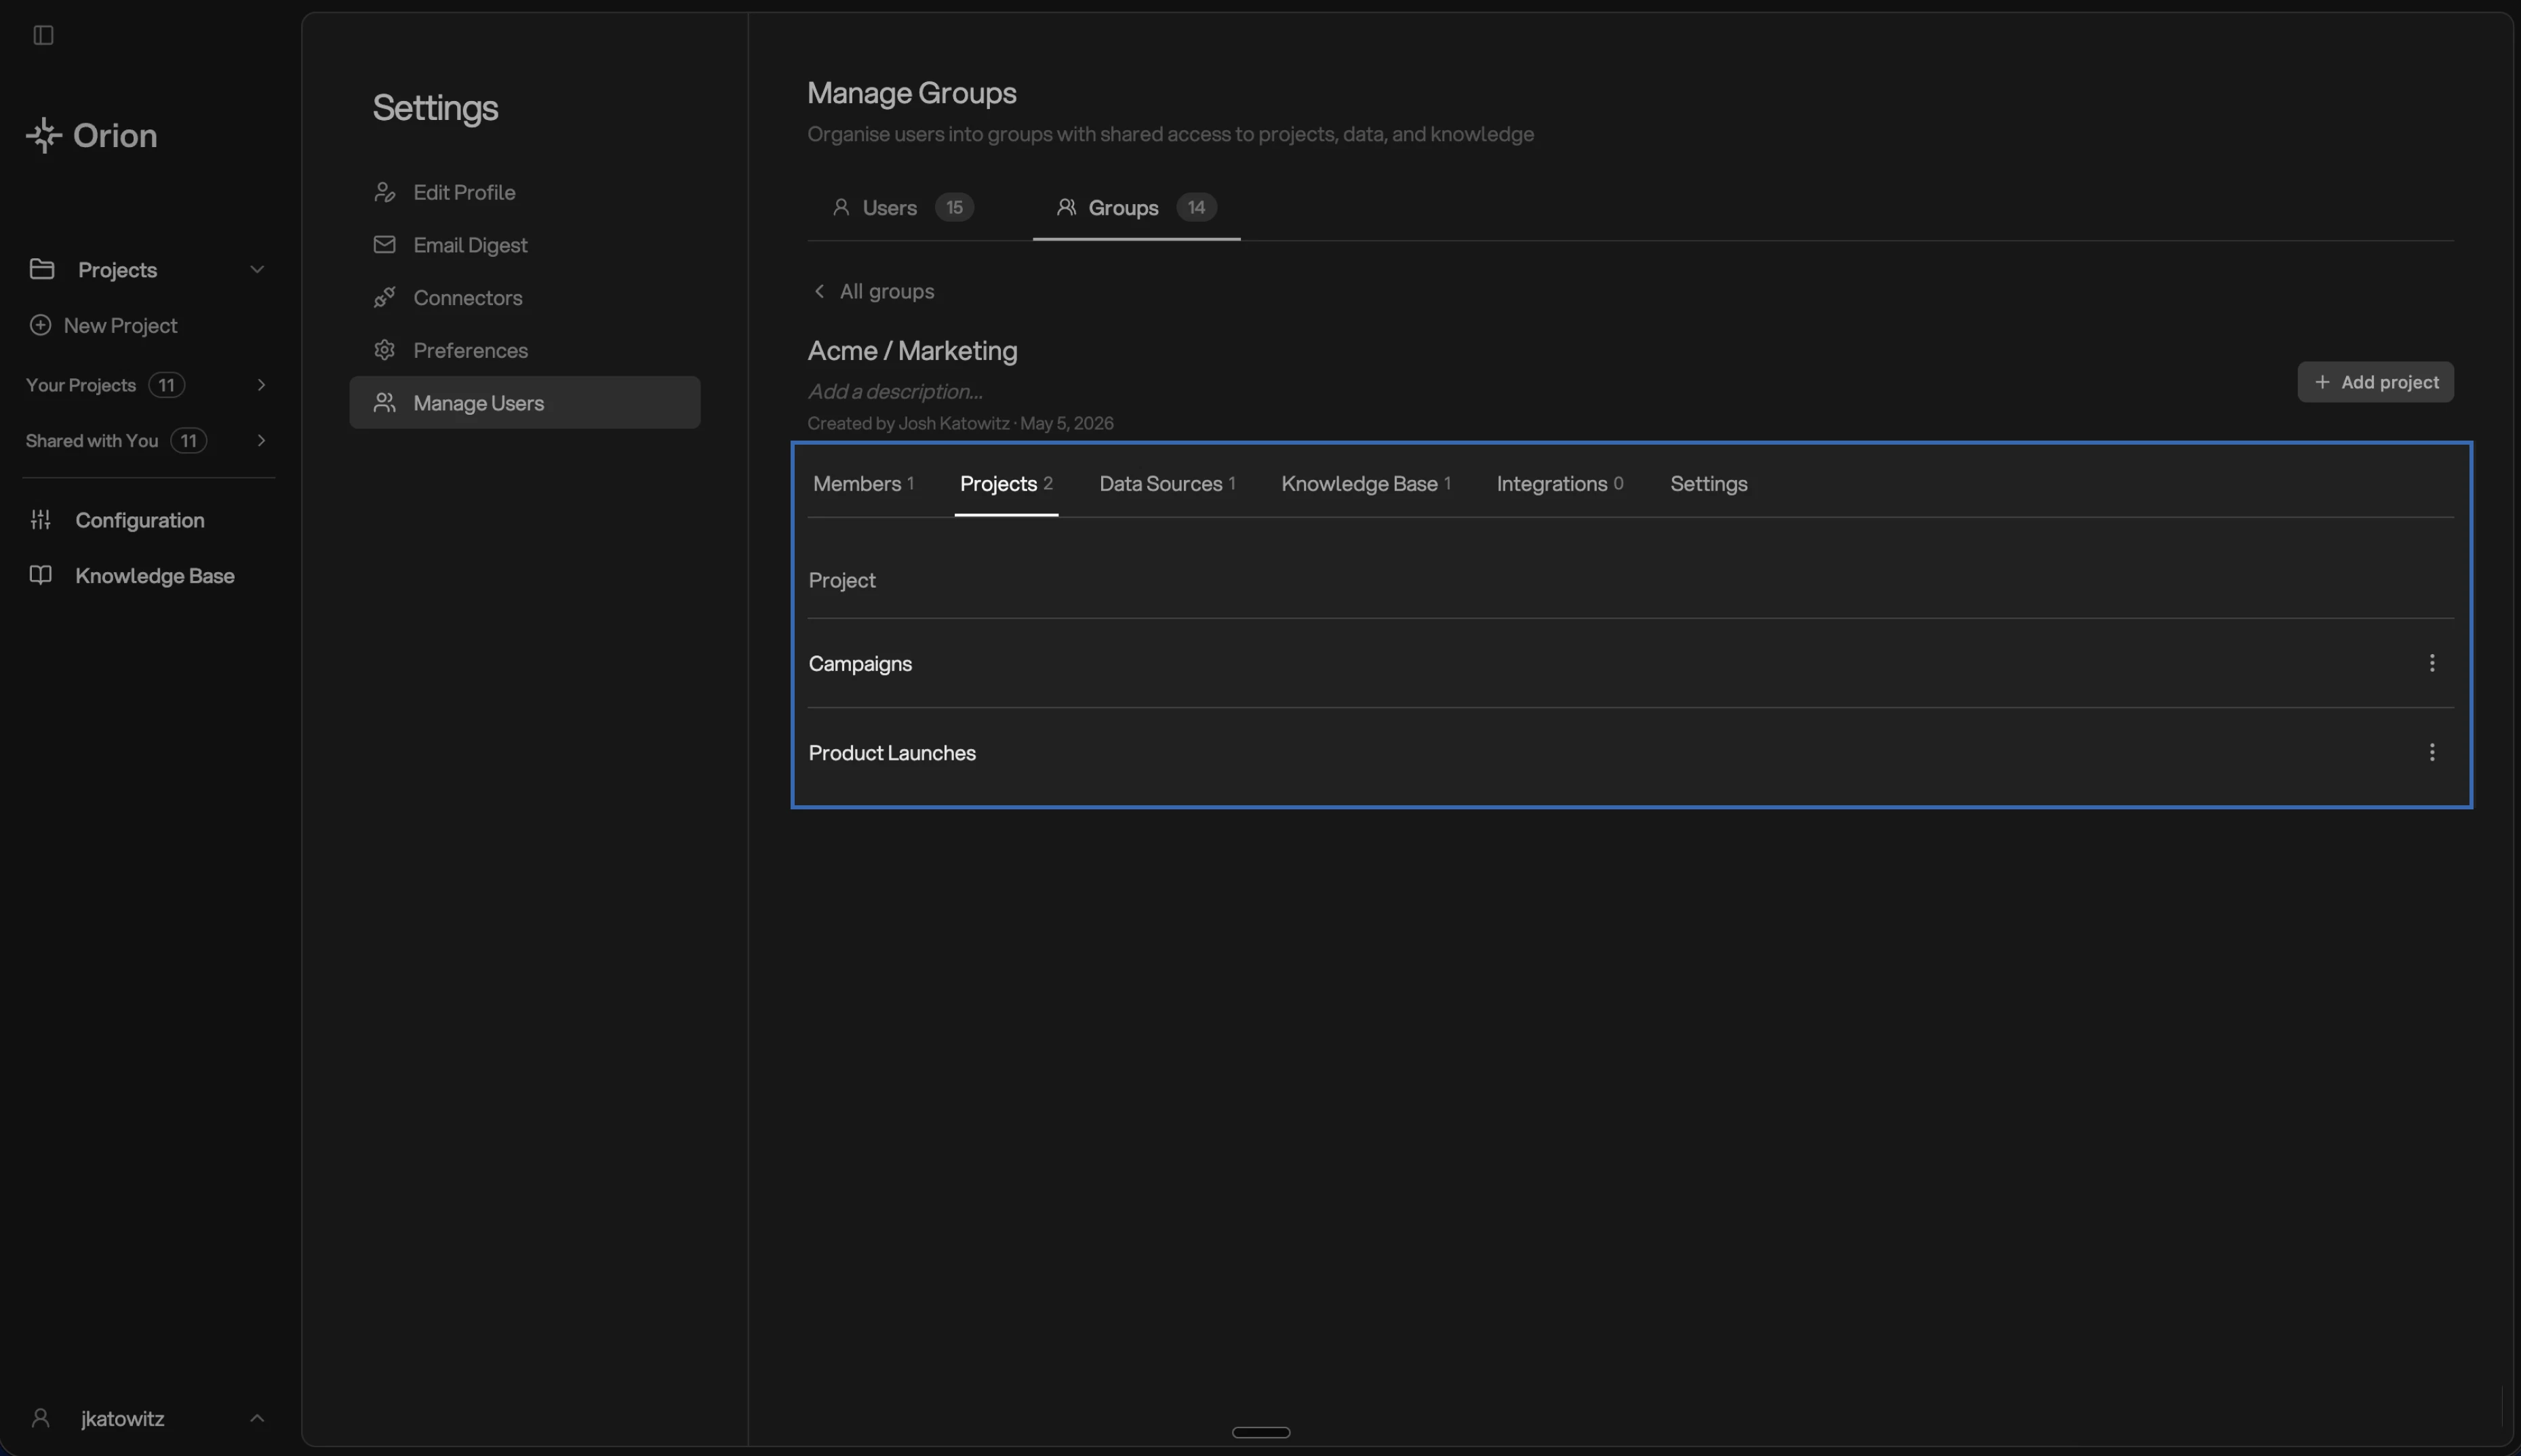 Click **Add project** to add more projects to the group. The picker shows projects you have access to.
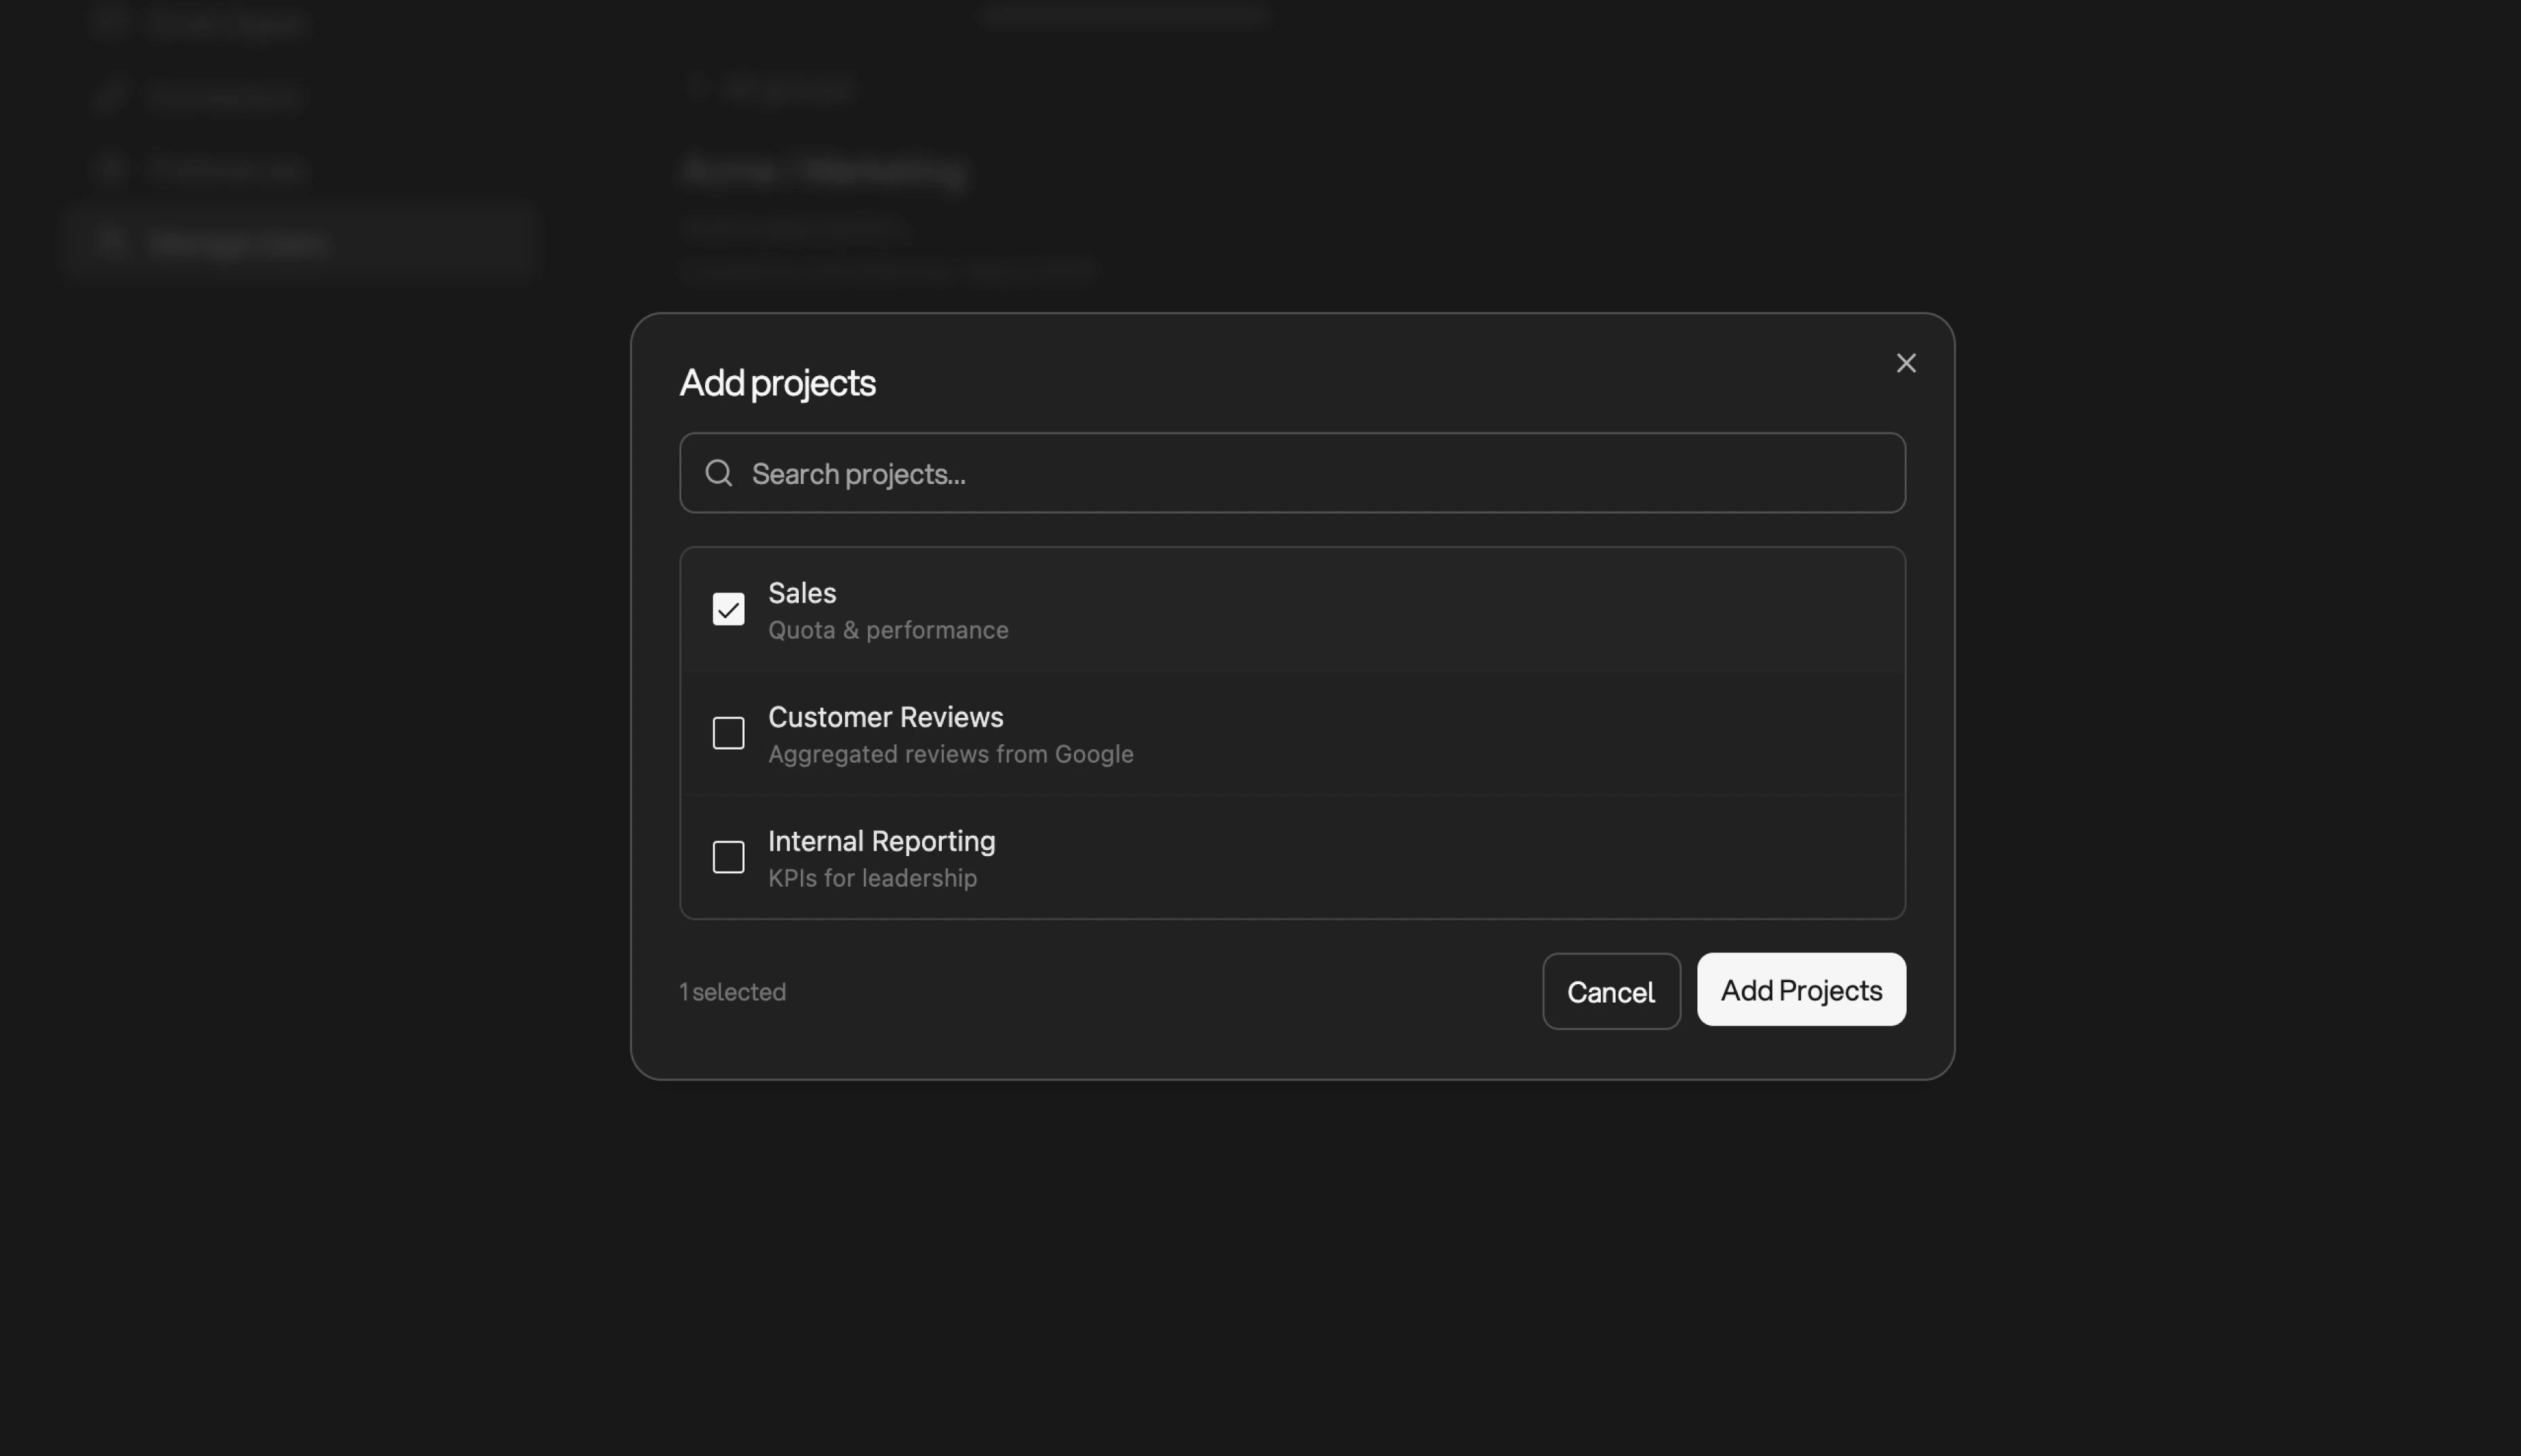 A single project can belong to more than one group — useful for shared work that spans multiple teams.
Creating a new project does not automatically add it to a group. A project
belongs only to the user who created it until a Group Admin or Group Analyst
explicitly adds it to the group from this tab.
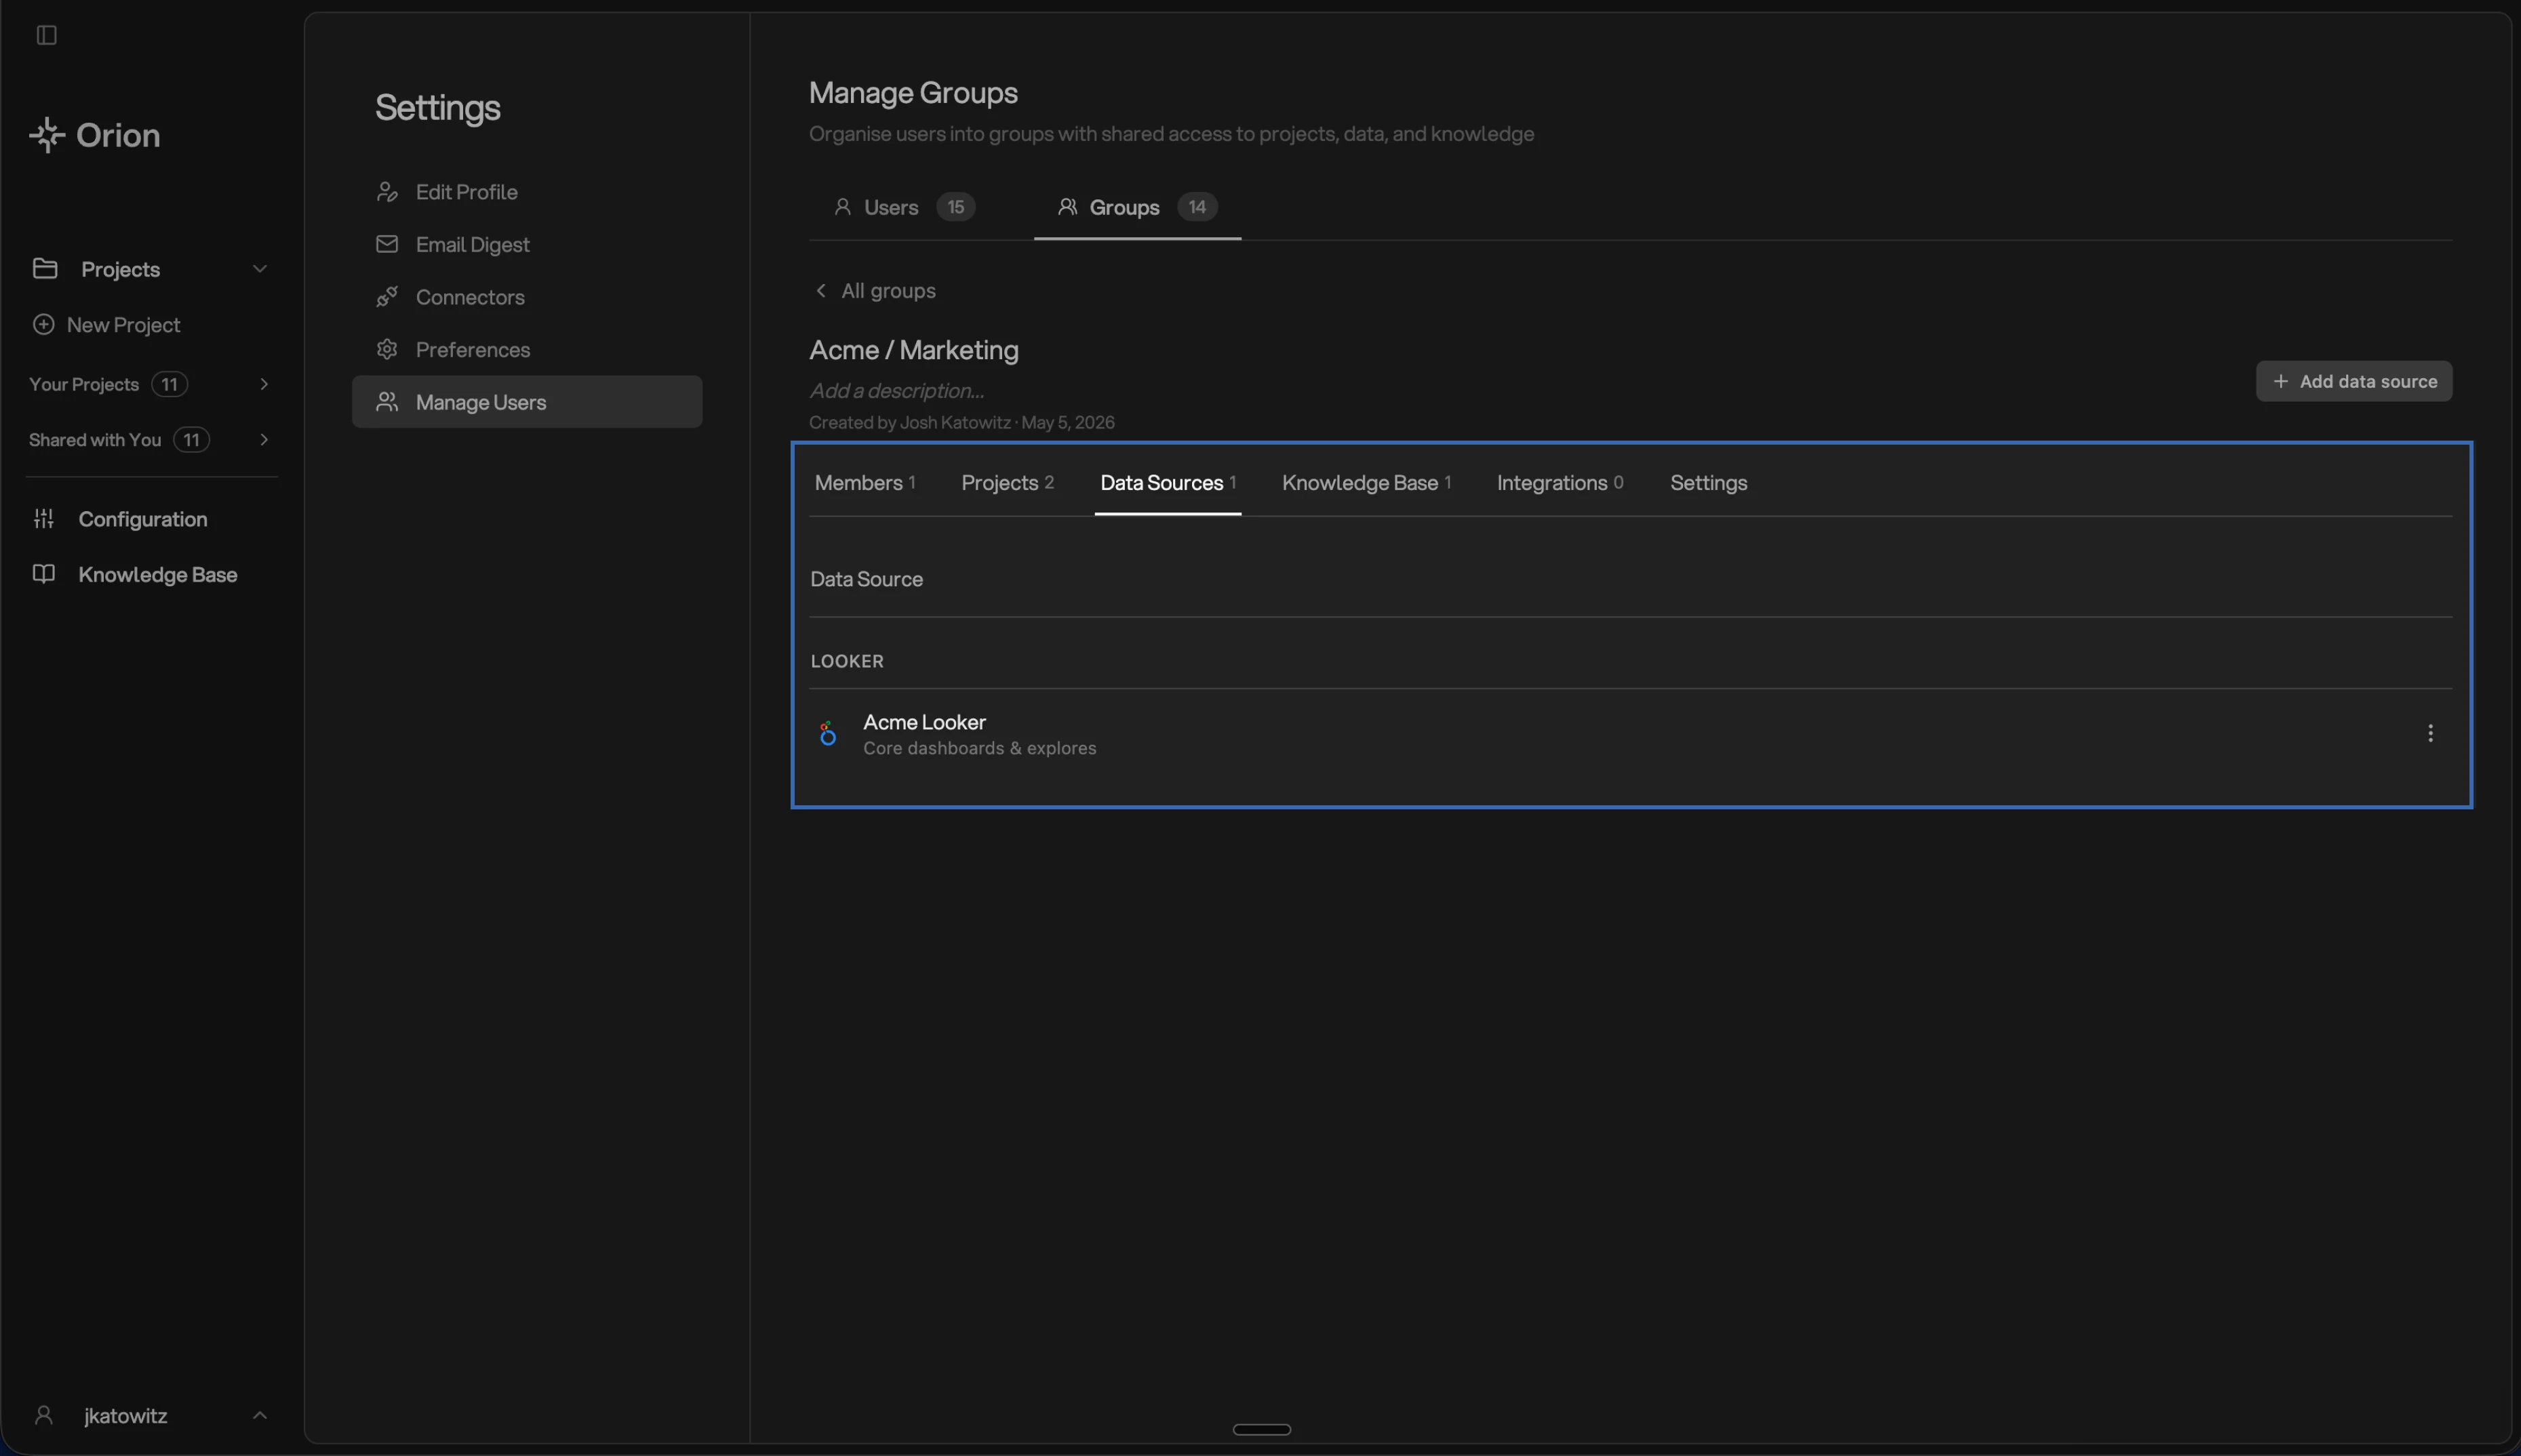
### Data Sources
When a project is added to a group, the [data sources](/configuration/data-sources) attached to that project automatically become available to everyone in the group — you don't need to enable them separately. The Data Sources tab is **additive**: use it to expose data sources to the group *beyond* what its projects already provide.
A single project can belong to more than one group — useful for shared work that spans multiple teams.
Creating a new project does not automatically add it to a group. A project
belongs only to the user who created it until a Group Admin or Group Analyst
explicitly adds it to the group from this tab.
### Data Sources
When a project is added to a group, the [data sources](/configuration/data-sources) attached to that project automatically become available to everyone in the group — you don't need to enable them separately. The Data Sources tab is **additive**: use it to expose data sources to the group *beyond* what its projects already provide.
 ### Knowledge Base
The Knowledge Base tab controls which [Knowledge Base](/core-concepts/knowledge-base) pages and folders the group can use. You can select individual pages or whole folders.
### Knowledge Base
The Knowledge Base tab controls which [Knowledge Base](/core-concepts/knowledge-base) pages and folders the group can use. You can select individual pages or whole folders.
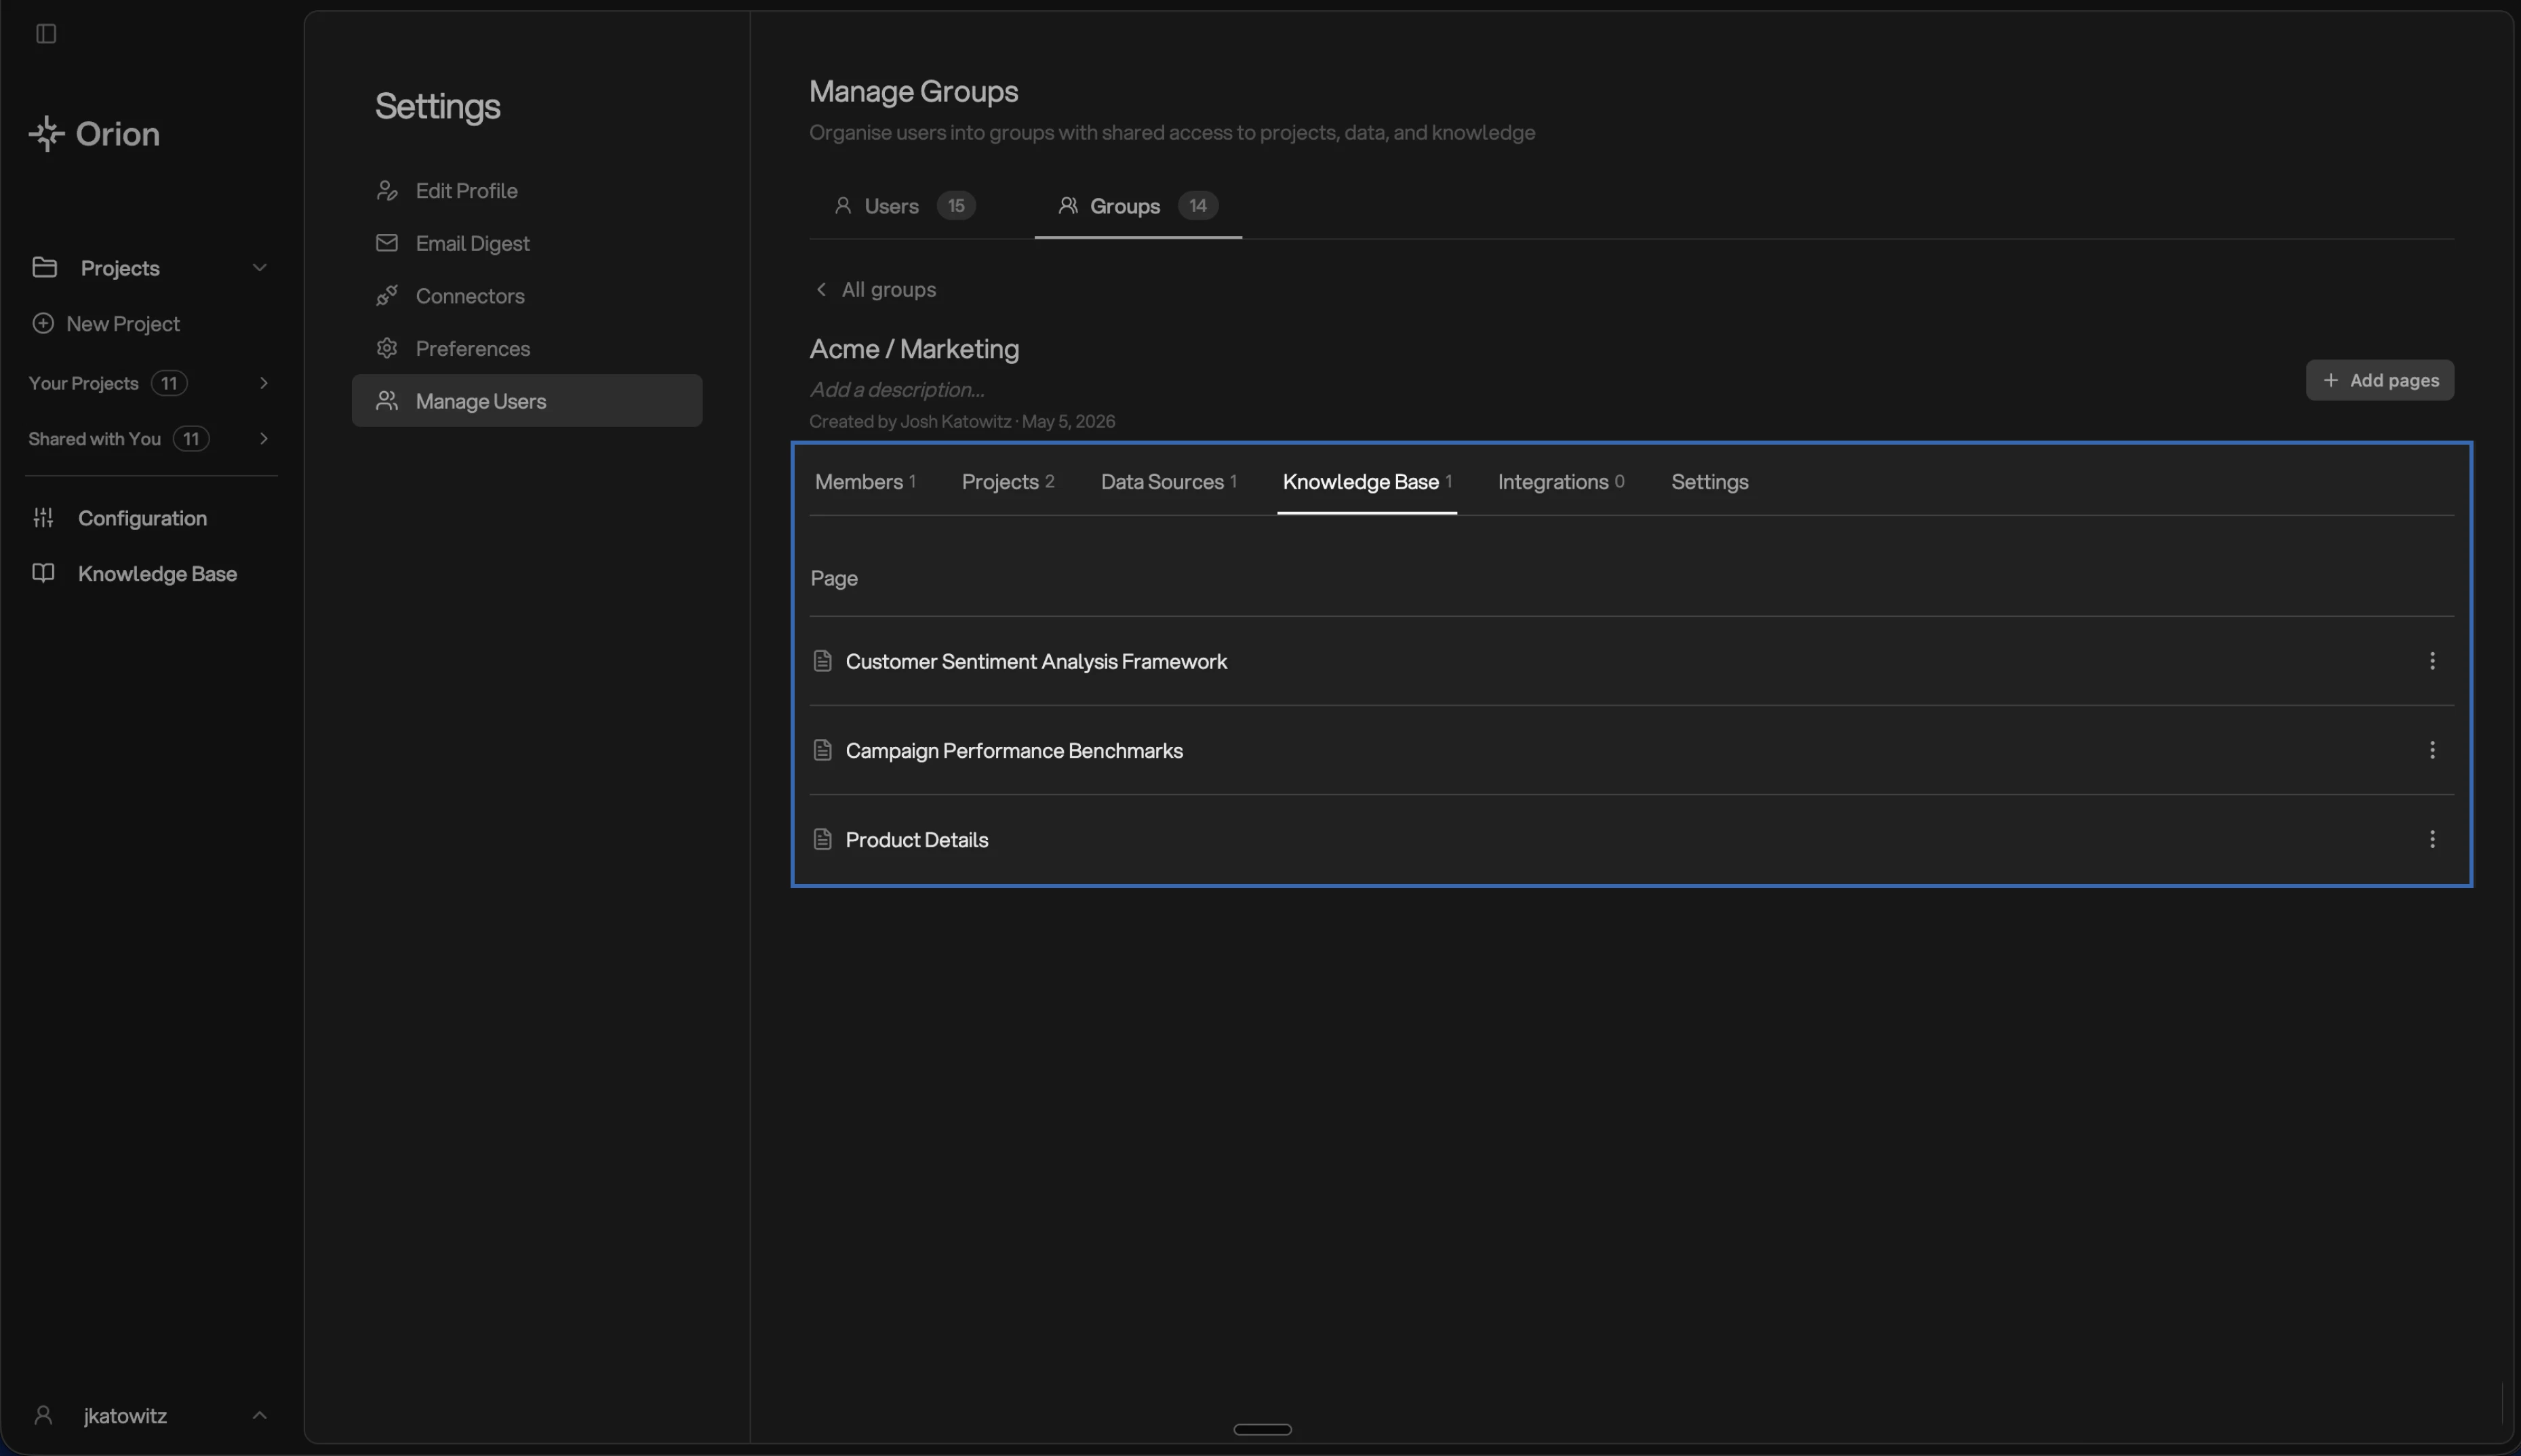 Selecting a **whole folder** means any new pages added to that folder later
are automatically available to the group. This is the easiest way to keep a
department's reference material in sync as it grows.
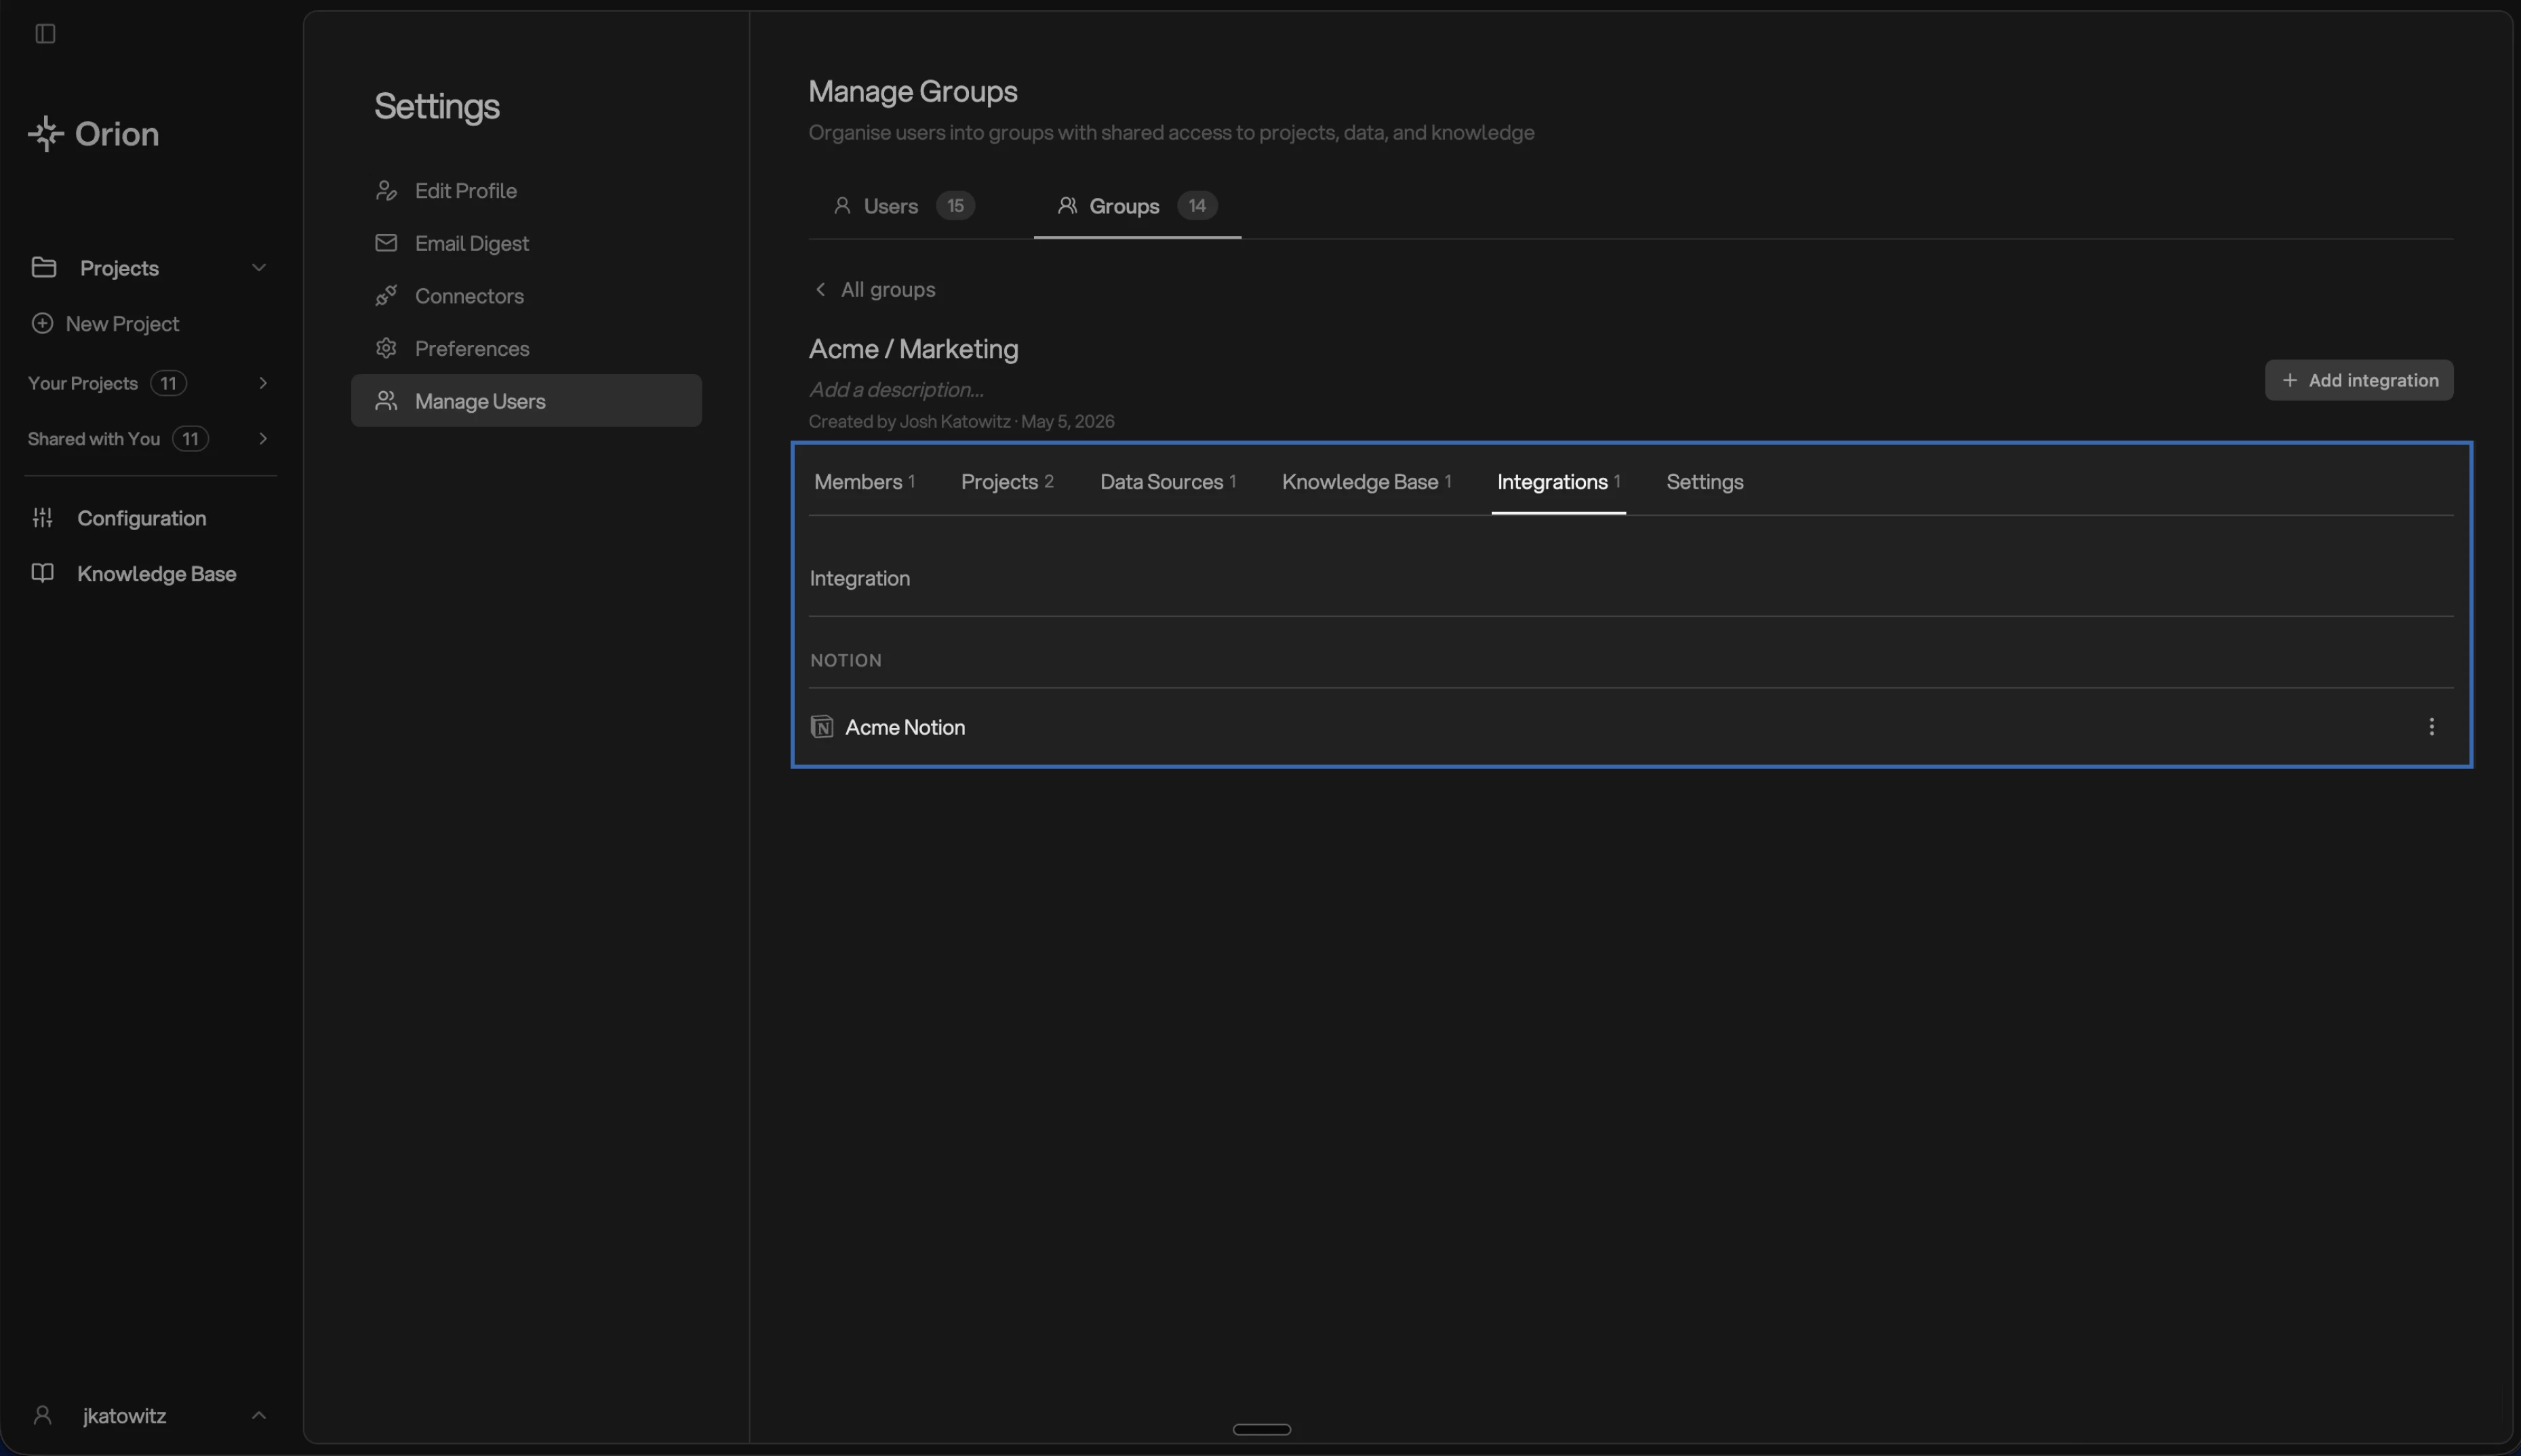
### Integrations
The Integrations tab controls which [integrations](/profile-settings/integrations) the group has access to.
Selecting a **whole folder** means any new pages added to that folder later
are automatically available to the group. This is the easiest way to keep a
department's reference material in sync as it grows.
### Integrations
The Integrations tab controls which [integrations](/profile-settings/integrations) the group has access to.
 ## How users get access to a project
A user can be given access to a project in two ways:
1. **Through a group** — they're a member of a group that the project belongs to. Their permissions match their role in the group.
2. **Directly** — they were invited to the project individually from the project's Share menu, independent of any group.
The two methods work side by side. Removing someone from a group doesn't cancel any direct invite they have, and removing a direct invite doesn't remove them from the group.
The Project Settings modal shows which groups currently have access to the project, alongside its other settings.
## Deleting a Group
To delete a group, open it and click **Delete group** in the upper-right corner. The confirmation dialog summarizes what will happen:
## How users get access to a project
A user can be given access to a project in two ways:
1. **Through a group** — they're a member of a group that the project belongs to. Their permissions match their role in the group.
2. **Directly** — they were invited to the project individually from the project's Share menu, independent of any group.
The two methods work side by side. Removing someone from a group doesn't cancel any direct invite they have, and removing a direct invite doesn't remove them from the group.
The Project Settings modal shows which groups currently have access to the project, alongside its other settings.
## Deleting a Group
To delete a group, open it and click **Delete group** in the upper-right corner. The confirmation dialog summarizes what will happen:
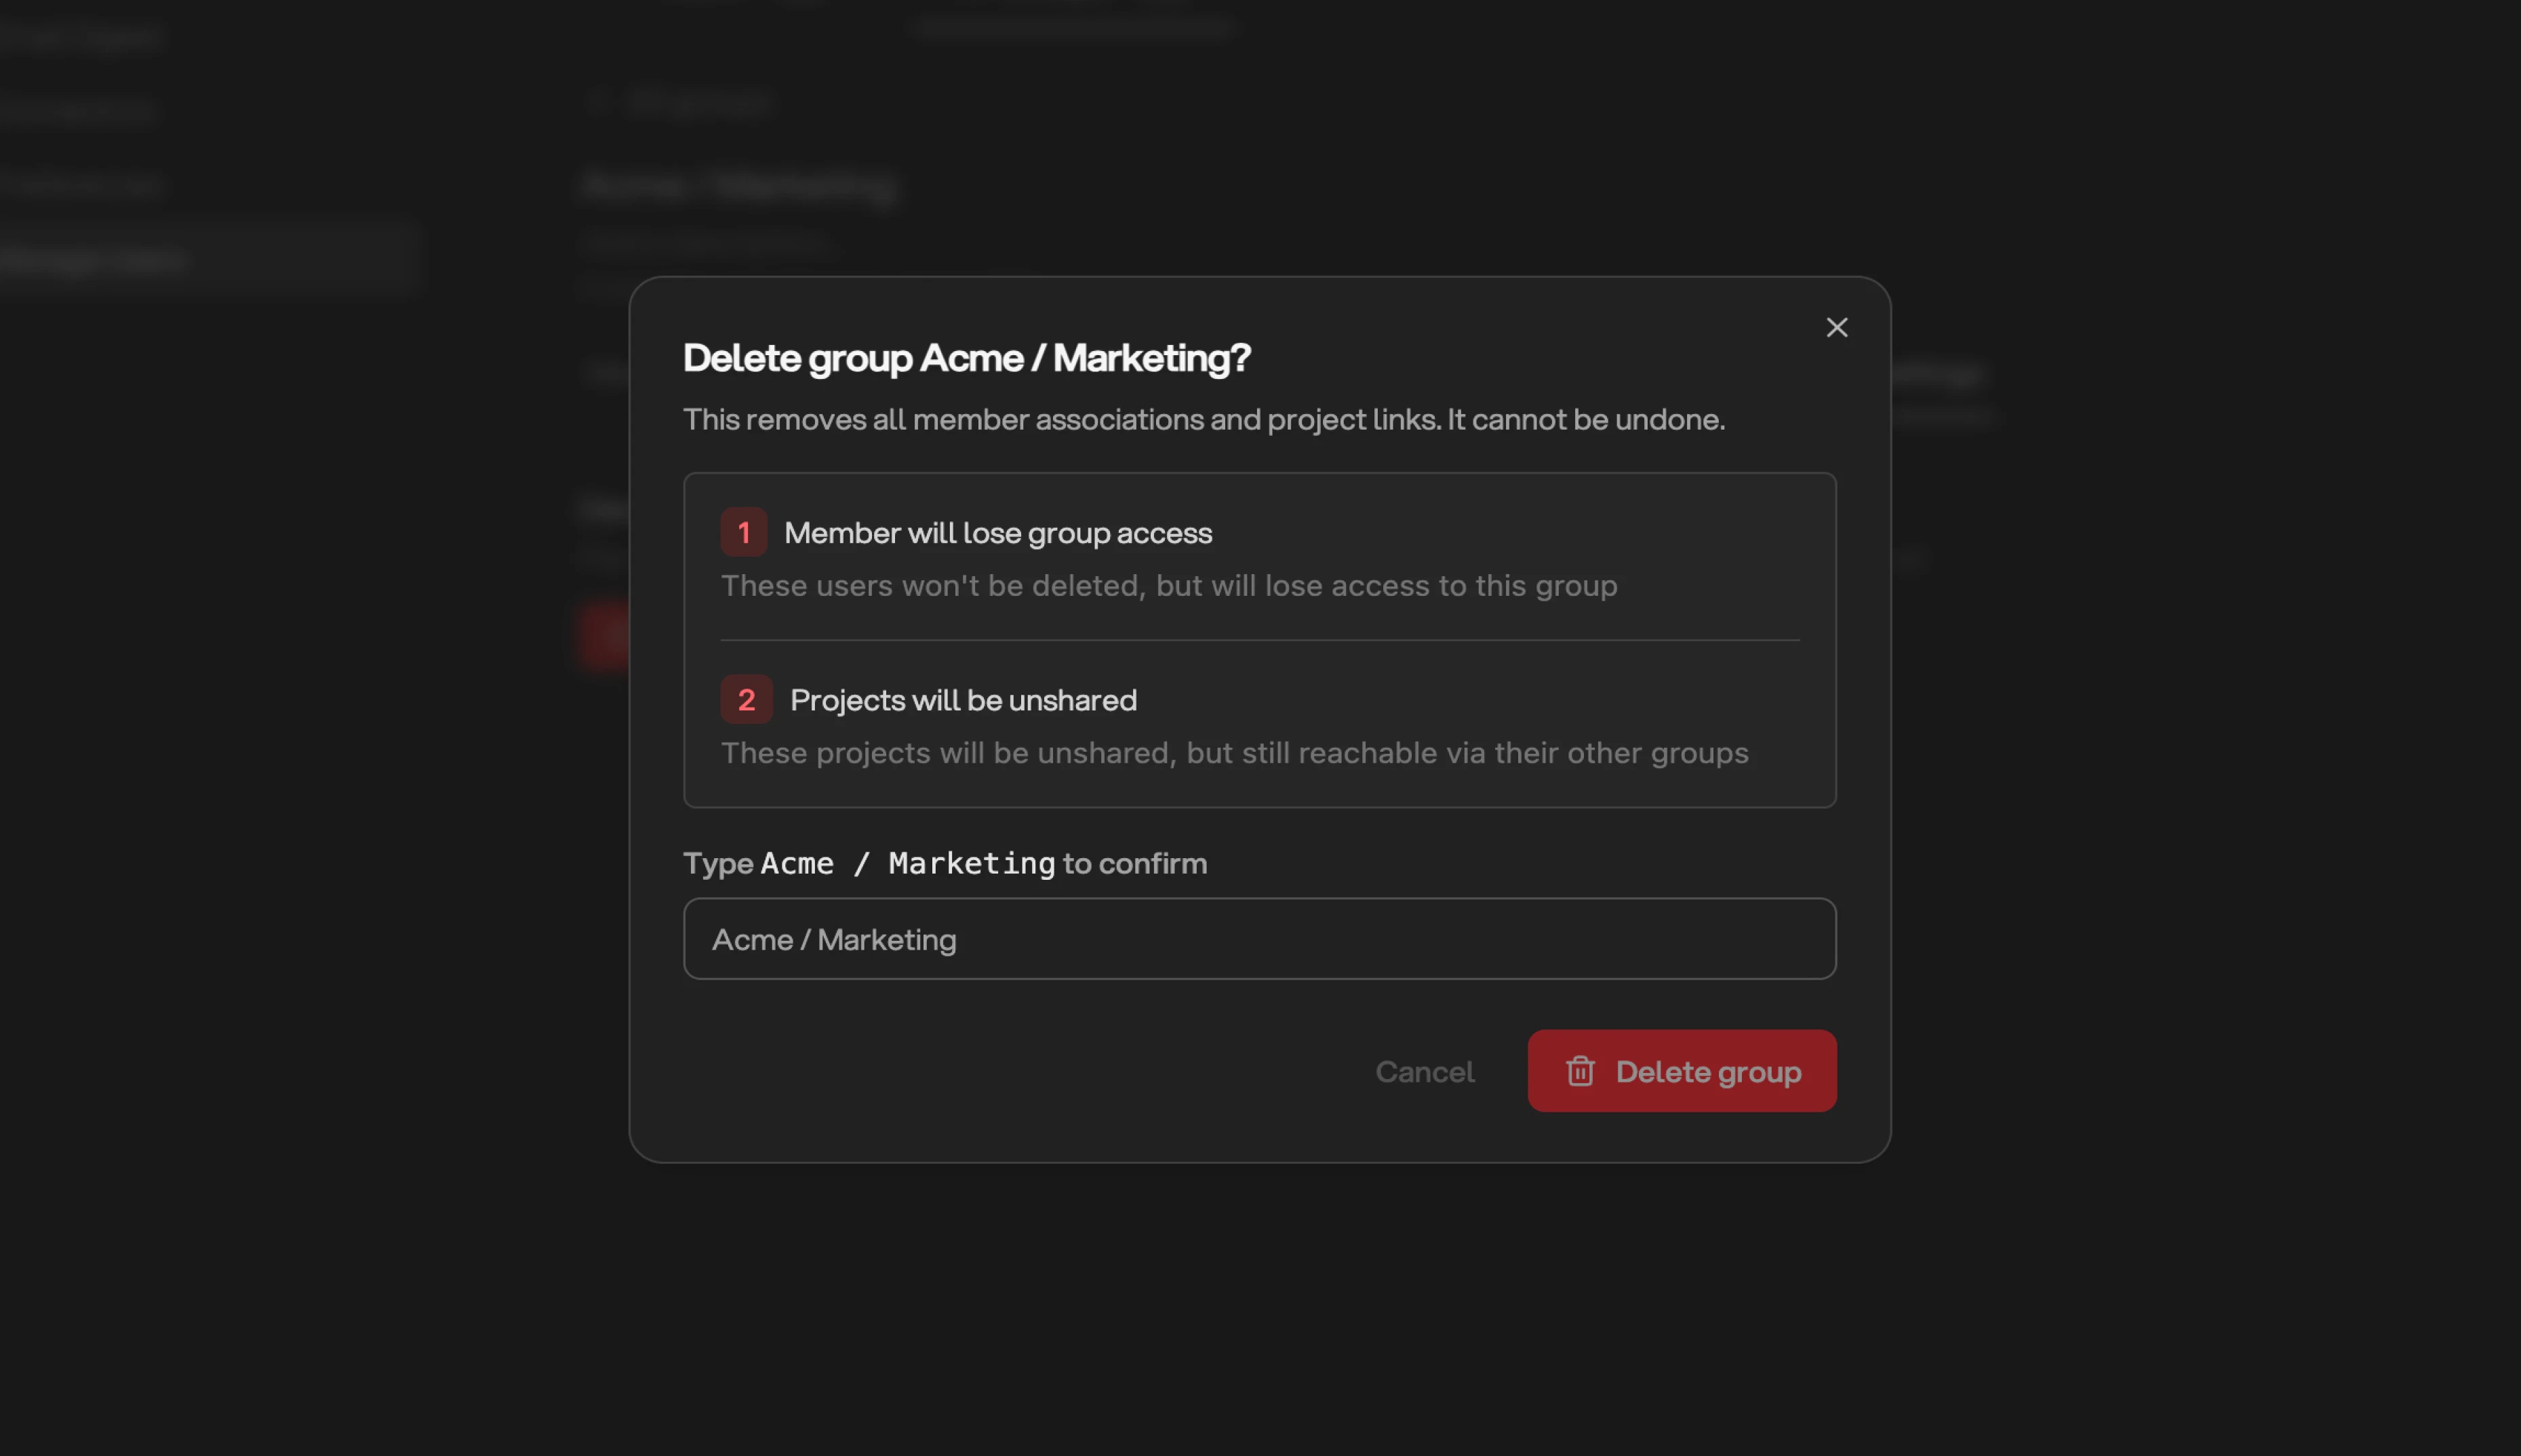 * **Members** lose access to anything they only had through this group. They keep any direct project access they were granted individually.
* **Projects** that are only used by this group can either be transferred to the group's Admins (who keep access individually) or deleted along with the group.
* **Data Sources, Knowledge Base pages, and Integrations** are not deleted — they simply leave the group.
If you choose to delete a project alongside the group, you'll be asked to type the project's name to confirm.
Deleting a group is permanent. The group and its membership are gone for good.
Members who had no other way to access projects will be left as Viewers with
no projects to see until someone adds them again.
* **Members** lose access to anything they only had through this group. They keep any direct project access they were granted individually.
* **Projects** that are only used by this group can either be transferred to the group's Admins (who keep access individually) or deleted along with the group.
* **Data Sources, Knowledge Base pages, and Integrations** are not deleted — they simply leave the group.
If you choose to delete a project alongside the group, you'll be asked to type the project's name to confirm.
Deleting a group is permanent. The group and its membership are gone for good.
Members who had no other way to access projects will be left as Viewers with
no projects to see until someone adds them again.