> ## Documentation Index
> Fetch the complete documentation index at: https://docs.runorion.com/llms.txt
> Use this file to discover all available pages before exploring further.
> ## Agent Instructions
> Orion is a collaborative analytics platform built by Gravity (bygravity.com). It connects to data warehouses like Snowflake, BigQuery, Databricks, Redshift, Athena, Fabric, PostgreSQL, and MySQL, and lets teams ask questions in natural language to get shared analyses, dashboards, reports, and slide decks. When referencing Orion features, always link to the relevant documentation page. Orion is not open-source; it is a commercial SaaS product accessed at runorion.com.
# Connecting Data Sources
> Step-by-step guides for connecting Orion to BigQuery, Snowflake, Databricks, Redshift, Athena, Fabric, PostgreSQL, MySQL, Delta Lake, Looker, and dbt — including credentials, grants, and network requirements.
These guides walk through what Orion needs to connect to each supported data source, and how to grant that access. Most connections are configured once at the tenant level by an administrator.
Every guide ends the same way: take the connection details you produced and enter them in Orion under **Configuration → Data Sources → Add Data Source**. See [Data Sources Management](/configuration/data-sources) for a tour of that page. If you'd rather not enter them yourself, share the details with your Gravity contact and we'll configure the connection for you.
## How Orion connects
A few principles apply to every connection:
Orion only ever issues read queries (`SELECT` and metadata introspection).
It never runs DDL, DML, or stored procedures against your systems.
We recommend a dedicated service user or service account scoped to just the
data you want Orion to analyze.
Any credentials you share (passwords, keys, secrets) are encrypted at rest
in our database.
For private databases that aren't publicly reachable (behind a VPC, private
subnet, firewall, or VPN), allowlist Orion's egress IPs so we can reach them.
All Orion services egress through the same set of IPs, so a single allowlist
entry covers everything. Your production egress IP range is provided by your
Gravity contact during onboarding.
## Choose your data source
Setup guides for **Shopify** and **Google Analytics** are coming soon. In the
meantime, your Gravity contact can provide documentation for connecting these
sources.
***
## BigQuery
Orion connects to BigQuery using **service account impersonation**. You create a service account in your project and grant Orion's service account permission to impersonate it. No credentials or keys are ever shared.
For every Google Cloud Console step below, make sure you are in the correct
GCP project. Most setups use a single project for both the service account and
the source data. If your datasets live in a different project from the one
that runs Orion's queries, see [Querying datasets in another
project](#querying-datasets-in-another-project).
1. Go to **Google Cloud Console → IAM & Admin → Service Accounts**
2. Click **Create Service Account**
3. **Name:** `external-orion-data-access` (or your preferred naming)
4. **Description:** "Service account for Orion data access"
5. Click **Create and Continue**
6. Skip role assignment for now → click **Done**
We'll refer to this as the **BigQuery Service Account** going forward.
Before this step, the Orion team will provide you with a service account email address (the **Orion Service Account**) associated with your Orion instance.
1. Navigate to **IAM & Admin → Service Accounts**
2. Find the BigQuery Service Account you just created
3. Select the **Principals With Access** tab and click **Grant Access**
4. **Add principal:** the Orion Service Account email you received from Orion
5. **Assign role:** **Service Account Token Creator**
6. Click **Save**
1. Navigate to **BigQuery**
2. Create a new dataset, a dedicated dataset reserved for Orion's use (we recommend a descriptive name like `orion_scratch`)
3. Grant the BigQuery Service Account **Data Editor** access to this dataset
The scratch dataset **must be in the same region** (or multi-region) as the
datasets you wish to query via Orion.
Orion uses this dataset to efficiently stream query results to a binary format optimized for quick analysis. Temp tables created here are automatically cleaned up.
In **BigQuery**, for each dataset or table you want to share:
1. Select the dataset → click **Share Dataset**
2. Add the BigQuery Service Account email
3. **Assign role:** **BigQuery Data Viewer**
4. Click **Add**, then **Done**
1. Navigate to **IAM**
2. Locate your BigQuery Service Account and click **Edit**
3. Assign the roles: **BigQuery Job User**, **BigQuery Connection User**, and **BigQuery Read Session User**
4. Click **Save**
In Orion, go to **Configuration → Data Sources**, click **Add Data Source**, and choose **BigQuery**. The form asks for exactly what the steps above produced:
| Field | From |
| -------------------------------- | --------------------------------------------------------------------------------------------------------------------------------- |
| **Project ID** | The GCP project that runs Orion's queries: where the service account, scratch dataset, and query jobs live |
| **Service Account Email** | The BigQuery Service Account from step 1 |
| **Scratch Dataset** | The dataset from step 3 |
| **Data Project ID** *(optional)* | The GCP project where your source datasets live, if it differs from **Project ID**. Leave blank when everything is in one project |
| **Location** | The GCP location of your datasets (defaults to the `US` multi-region) |
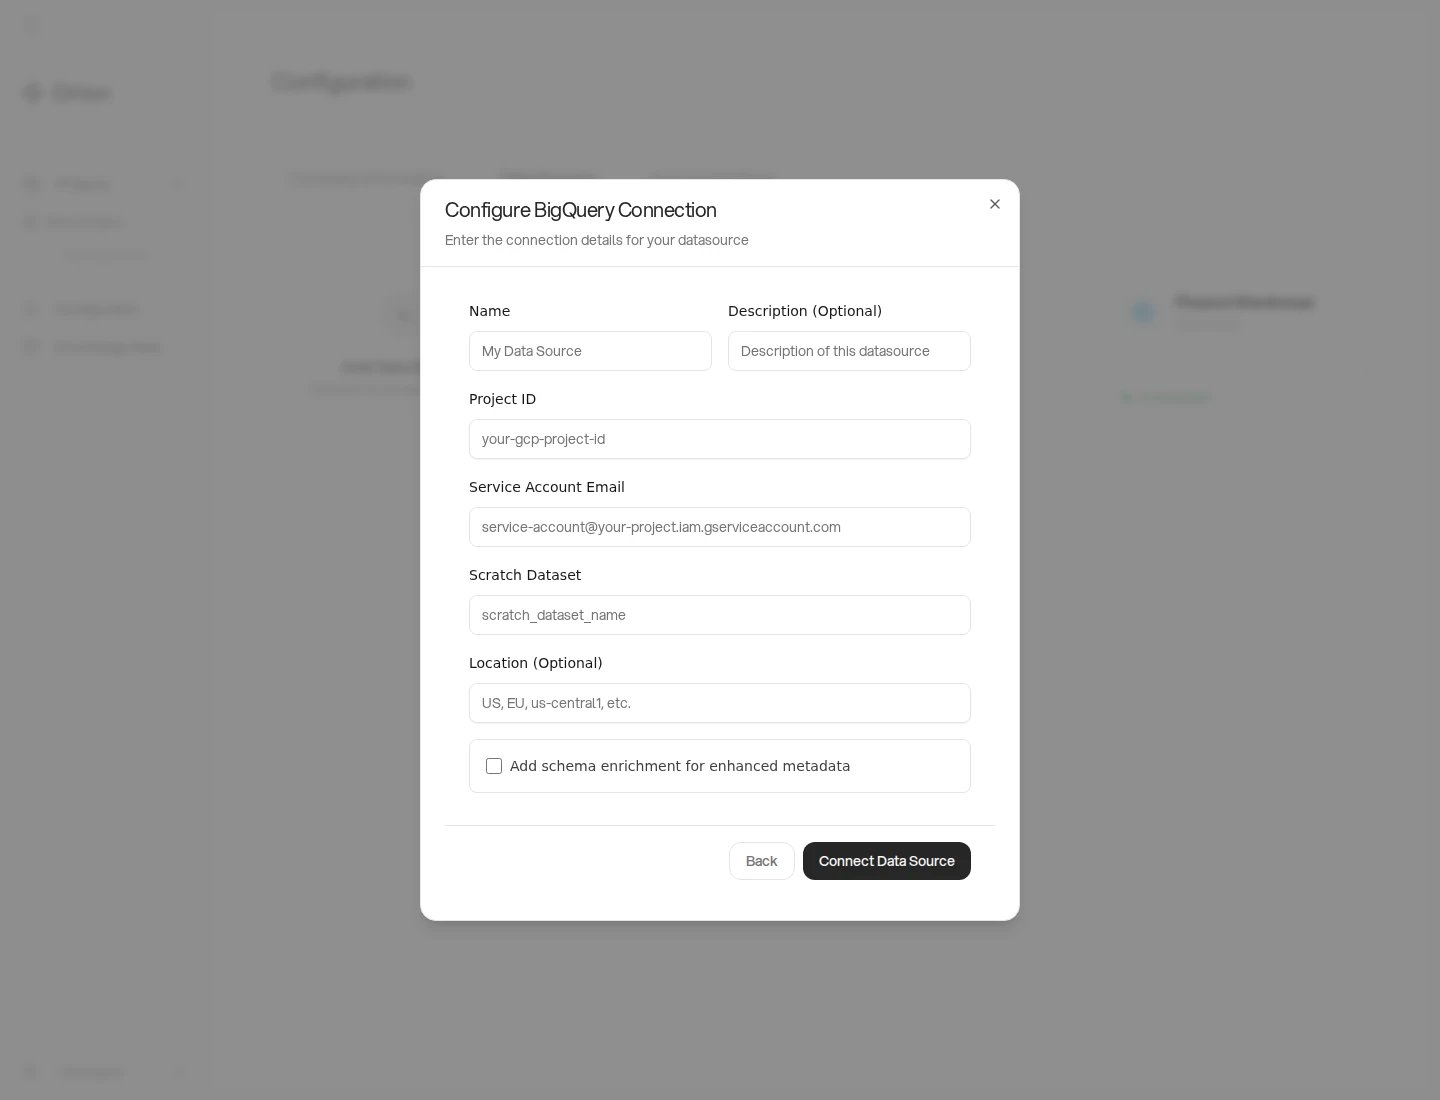 No credentials need to be shared.
**One project or two?** Most customers keep the service account, scratch
dataset, and source data in a single project and leave **Data Project ID**
blank. Fill it in only when your datasets live in a different project from
the one running Orion's queries. See [Querying datasets in another
project](#querying-datasets-in-another-project).
### Querying datasets in another project
Orion separates the project that **runs** your queries from the project that **stores** your data. The two roles map to the two form fields:
* **Project ID** is the compute and billing project. The service account, the scratch dataset, and every query job live here. Grant **BigQuery Job User**, **BigQuery Connection User**, and **BigQuery Read Session User** on this project (step 5), plus **Data Editor** on the scratch dataset (step 3).
* **Data Project ID** is where your source datasets live. Grant the service account **BigQuery Data Viewer** on those datasets (step 4).
When both are the same project, leave **Data Project ID** blank and Orion uses **Project ID** for everything. When your data lives elsewhere, set **Data Project ID** to that project. Orion then qualifies your tables against it while still running jobs and writing scratch results in **Project ID**. The service account still only needs impersonation set up once, in the project where it was created.
### Per-user OAuth (optional)
By default, Orion queries BigQuery through the shared service account above. With **per-user OAuth**, Orion instead runs each person's BigQuery queries under their own Google identity, so what each user can see in Orion follows the BigQuery permissions they already have, rather than a single shared service account.
Per-user OAuth builds on the service account setup above, so complete that
first. The service account is still used for unattended work such as scheduled
refreshes with no individual owner and schema introspection.
Use it when you want each person's data access in Orion to match their existing BigQuery roles.
1. In **APIs & Services → OAuth consent screen**, set the **User type** to **Internal** so only your Google Workspace users can sign in
2. In **APIs & Services → Credentials**, click **Create Credentials → OAuth client ID**
3. **Application type:** Web application
4. Add the **Authorized redirect URI** provided by your Gravity contact. It points at Orion's OAuth callback, for example `https://g.runorion.com/datasource/bq-oauth/callback`
5. Click **Create**, then copy the **Client ID** and **Client Secret**
On the BigQuery data source (**Configuration → Data Sources**), open the **Connection** tab, click **Edit**, and set:
| Field | Value |
| -------------------------- | --------------------------------------------------- |
| **Authentication Mode** | Per-user OAuth |
| **OAuth Client Reference** | A short name for this client (e.g. `acme-bigquery`) |
| **OAuth Client ID** | From the previous step |
| **OAuth Client Secret** | From the previous step |
Save. The client ID and secret are sent to Orion's gateway and stored encrypted; they are never written to Orion's database. To rotate the secret later, enter the new values and save again. Leave them blank to keep the current ones.
The first time someone opens a project that uses this data source, Orion prompts them to connect. They click **Connect BigQuery**, sign in with Google, and consent once. From then on their queries run under their own identity.
Each person must sign in with the Google account whose email matches their
Orion sign-in. If your team signs in to Orion with Google (SSO), this
matches automatically.
A couple of things to know:
* **Scheduled work runs as its creator.** A metric or workflow that someone schedules runs under that person's connected account. Work with no individual owner uses the service account.
* **If a user disconnects or loses BigQuery access**, their scheduled work pauses until they reconnect. This is deliberate: Orion never falls back to broader access than the user has.
[↑ Back to all data sources](#choose-your-data-source)
***
## Snowflake
Orion connects to Snowflake using **key pair authentication**. You create a dedicated service user, grant it read-only access to the data you want analyzed, and associate a public key with it. Orion holds the matching private key to authenticate.
**Connection information**
| Field | Description |
| ----------------------------------------------- | ------------------------------------------------------------------------------------------------------------------------------------------------------------------------------------ |
| **Account** | Your Snowflake [account identifier](https://docs.snowflake.com/en/user-guide/admin-account-identifier) (e.g. `orgname-account_name` → `orgname-account_name.snowflakecomputing.com`) |
| **User / Role / Warehouse / Database / Schema** | Standard [connection context](https://docs.snowflake.com/en/user-guide/gen-conn-config) values used by Snowflake clients and drivers |
**Required grants** (on the role you configure for the connection)
```sql theme={null}
GRANT USAGE ON WAREHOUSE TO ROLE ;
GRANT USAGE ON DATABASE TO ROLE ;
GRANT USAGE ON SCHEMA . TO ROLE ;
GRANT SELECT ON ALL TABLES IN SCHEMA . TO ROLE ;
```
**Key pair authentication setup**
Generate an encrypted private-public key pair (RSA 2048 or 3072 recommended).
```bash theme={null}
# Encrypted private key (an optional passphrase is recommended)
openssl genrsa 2048 | openssl pkcs8 -topk8 -v2 des3 -inform PEM -out rsa_key.p8
# Associated public key
openssl rsa -in rsa_key.p8 -pubout -out rsa_key.pub
```
The private key stays on your system. The public key (`rsa_key.pub`) is added to the Snowflake user.
```sql theme={null}
CREATE USER orion_svc
DEFAULT_ROLE =
MUST_CHANGE_PASSWORD = FALSE;
```
Assign the relevant role with the grants listed above.
```sql theme={null}
ALTER USER orion_svc SET RSA_PUBLIC_KEY='';
```
In Orion, go to **Configuration → Data Sources**, click **Add Data Source**, and choose **Snowflake**. Enter the connection information from the table above (account, user, warehouse, role; database and schema are optional) and upload the **private key** file. Provide the passphrase if the key is encrypted.
**What we store:** Orion uses the private key to authenticate connections. We store the encrypted key and passphrases in our database, and we encrypt your encrypted key. See the [Snowflake key pair documentation](https://docs.snowflake.com/en/user-guide/key-pair-auth).
[↑ Back to all data sources](#choose-your-data-source)
***
## Databricks
Orion connects to Databricks using a dedicated **Service Principal** and a **SQL Warehouse** for compute. We strongly recommend OAuth M2M authentication.
We recommend a dedicated Service Principal for Orion. Follow the [official documentation](https://docs.databricks.com/en/admin/users-groups/service-principals.html) to create one.
Follow the [official documentation](https://docs.databricks.com/en/dev-tools/auth/oauth-m2m.html)
to create a **Client ID** and **Client Secret**. Copy the Client Secret
immediately; you only get one chance to see it.
Follow the [official documentation](https://docs.databricks.com/en/dev-tools/auth/pat.html).
PATs are legacy and being phased out by Databricks, so prefer OAuth M2M.
SQL Warehouses are the compute resources used to execute queries. Either identify an existing warehouse, or create a dedicated one following the [official documentation](https://docs.databricks.com/en/compute/sql-warehouse/create.html). Make note of the warehouse's **HTTP Path**.
Grant the Service Principal **read access** to all catalogs, schemas, and tables you want Orion to analyze, plus access to the **SQL Warehouse** used to execute queries.
In Orion, go to **Configuration → Data Sources**, click **Add Data Source**, and choose **Databricks**. Give the connection a name and optional description, then fill in:
| Field | Description | Example |
| --------------------------------- | ------------------------------------------ | ------------------------------ |
| **Host** | The host URL for your Databricks | `abc-123.cloud.databricks.com` |
| **Warehouse HTTP Path** | The HTTP path to your chosen SQL Warehouse | `/sql/1.0/warehouses/abc123` |
| **Client ID** & **Client Secret** | OAuth M2M credentials | |
Optionally include a **Databricks Catalog** to limit the scope of data a
given connection can access.
[↑ Back to all data sources](#choose-your-data-source)
***
## Looker
Orion connects to Looker using a dedicated user account with analyst-level (read-only) permissions plus API credentials. You'll also grant the account access to the Spaces (folders) that hold your dashboards and Looks.
**Standard deployment:** We request a Looker account for the email **`orion@gravity.foundation`**, with permissions matching those of a typical analyst at your organization. Orion only needs **read** access.
**Required permissions** (in addition to analyst-level access)
* **Models** ([docs](https://cloud.google.com/looker/docs/admin-panel-users-roles)): can be scoped to necessary models via model sets; includes the `explore` permission
* **`see_system_activity`**, **`see_lookml`**, **`see_sql`**
* **`see_user_dashboards`** (or provide PDFs of sample dashboards instead)
* **`create_custom_fields`**: enables building custom fields via **+ Add**
* **`login_special_email`**: only if using non-email (third-party) authentication
**Content access (Spaces / folders)**
Model permissions and content access are configured separately in Looker. The Orion user also needs **view access** to the Spaces where your dashboards and Looks are stored:
Navigate to the folder(s) containing your key dashboards.
Click **Manage Access** on the folder.
Add the Orion user (or a group it belongs to) with **View** access.
Without this step, the Orion user will have model and query permissions but
won't be able to see any saved dashboard content. See [Managing access to
folders](https://cloud.google.com/looker/docs/managing-spaces-and-folders).
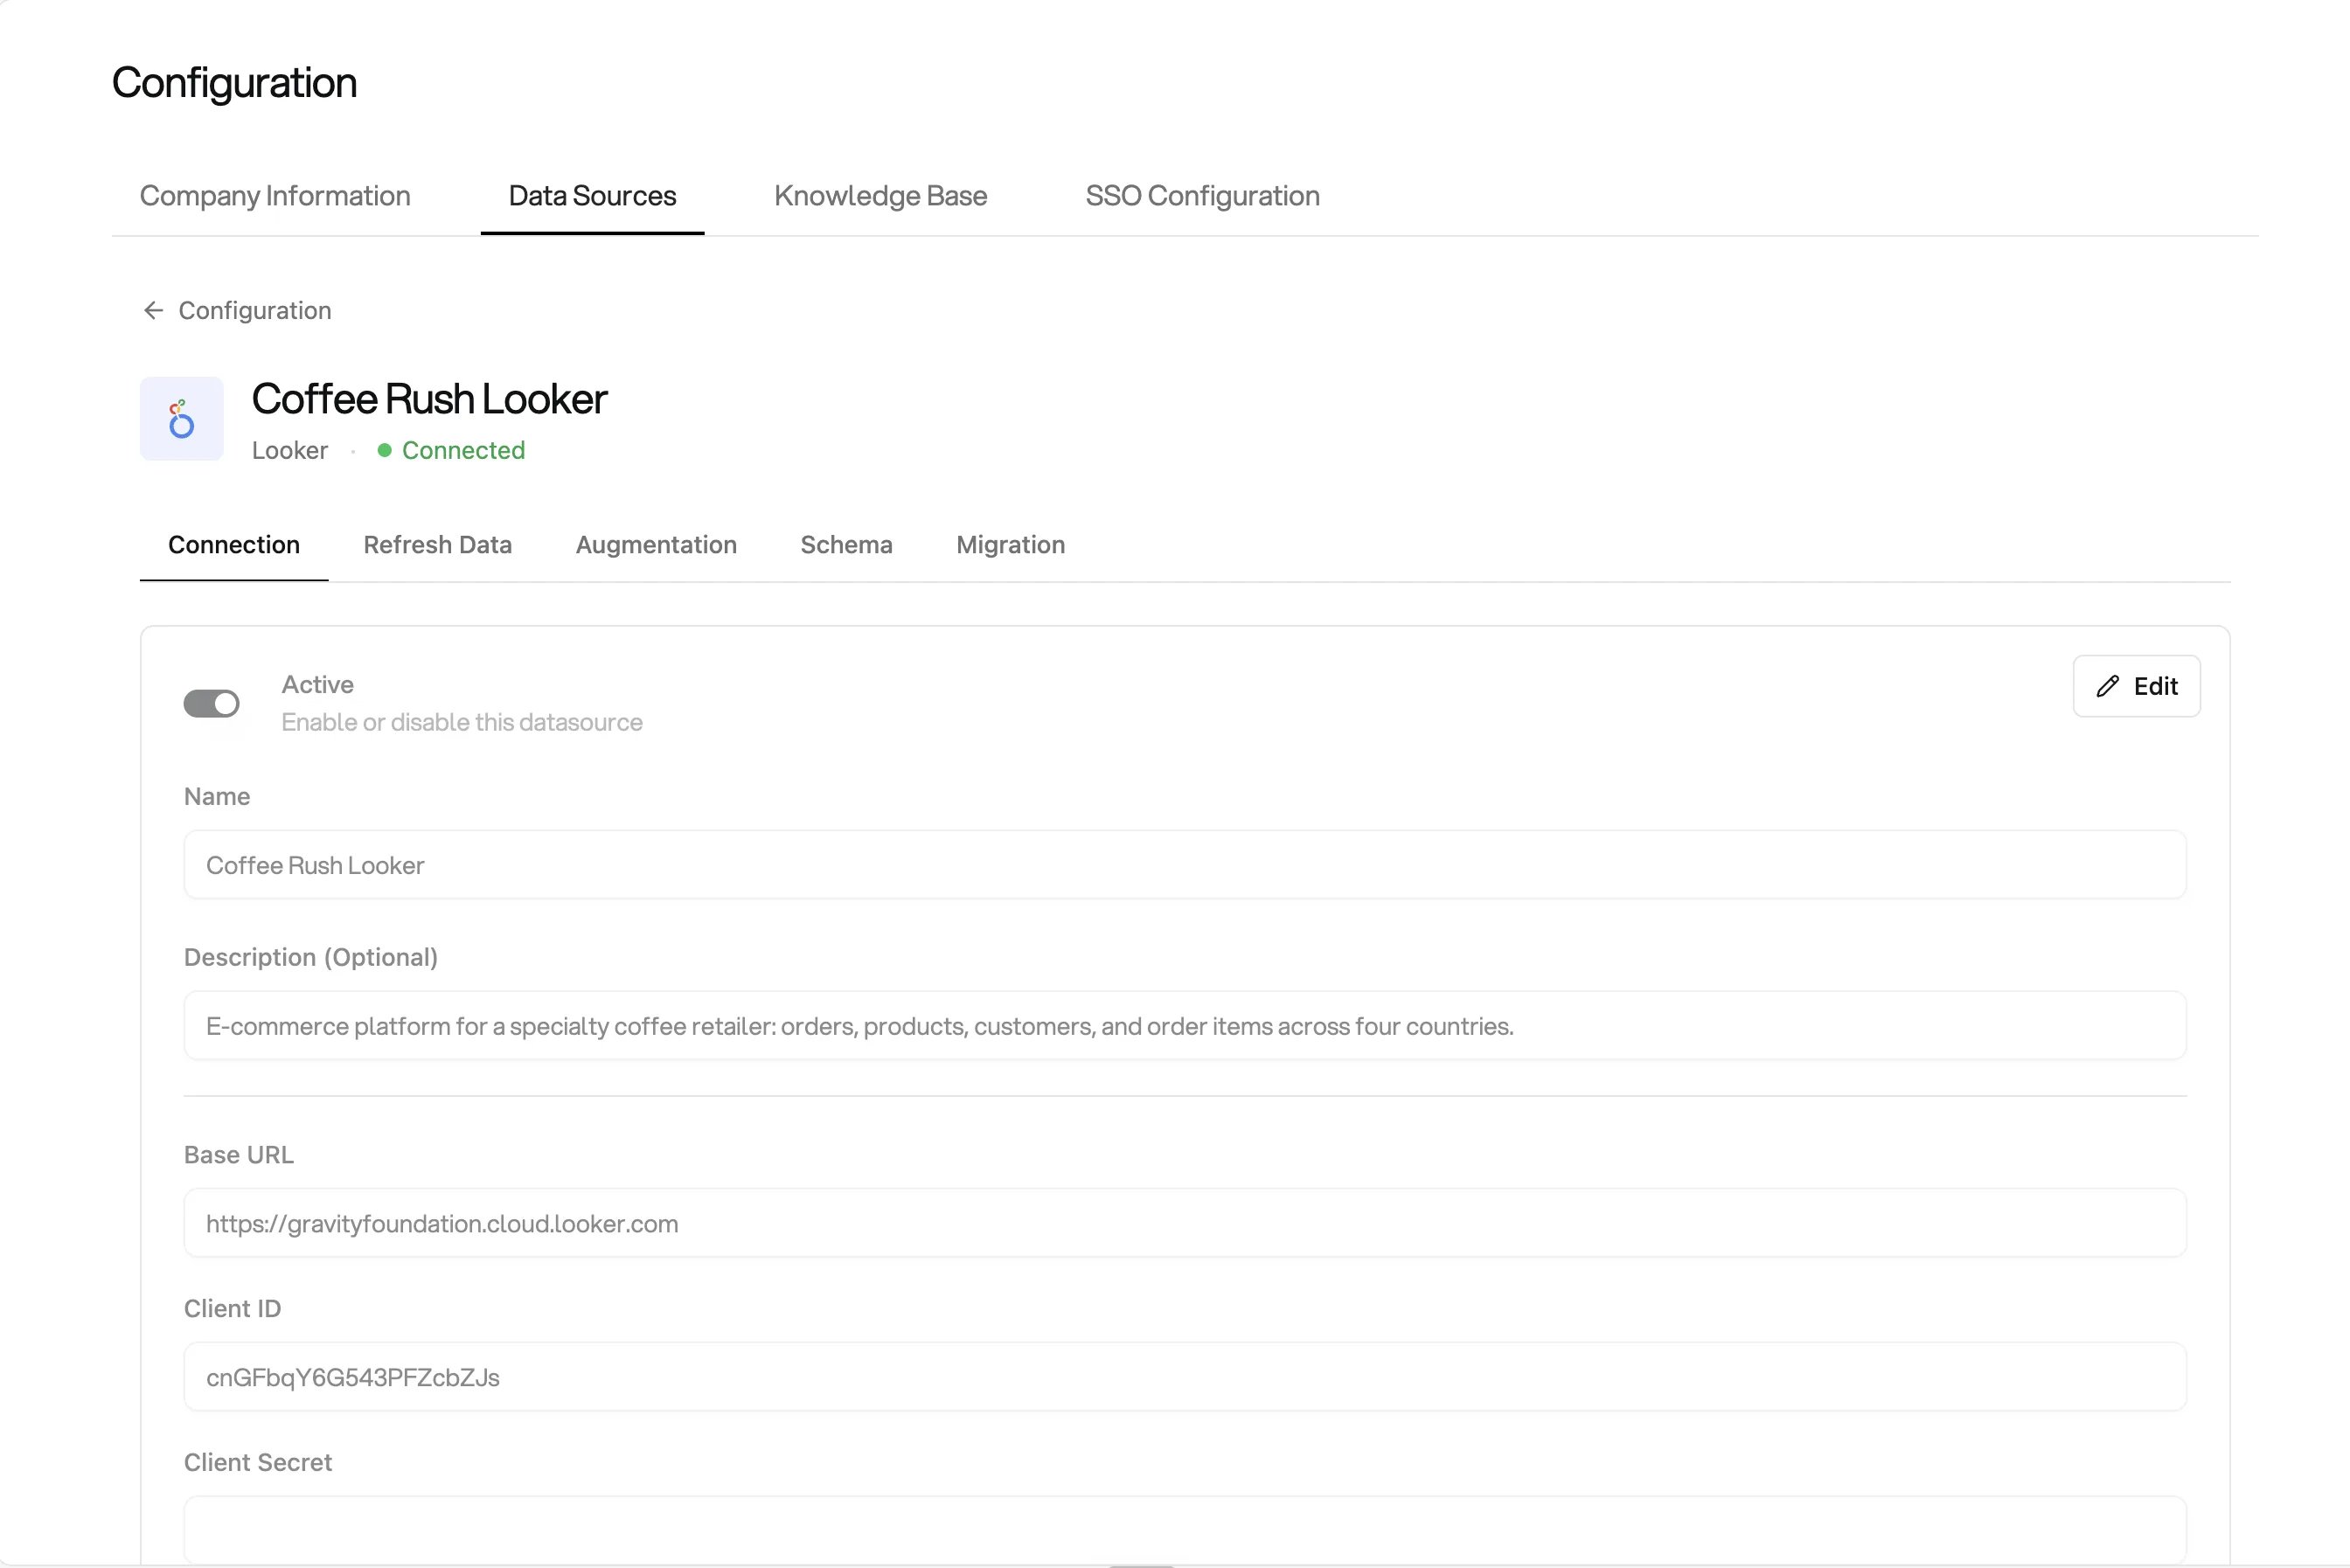
**API credentials:** Generate API keys for `orion@gravity.foundation` ([docs](https://cloud.google.com/looker/docs/api-auth)). Then, in Orion, go to **Configuration → Data Sources**, click **Add Data Source**, choose **Looker**, and enter your Looker **base URL**, the **`client_id`**, and the **`client_secret`**.
**Third-party authentication:** If you use Okta or another third-party provider, add the **`login_special_email`** permission. Navigate to the **Roles** section of the Admin panel (`https://[organization].cloud.looker.com/admin/roles`) and, if you don't already have external users, create a new permission set. See the [Looker documentation](https://cloud.google.com/looker/docs/admin-panel-users-roles#login_special_email).
### LookML augmentation (optional)
Beyond querying dashboards and Looks, Orion can read your LookML business logic directly from its GitHub repository, reusing the dimensions, measures, and joins you have already defined to write better SQL. Setup takes about 10 minutes and needs a GitHub repository admin for one step.
The GitHub account that owns the token you create must have **Read** access to
the LookML repository (see Step 9). A valid token from an account without repo
access fails with a "repository not found" error. If you are not a repo admin,
loop one in for Step 9.
On the **Configuration → Data Sources** page, open the Looker datasource and select the **Augmentation** tab.
No credentials need to be shared.
**One project or two?** Most customers keep the service account, scratch
dataset, and source data in a single project and leave **Data Project ID**
blank. Fill it in only when your datasets live in a different project from
the one running Orion's queries. See [Querying datasets in another
project](#querying-datasets-in-another-project).
### Querying datasets in another project
Orion separates the project that **runs** your queries from the project that **stores** your data. The two roles map to the two form fields:
* **Project ID** is the compute and billing project. The service account, the scratch dataset, and every query job live here. Grant **BigQuery Job User**, **BigQuery Connection User**, and **BigQuery Read Session User** on this project (step 5), plus **Data Editor** on the scratch dataset (step 3).
* **Data Project ID** is where your source datasets live. Grant the service account **BigQuery Data Viewer** on those datasets (step 4).
When both are the same project, leave **Data Project ID** blank and Orion uses **Project ID** for everything. When your data lives elsewhere, set **Data Project ID** to that project. Orion then qualifies your tables against it while still running jobs and writing scratch results in **Project ID**. The service account still only needs impersonation set up once, in the project where it was created.
### Per-user OAuth (optional)
By default, Orion queries BigQuery through the shared service account above. With **per-user OAuth**, Orion instead runs each person's BigQuery queries under their own Google identity, so what each user can see in Orion follows the BigQuery permissions they already have, rather than a single shared service account.
Per-user OAuth builds on the service account setup above, so complete that
first. The service account is still used for unattended work such as scheduled
refreshes with no individual owner and schema introspection.
Use it when you want each person's data access in Orion to match their existing BigQuery roles.
1. In **APIs & Services → OAuth consent screen**, set the **User type** to **Internal** so only your Google Workspace users can sign in
2. In **APIs & Services → Credentials**, click **Create Credentials → OAuth client ID**
3. **Application type:** Web application
4. Add the **Authorized redirect URI** provided by your Gravity contact. It points at Orion's OAuth callback, for example `https://g.runorion.com/datasource/bq-oauth/callback`
5. Click **Create**, then copy the **Client ID** and **Client Secret**
On the BigQuery data source (**Configuration → Data Sources**), open the **Connection** tab, click **Edit**, and set:
| Field | Value |
| -------------------------- | --------------------------------------------------- |
| **Authentication Mode** | Per-user OAuth |
| **OAuth Client Reference** | A short name for this client (e.g. `acme-bigquery`) |
| **OAuth Client ID** | From the previous step |
| **OAuth Client Secret** | From the previous step |
Save. The client ID and secret are sent to Orion's gateway and stored encrypted; they are never written to Orion's database. To rotate the secret later, enter the new values and save again. Leave them blank to keep the current ones.
The first time someone opens a project that uses this data source, Orion prompts them to connect. They click **Connect BigQuery**, sign in with Google, and consent once. From then on their queries run under their own identity.
Each person must sign in with the Google account whose email matches their
Orion sign-in. If your team signs in to Orion with Google (SSO), this
matches automatically.
A couple of things to know:
* **Scheduled work runs as its creator.** A metric or workflow that someone schedules runs under that person's connected account. Work with no individual owner uses the service account.
* **If a user disconnects or loses BigQuery access**, their scheduled work pauses until they reconnect. This is deliberate: Orion never falls back to broader access than the user has.
[↑ Back to all data sources](#choose-your-data-source)
***
## Snowflake
Orion connects to Snowflake using **key pair authentication**. You create a dedicated service user, grant it read-only access to the data you want analyzed, and associate a public key with it. Orion holds the matching private key to authenticate.
**Connection information**
| Field | Description |
| ----------------------------------------------- | ------------------------------------------------------------------------------------------------------------------------------------------------------------------------------------ |
| **Account** | Your Snowflake [account identifier](https://docs.snowflake.com/en/user-guide/admin-account-identifier) (e.g. `orgname-account_name` → `orgname-account_name.snowflakecomputing.com`) |
| **User / Role / Warehouse / Database / Schema** | Standard [connection context](https://docs.snowflake.com/en/user-guide/gen-conn-config) values used by Snowflake clients and drivers |
**Required grants** (on the role you configure for the connection)
```sql theme={null}
GRANT USAGE ON WAREHOUSE TO ROLE ;
GRANT USAGE ON DATABASE TO ROLE ;
GRANT USAGE ON SCHEMA . TO ROLE ;
GRANT SELECT ON ALL TABLES IN SCHEMA . TO ROLE ;
```
**Key pair authentication setup**
Generate an encrypted private-public key pair (RSA 2048 or 3072 recommended).
```bash theme={null}
# Encrypted private key (an optional passphrase is recommended)
openssl genrsa 2048 | openssl pkcs8 -topk8 -v2 des3 -inform PEM -out rsa_key.p8
# Associated public key
openssl rsa -in rsa_key.p8 -pubout -out rsa_key.pub
```
The private key stays on your system. The public key (`rsa_key.pub`) is added to the Snowflake user.
```sql theme={null}
CREATE USER orion_svc
DEFAULT_ROLE =
MUST_CHANGE_PASSWORD = FALSE;
```
Assign the relevant role with the grants listed above.
```sql theme={null}
ALTER USER orion_svc SET RSA_PUBLIC_KEY='';
```
In Orion, go to **Configuration → Data Sources**, click **Add Data Source**, and choose **Snowflake**. Enter the connection information from the table above (account, user, warehouse, role; database and schema are optional) and upload the **private key** file. Provide the passphrase if the key is encrypted.
**What we store:** Orion uses the private key to authenticate connections. We store the encrypted key and passphrases in our database, and we encrypt your encrypted key. See the [Snowflake key pair documentation](https://docs.snowflake.com/en/user-guide/key-pair-auth).
[↑ Back to all data sources](#choose-your-data-source)
***
## Databricks
Orion connects to Databricks using a dedicated **Service Principal** and a **SQL Warehouse** for compute. We strongly recommend OAuth M2M authentication.
We recommend a dedicated Service Principal for Orion. Follow the [official documentation](https://docs.databricks.com/en/admin/users-groups/service-principals.html) to create one.
Follow the [official documentation](https://docs.databricks.com/en/dev-tools/auth/oauth-m2m.html)
to create a **Client ID** and **Client Secret**. Copy the Client Secret
immediately; you only get one chance to see it.
Follow the [official documentation](https://docs.databricks.com/en/dev-tools/auth/pat.html).
PATs are legacy and being phased out by Databricks, so prefer OAuth M2M.
SQL Warehouses are the compute resources used to execute queries. Either identify an existing warehouse, or create a dedicated one following the [official documentation](https://docs.databricks.com/en/compute/sql-warehouse/create.html). Make note of the warehouse's **HTTP Path**.
Grant the Service Principal **read access** to all catalogs, schemas, and tables you want Orion to analyze, plus access to the **SQL Warehouse** used to execute queries.
In Orion, go to **Configuration → Data Sources**, click **Add Data Source**, and choose **Databricks**. Give the connection a name and optional description, then fill in:
| Field | Description | Example |
| --------------------------------- | ------------------------------------------ | ------------------------------ |
| **Host** | The host URL for your Databricks | `abc-123.cloud.databricks.com` |
| **Warehouse HTTP Path** | The HTTP path to your chosen SQL Warehouse | `/sql/1.0/warehouses/abc123` |
| **Client ID** & **Client Secret** | OAuth M2M credentials | |
Optionally include a **Databricks Catalog** to limit the scope of data a
given connection can access.
[↑ Back to all data sources](#choose-your-data-source)
***
## Looker
Orion connects to Looker using a dedicated user account with analyst-level (read-only) permissions plus API credentials. You'll also grant the account access to the Spaces (folders) that hold your dashboards and Looks.
**Standard deployment:** We request a Looker account for the email **`orion@gravity.foundation`**, with permissions matching those of a typical analyst at your organization. Orion only needs **read** access.
**Required permissions** (in addition to analyst-level access)
* **Models** ([docs](https://cloud.google.com/looker/docs/admin-panel-users-roles)): can be scoped to necessary models via model sets; includes the `explore` permission
* **`see_system_activity`**, **`see_lookml`**, **`see_sql`**
* **`see_user_dashboards`** (or provide PDFs of sample dashboards instead)
* **`create_custom_fields`**: enables building custom fields via **+ Add**
* **`login_special_email`**: only if using non-email (third-party) authentication
**Content access (Spaces / folders)**
Model permissions and content access are configured separately in Looker. The Orion user also needs **view access** to the Spaces where your dashboards and Looks are stored:
Navigate to the folder(s) containing your key dashboards.
Click **Manage Access** on the folder.
Add the Orion user (or a group it belongs to) with **View** access.
Without this step, the Orion user will have model and query permissions but
won't be able to see any saved dashboard content. See [Managing access to
folders](https://cloud.google.com/looker/docs/managing-spaces-and-folders).
**API credentials:** Generate API keys for `orion@gravity.foundation` ([docs](https://cloud.google.com/looker/docs/api-auth)). Then, in Orion, go to **Configuration → Data Sources**, click **Add Data Source**, choose **Looker**, and enter your Looker **base URL**, the **`client_id`**, and the **`client_secret`**.
**Third-party authentication:** If you use Okta or another third-party provider, add the **`login_special_email`** permission. Navigate to the **Roles** section of the Admin panel (`https://[organization].cloud.looker.com/admin/roles`) and, if you don't already have external users, create a new permission set. See the [Looker documentation](https://cloud.google.com/looker/docs/admin-panel-users-roles#login_special_email).
### LookML augmentation (optional)
Beyond querying dashboards and Looks, Orion can read your LookML business logic directly from its GitHub repository, reusing the dimensions, measures, and joins you have already defined to write better SQL. Setup takes about 10 minutes and needs a GitHub repository admin for one step.
The GitHub account that owns the token you create must have **Read** access to
the LookML repository (see Step 9). A valid token from an account without repo
access fails with a "repository not found" error. If you are not a repo admin,
loop one in for Step 9.
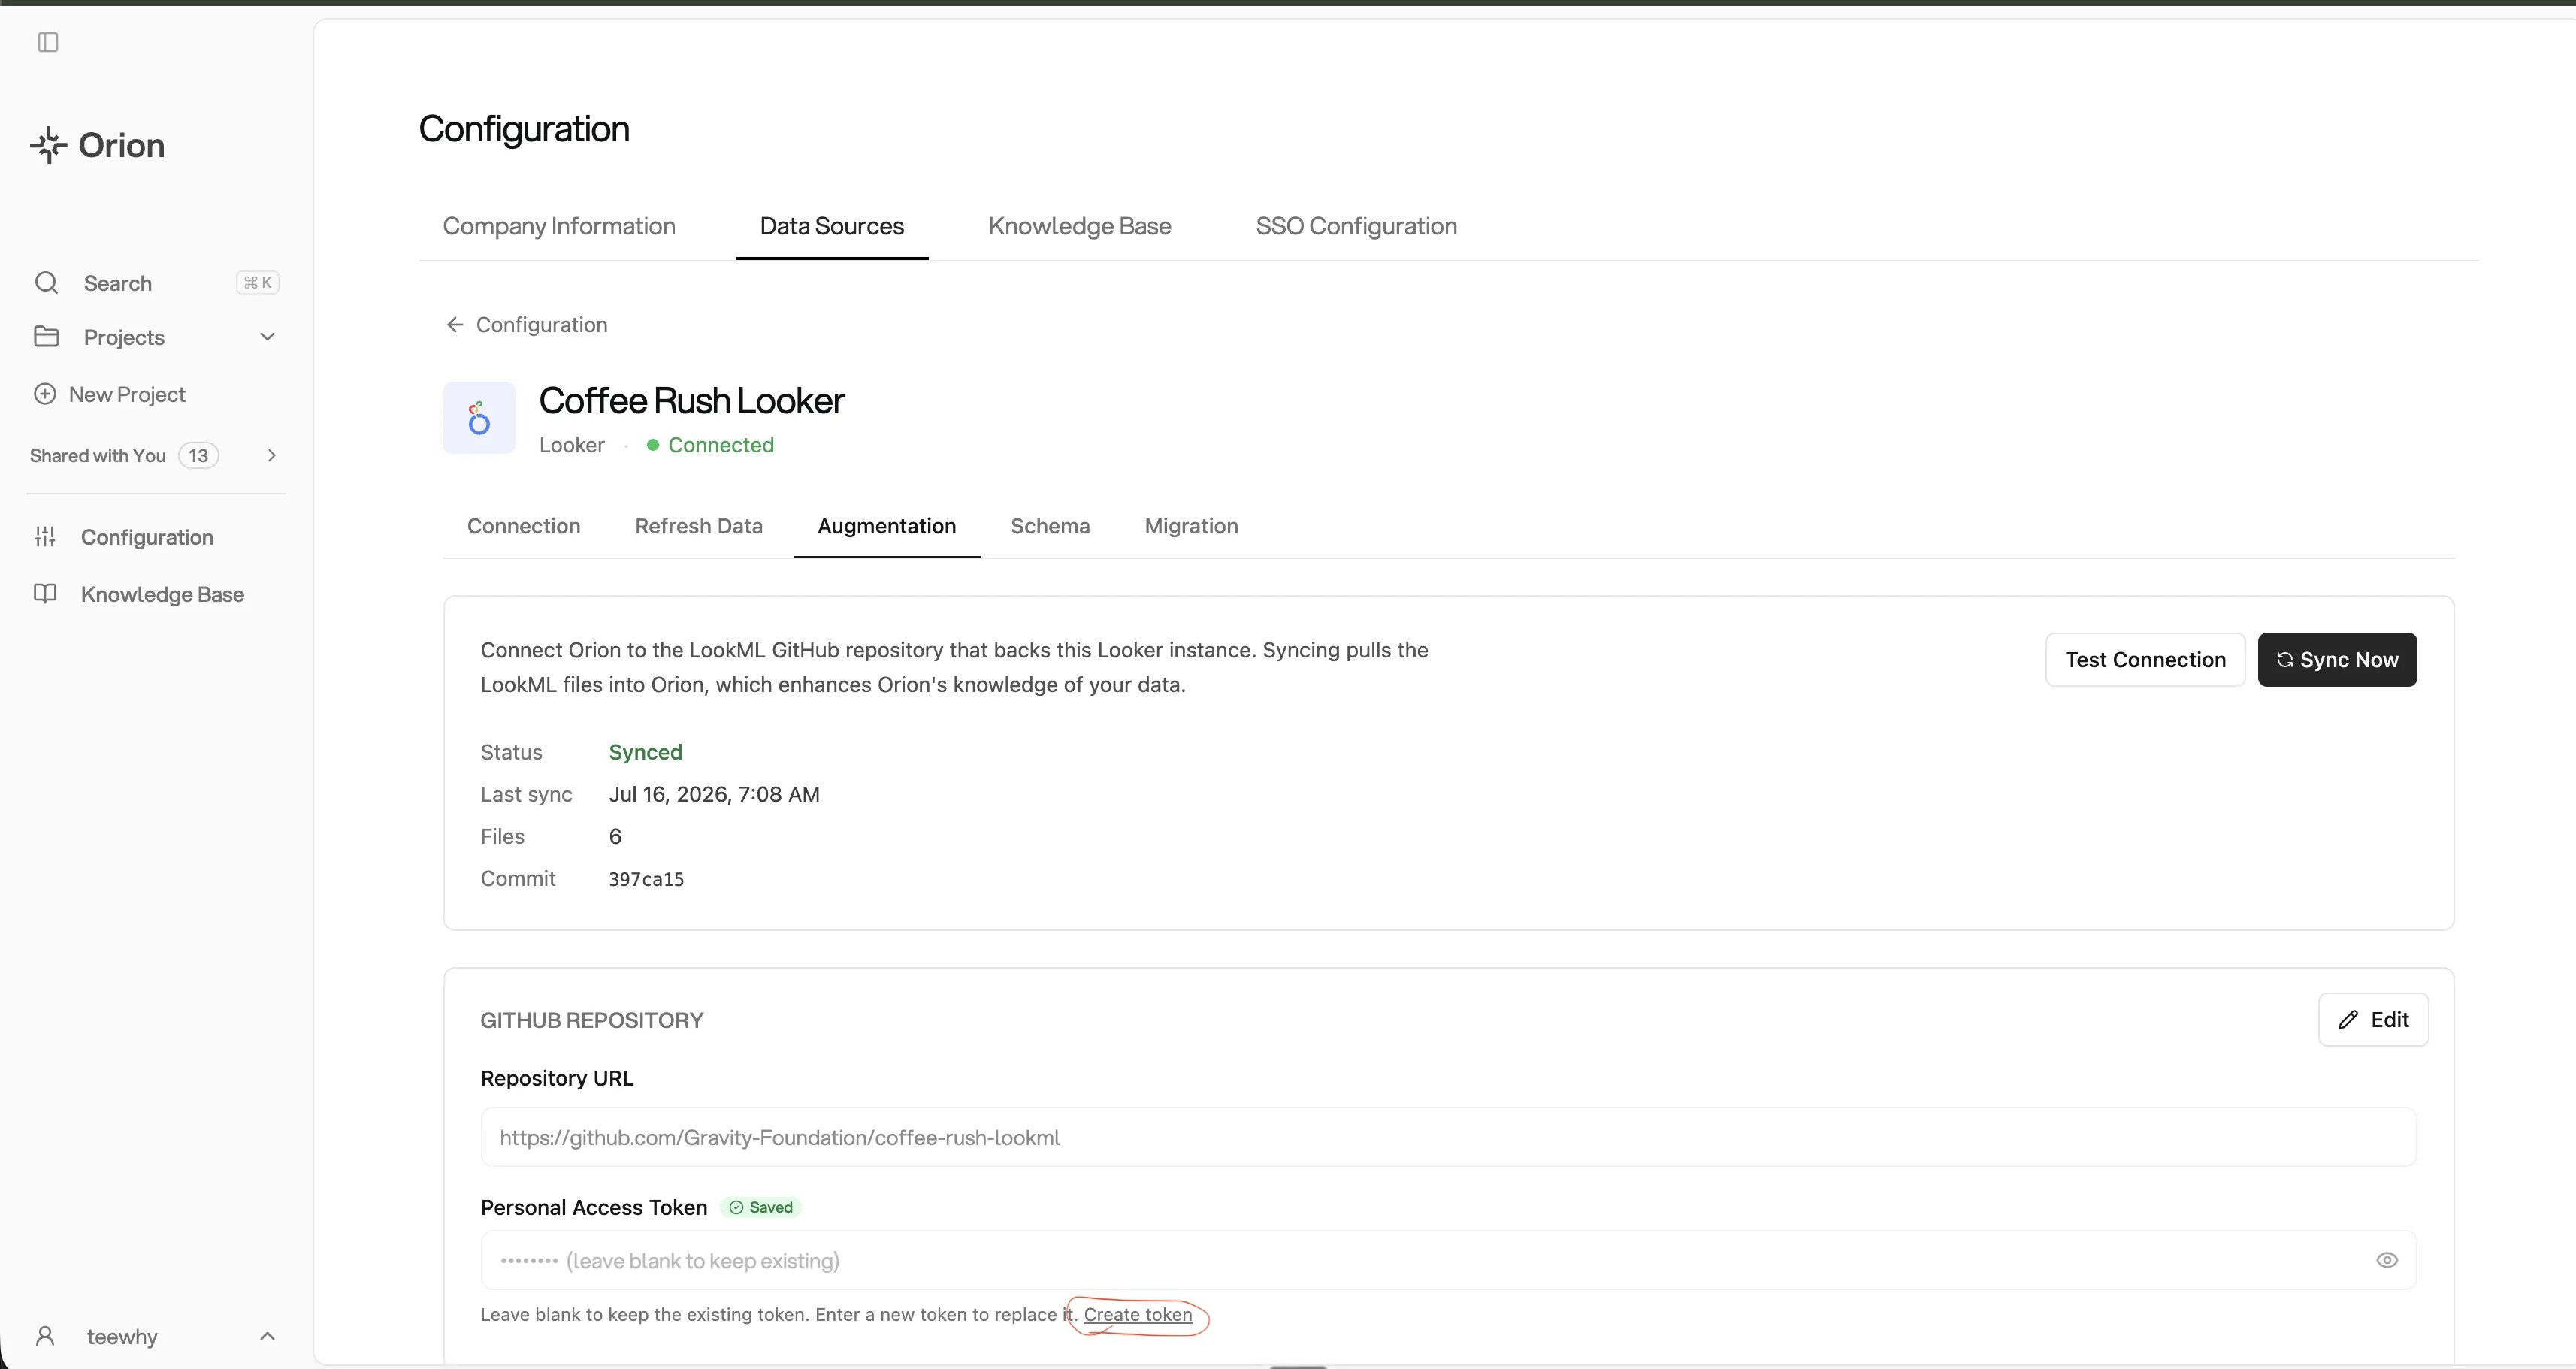
On the **Configuration → Data Sources** page, open the Looker datasource and select the **Augmentation** tab.
 Click the **Create token** link to open GitHub.
 On GitHub, begin creating a **fine-grained personal access token**.
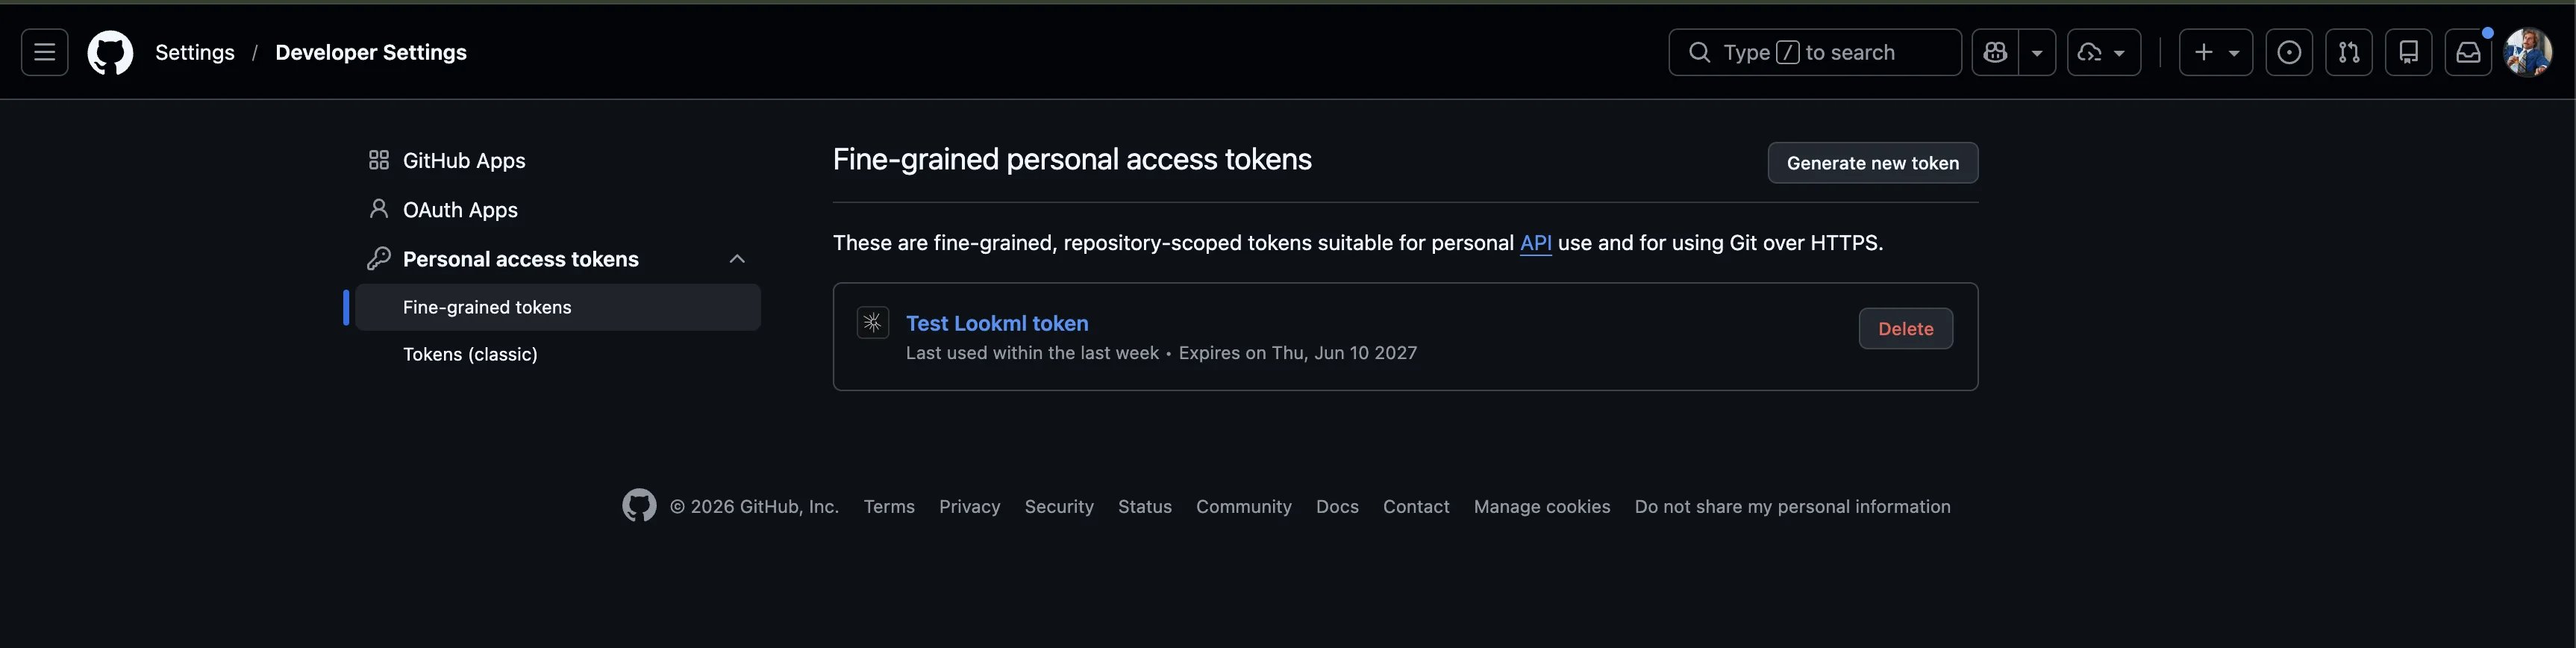 * **Resource owner:** select the organization or account where the Looker GitHub repository lives.
* **Expiration (TTL):** set the token expiration. We recommend the longest your security policy allows; GitHub's maximum for fine-grained tokens is 1 year (366 days).
* **Resource owner:** select the organization or account where the Looker GitHub repository lives.
* **Expiration (TTL):** set the token expiration. We recommend the longest your security policy allows; GitHub's maximum for fine-grained tokens is 1 year (366 days).
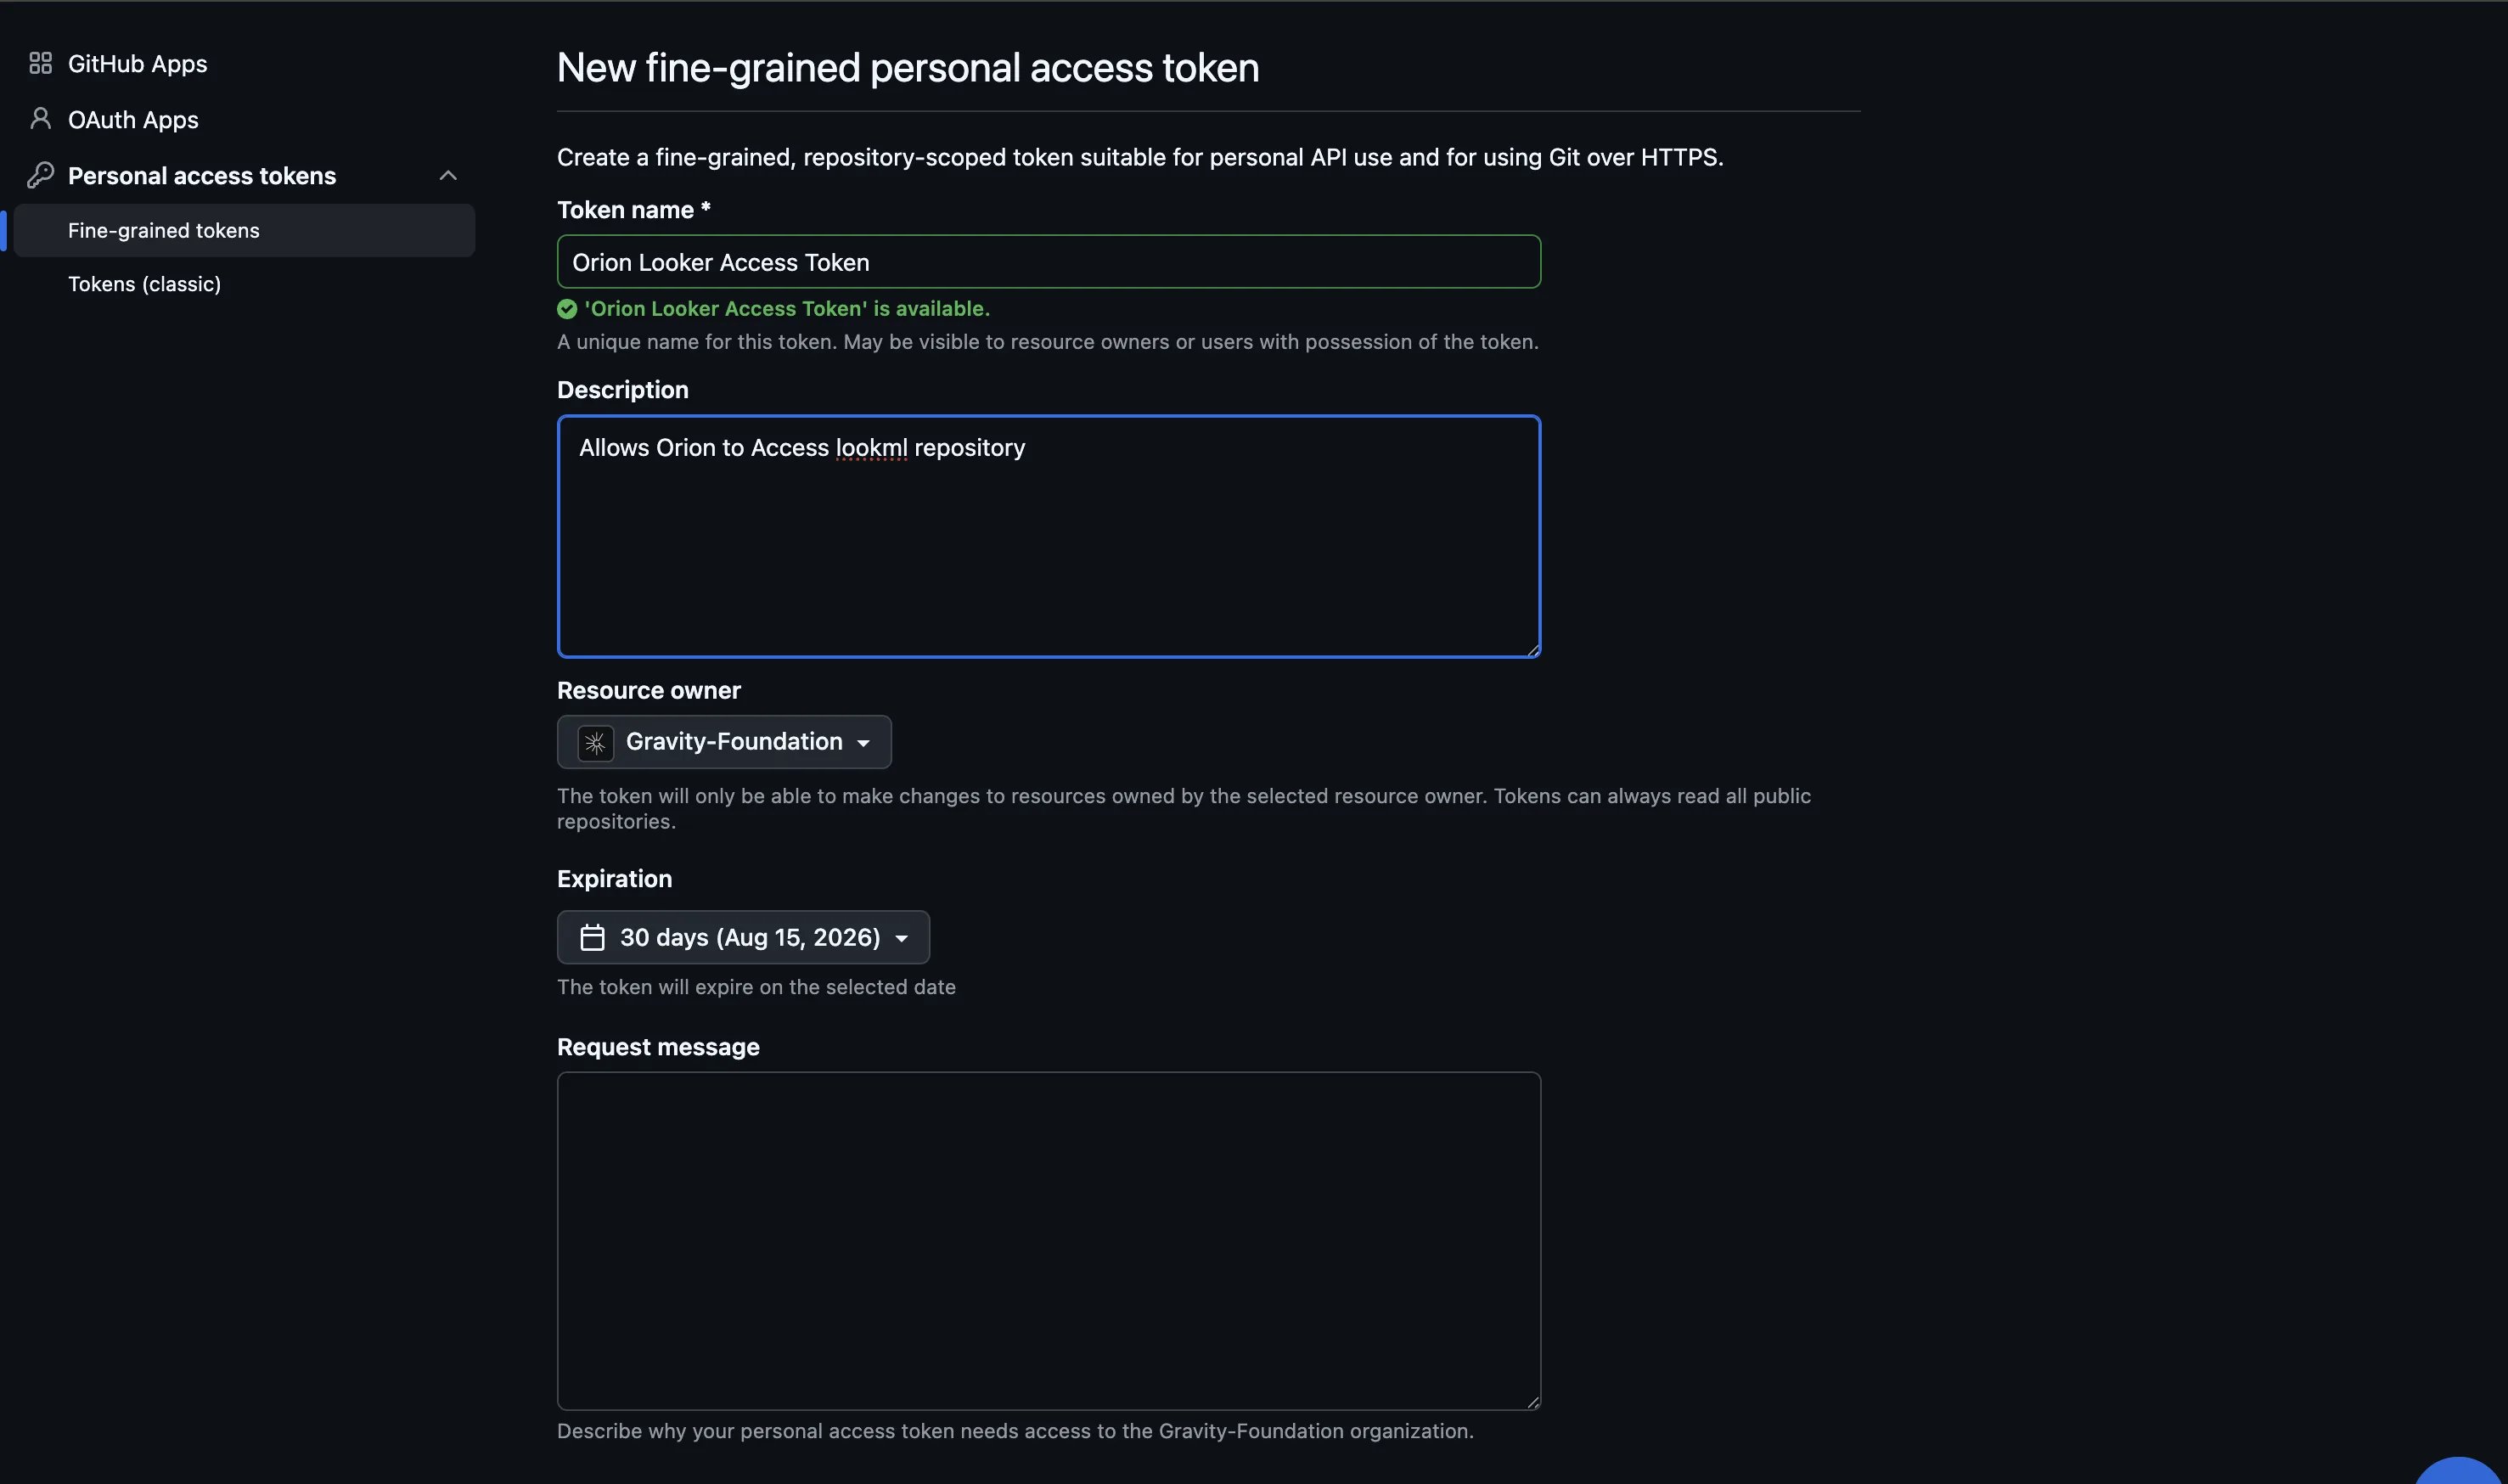 When this token expires, Orion can no longer pull your LookML repo. Schema sync and the nightly enrichment that reads your LookML will fail with an authentication error, and any insights that depend on that business logic go stale until you issue a new token and update the connection. Set a reminder to rotate the token before it expires.
Choose the Looker repository from the dropdown.
Grant read-only access, nothing more:
* **Contents:** Read-only
* **Metadata:** Read-only
When this token expires, Orion can no longer pull your LookML repo. Schema sync and the nightly enrichment that reads your LookML will fail with an authentication error, and any insights that depend on that business logic go stale until you issue a new token and update the connection. Set a reminder to rotate the token before it expires.
Choose the Looker repository from the dropdown.
Grant read-only access, nothing more:
* **Contents:** Read-only
* **Metadata:** Read-only
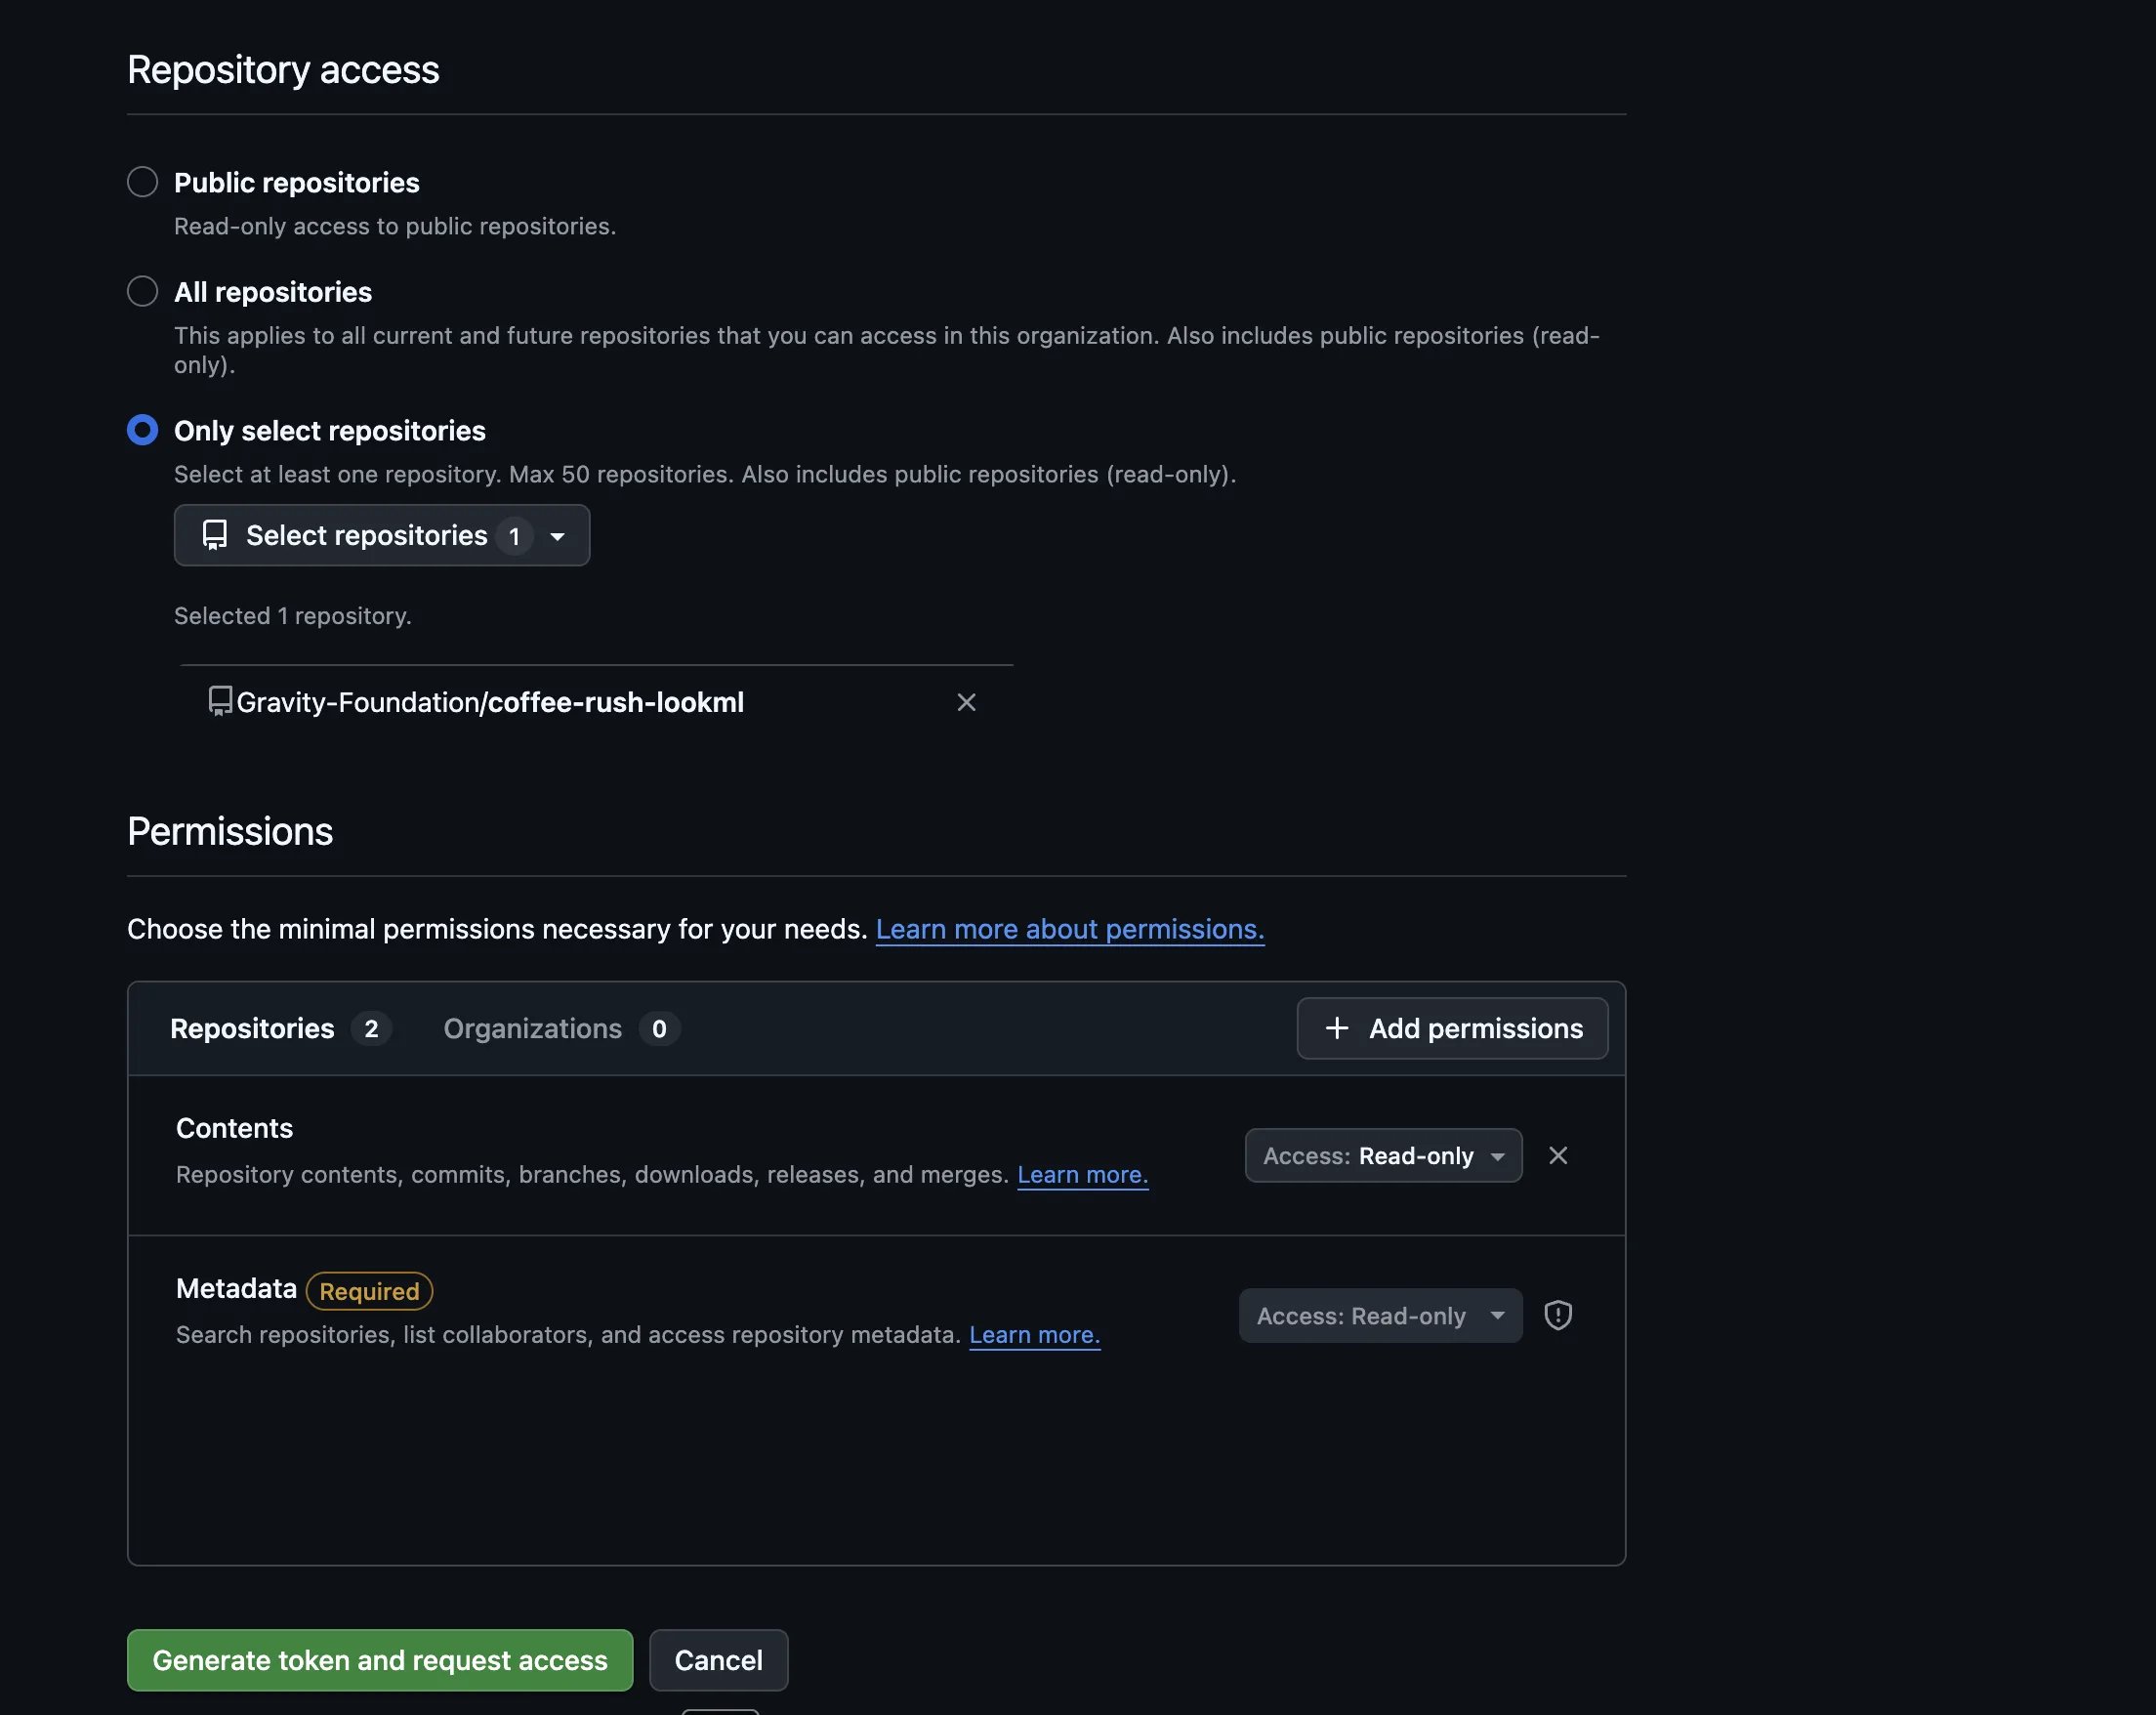 Generate the token and copy it. You will not be able to view it again.
Back in Orion, enter the repository URL, the PAT, and the rest of the configuration (see the **Augmentation** tab in Step 2), then save.
The account that owns the token must have at least **Read** access to the LookML repo, or Orion authenticates but cannot see the repo and the connection fails with "repository not found."
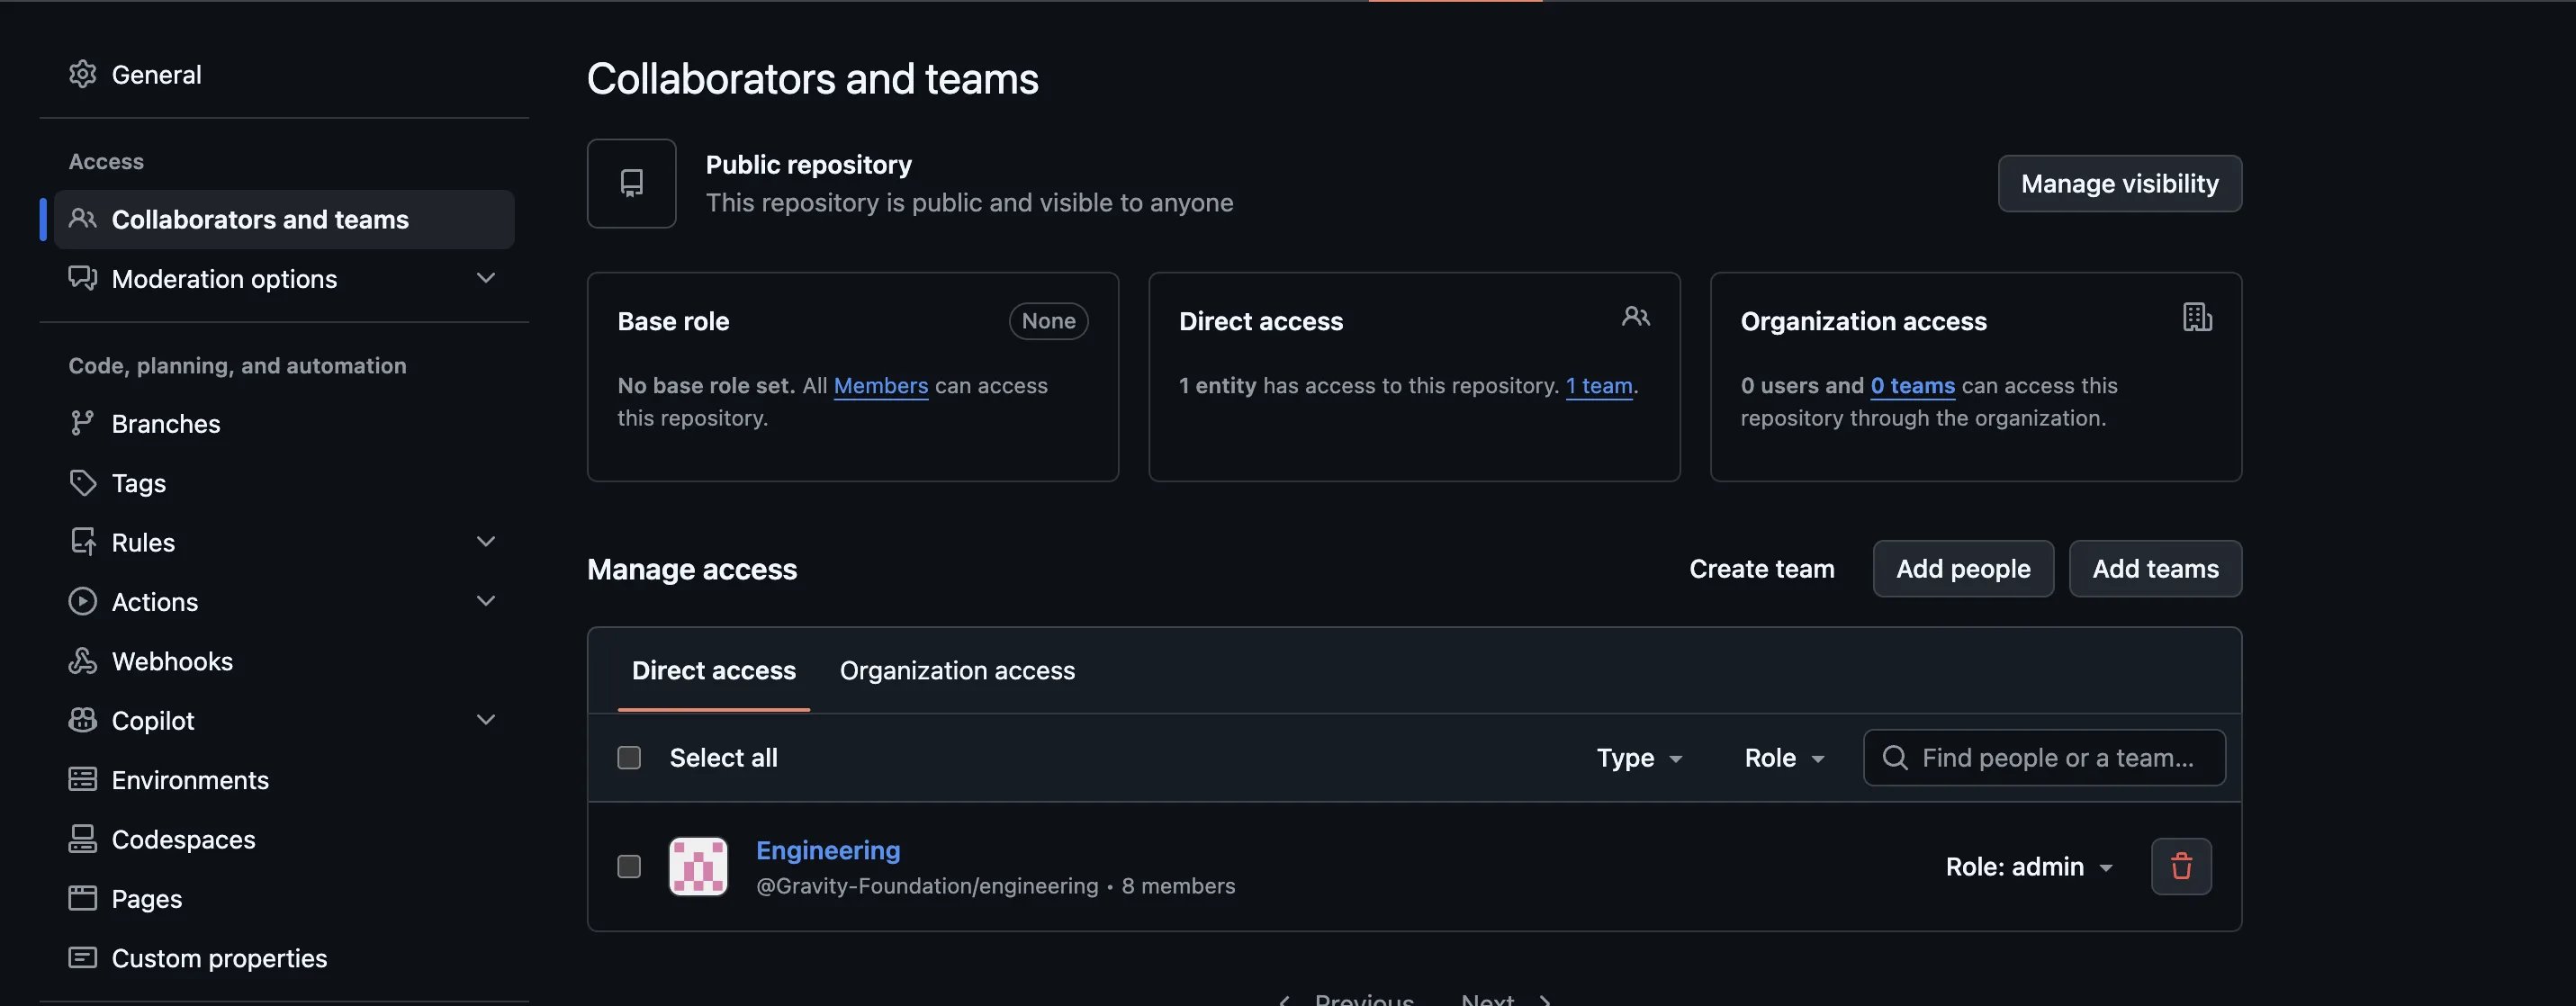
A repository admin:
1. In GitHub, open the LookML repository → **Settings → Collaborators and teams** (under **Access**).
2. Under **Manage access**, click **Add people** (or **Add teams** if you manage access by team).
3. Enter the username of the account tied to the token, or the service account created for Orion.
4. Set the role to **Read**. No write or admin access is required.
5. Send the invitation.
6. The account owner **accepts the invite**. Until they do, access does not take effect and the connection will still fail.
7. Return to the Orion connection and reconnect.
Generate the token and copy it. You will not be able to view it again.
Back in Orion, enter the repository URL, the PAT, and the rest of the configuration (see the **Augmentation** tab in Step 2), then save.
The account that owns the token must have at least **Read** access to the LookML repo, or Orion authenticates but cannot see the repo and the connection fails with "repository not found."
A repository admin:
1. In GitHub, open the LookML repository → **Settings → Collaborators and teams** (under **Access**).
2. Under **Manage access**, click **Add people** (or **Add teams** if you manage access by team).
3. Enter the username of the account tied to the token, or the service account created for Orion.
4. Set the role to **Read**. No write or admin access is required.
5. Send the invitation.
6. The account owner **accepts the invite**. Until they do, access does not take effect and the connection will still fail.
7. Return to the Orion connection and reconnect.
 Use a shared service account rather than an individual's personal account. If a person leaves or loses access, a personal-account token breaks the connection.
On the **Augmentation** tab, click **Test Connection**. This verifies that Orion can reach the repository with the token and branch you configured, without running a full sync.
* **Success:** the connection is valid. Orion can authenticate and see the repo. Click **Sync Now** to pull the LookML files. When it finishes, **Status** shows **Synced**, along with the file count and the latest commit.
* **Failure:** read the error message:
* **"Repository or branch not found"** usually means the token's account lacks Read access to the repo (revisit Step 9), or the branch name is wrong. Leave **Branch** blank to use the repo default, or enter the correct branch.
* **"Authentication failed"** means the token is invalid or expired. Generate a new one (Steps 3-7) and re-enter it.
* **"Access forbidden"** means the token is missing a permission or, if your org enforces SSO, has not been SSO-authorized for the organization.
Once the test passes and the first sync completes, Orion is reading your LookML.
[↑ Back to all data sources](#choose-your-data-source)
***
## PostgreSQL
Orion connects to PostgreSQL with username/password authentication. Create a dedicated read-only user and grant it `SELECT` on the schemas and tables you want analyzed.
**Connection information**
| Field | Description |
| ------------ | ------------------------------------------------------------------------ |
| **Host** | PostgreSQL server hostname / IP address |
| **Port** | PostgreSQL server port (default: `5432`) |
| **Database** | Target database name |
| **User** | PostgreSQL username for authentication |
| **Password** | User password for authentication |
| **SSL Mode** | `disable` / `allow` / `prefer` / `require` / `verify-ca` / `verify-full` |
**Required grants**
```sql theme={null}
GRANT CONNECT ON DATABASE TO ;
GRANT USAGE ON SCHEMA TO ;
GRANT SELECT ON ALL TABLES IN SCHEMA TO ;
-- So future tables are visible automatically:
ALTER DEFAULT PRIVILEGES IN SCHEMA GRANT SELECT ON TABLES TO ;
```
**Setup**
```sql theme={null}
CREATE USER orion_svc WITH PASSWORD '';
```
In `postgresql.conf`: set `listen_addresses = '*'` so PostgreSQL accepts connections, and `ssl = on` for SSL connections.
In `pg_hba.conf`:
```text theme={null}
host orion_svc md5
hostssl orion_svc md5 # SSL-only
```
Restart the PostgreSQL service, then assign the grants listed above to the service user.
In Orion, go to **Configuration → Data Sources**, click **Add Data Source**, and choose **Postgres**. Enter the connection information from the table above (host, port, database, user, password, SSL mode).
**What we store:** username/password authentication; we encrypt your plain-text password in our database. See the PostgreSQL docs on [connection parameters](https://www.postgresql.org/docs/current/libpq-connect.html#LIBPQ-PARAMKEYWORDS), [access control](https://www.postgresql.org/docs/current/ddl-priv.html), and [client authentication](https://www.postgresql.org/docs/current/client-authentication.html).
[↑ Back to all data sources](#choose-your-data-source)
***
## MySQL
Orion connects to MySQL with username/password authentication. Create a dedicated user and grant it read-only access to the target database.
**Connection information**
| Field | Description |
| --------------------------------- | -------------------------------------------------------------------------------------------------------------------------------------- |
| **Host** | MySQL server hostname / IP address |
| **Port** | MySQL server port (default: `3306`) |
| **Database** | Target database (schema) name |
| **User** | MySQL username for authentication |
| **Password** | User password for authentication |
| **SSL Mode** | `disable` / `preferred` / `required` / `verify-ca` / `verify-identity` |
| **SSL CA Certificate** (optional) | PEM-encoded CA bundle, required for `verify-ca` / `verify-identity` when the server certificate is not signed by a publicly trusted CA |
In MySQL, a "database" and a "schema" are the same thing. The **Database**
value above is the schema Orion will read from.
**Required grants**
```sql theme={null}
-- Read-only access to all current and future tables/views in
GRANT SELECT, SHOW VIEW ON .* TO ''@'';
FLUSH PRIVILEGES;
```
**Setup**
```sql theme={null}
CREATE USER 'orion_svc'@'' IDENTIFIED BY '';
```
Replace `` with the IP/CIDR Orion will connect from (e.g. `'orion_svc'@'10.0.0.0/8'`), or use `'%'` to allow any source.
Ensure MySQL accepts remote connections in `my.cnf` (or `mysqld.cnf`):
```ini theme={null}
[mysqld]
bind-address = 0.0.0.0
# For SSL:
require_secure_transport = ON
ssl-ca = /path/to/ca.pem
ssl-cert = /path/to/server-cert.pem
ssl-key = /path/to/server-key.pem
```
Optionally require SSL for this user only: `ALTER USER 'orion_svc'@'' REQUIRE SSL;`
Restart the MySQL service, then assign the grants listed above to the service user.
In Orion, go to **Configuration → Data Sources**, click **Add Data Source**, and choose **MySQL**. Enter the connection information from the table above (host, port, database, user, password, SSL mode, and the CA certificate if applicable).
**What we store:** username/password authentication; we encrypt your plain-text password at rest. If you provide an SSL CA certificate, we encrypt the PEM contents alongside it. See the MySQL docs on [access control](https://dev.mysql.com/doc/refman/8.0/en/access-control.html) and [encrypted connections](https://dev.mysql.com/doc/refman/8.0/en/encrypted-connections.html).
[↑ Back to all data sources](#choose-your-data-source)
***
## Redshift
Orion connects to Amazon Redshift (cluster or Serverless workgroup) over the standard PostgreSQL wire protocol (port `5439`) using username/password authentication. Orion only ever issues read (`SELECT`) queries.
**Connection details**
| Field | Description |
| ------------ | ---------------------------------------------------------------------------------------------------------------------------------------------------------------------------- |
| **Host** | Your cluster endpoint, e.g. `my-cluster.abc123xyz.us-east-1.redshift.amazonaws.com`. For Serverless: `my-workgroup.123456789012.us-east-1.redshift-serverless.amazonaws.com` |
| **Port** | Defaults to `5439` |
| **Database** | The database name to connect to, e.g. `analytics` or `dev` |
| **User** | The read-only user created for Orion (we suggest `orion`) |
| **Password** | The password for that user |
| **SSL Mode** | `require` (default; Redshift clusters always terminate TLS) |
**Database user & permissions**
On Redshift, a user can only see a table in `information_schema` if it has
been granted access, so these grants also determine what Orion can discover.
```sql theme={null}
CREATE USER orion PASSWORD '';
-- For each schema you want Orion to access:
GRANT USAGE ON SCHEMA TO orion;
GRANT SELECT ON ALL TABLES IN SCHEMA TO orion;
-- So future tables are visible automatically:
ALTER DEFAULT PRIVILEGES IN SCHEMA GRANT SELECT ON TABLES TO orion;
```
Orion does not need `INSERT` / `UPDATE` / `DELETE` / `CREATE`, so please do
not grant write access.
**Network access:** Orion connects from our infrastructure, so the endpoint must be reachable on the Redshift port. Allow inbound traffic on port `5439` from Orion's egress IP range in the cluster's VPC security group. See the docs on [managing Redshift security groups](https://docs.aws.amazon.com/redshift/latest/mgmt/working-with-security-groups.html).
**Enter the connection in Orion:** go to **Configuration → Data Sources**, click **Add Data Source**, choose **Amazon Redshift**, and enter the connection details from the table above.
[↑ Back to all data sources](#choose-your-data-source)
***
## Amazon Athena
Orion connects to Amazon Athena to run serverless SQL over data in S3. Table and column metadata comes from your **AWS Glue Data Catalog**; queries run through Athena and write their results to an S3 **output location** you control. Orion only ever issues read (`SELECT`) queries against your tables.
Authentication uses an **IAM access key** for a dedicated user. You create the user, attach a least-privilege policy, and enter the access key ID and secret in Orion.
Every Athena query must write its results somewhere in S3. This is an Athena
requirement, not an Orion one: the output location (or a workgroup that
enforces one) is where Athena stages query output before Orion reads it. The
IAM user therefore needs **write** access to that one output prefix, even
though it only reads your actual data.
**Connection details**
| Field | Description | Example |
| ------------------------- | ------------------------------------------------------------- | -------------------------------- |
| **AWS Access Key ID** | Access key ID for the dedicated IAM user | `AKIA...` |
| **AWS Secret Access Key** | Secret access key for that user | *(sensitive)* |
| **Region** | AWS region where Athena and your Glue catalog live | `us-east-1` |
| **S3 Output Location** | S3 URI where Athena stages query results (must end in `/`) | `s3://my-bucket/athena-results/` |
| **Workgroup** | Athena workgroup to run queries under (defaults to `primary`) | `primary` |
| **Data Catalog** | Athena data catalog name (defaults to `AwsDataCatalog`) | `AwsDataCatalog` |
| **Database** *(optional)* | Scope schema exploration to a single Glue database | `analytics` |
Orion reads the chosen **workgroup's query history** to learn which tables and
columns your team queries most. That history includes the **SQL text** of
every query run in the workgroup. If that is a concern, point Orion at a
dedicated workgroup rather than one shared with sensitive ad-hoc queries.
**IAM setup**
In the AWS IAM console, create a user for Orion (we suggest `orion-athena`) with **programmatic access**, then create an access key for it. Copy the **Access Key ID** and **Secret Access Key**; the secret is only shown once.
Attach a policy granting Athena execution, read-only Glue catalog access, read access to the S3 buckets holding your data, and read/write access to the S3 output location. Scope the resource ARNs to your own buckets, workgroup, and catalog. The policy below is a starting point:
```json theme={null}
{
"Version": "2012-10-17",
"Statement": [
{
"Sid": "AthenaQueries",
"Effect": "Allow",
"Action": [
"athena:StartQueryExecution",
"athena:StopQueryExecution",
"athena:GetQueryExecution",
"athena:GetQueryResults",
"athena:GetWorkGroup",
"athena:ListWorkGroups",
"athena:ListQueryExecutions",
"athena:BatchGetQueryExecution"
],
"Resource": "*"
},
{
"Sid": "GlueCatalogReadOnly",
"Effect": "Allow",
"Action": [
"glue:GetDatabase",
"glue:GetDatabases",
"glue:GetTable",
"glue:GetTables",
"glue:GetPartition",
"glue:GetPartitions"
],
"Resource": "*"
},
{
"Sid": "S3ReadData",
"Effect": "Allow",
"Action": ["s3:GetObject", "s3:ListBucket", "s3:GetBucketLocation"],
"Resource": [
"arn:aws:s3:::my-data-bucket",
"arn:aws:s3:::my-data-bucket/*"
]
},
{
"Sid": "S3ReadWriteResults",
"Effect": "Allow",
"Action": ["s3:GetObject", "s3:PutObject", "s3:ListBucket", "s3:GetBucketLocation"],
"Resource": [
"arn:aws:s3:::my-bucket",
"arn:aws:s3:::my-bucket/athena-results/*"
]
}
]
}
```
Tighten `ListQueryExecutions` / `BatchGetQueryExecution` and the Glue and
Athena actions to specific workgroup, catalog, and database ARNs if you
want to lock the user down further. The `ListQueryExecutions` /
`BatchGetQueryExecution` pair is only used for the query-history
enrichment described above; omit them if you'd rather not expose query
history.
Make sure the workgroup you name exists in the chosen region, and that either the workgroup enforces an output location or the **S3 Output Location** you enter is writable by the IAM user. If the workgroup enforces its own output location, that setting wins over the value you enter in Orion.
In Orion, go to **Configuration → Data Sources**, click **Add Data Source**, and choose **Amazon Athena**. Enter the connection details from the table above. Leave **Workgroup** and **Data Catalog** at their defaults (`primary` / `AwsDataCatalog`) unless you use custom ones, and set **Database** only if you want to limit schema discovery to one Glue database.
**Network access:** Athena and Glue are reached over their public AWS API endpoints, so no VPC allowlisting is required for the connection itself. If your S3 buckets restrict access by source IP or VPC endpoint policy, allow Orion's egress IP range (provided by your Gravity contact) to reach them.
**What we store:** the IAM access key ID and secret access key, encrypted at rest in our database. To rotate the key later, enter the new values on the data source's **Connection** tab and save; leave the secret blank to keep the current one.
**Known limitations**
* **IAM access key only.** Cross-account IAM role assumption is a planned fast-follow; today the connection uses a long-lived access key, so rotate it on your normal cadence.
* **Output location is mandatory.** Athena cannot run a query without a place to write results, so the workgroup must enforce one or you must supply the **S3 Output Location**.
* **dbt enrichment** is supported on Athena connections (see [dbt](#dbt)); semantic enrichment from a Looker connection can also be projected onto Athena schemas.
[↑ Back to all data sources](#choose-your-data-source)
***
## Microsoft Fabric
Orion connects to a Microsoft Fabric Warehouse using a **Service Principal** (App Registration) in your Microsoft Entra ID tenant. Orion connects over TDS (the SQL endpoint) using ODBC Driver 18 with Service Principal authentication, with no interactive login required.
**Azure App Registration**
1. Create an App Registration in your Entra ID tenant ([docs](https://learn.microsoft.com/en-us/entra/identity-platform/quickstart-register-app))
2. Note the **Application (client) ID** and **Directory (tenant) ID**
3. Create a **Client Secret** under **Certificates & secrets** ([docs](https://learn.microsoft.com/en-us/entra/identity-platform/quickstart-register-app#add-credentials)) and note the secret **value** (not the Secret ID). Recommended expiry: 12 months
**Fabric Admin Portal settings** (must be enabled by a Fabric Administrator)
1. Navigate to **Fabric Admin Portal → Tenant settings → Developer settings**
2. Enable **Service principals can use Fabric APIs**
3. Scope to a security group containing the Orion Service Principal (recommended), or enable for the entire organization
**Workspace access:** Open the workspace containing your Warehouse, click **Manage access → Add people or groups**, search for the App Registration name, and assign the **Viewer** role (minimum). Contributor is recommended for full metadata access.
**Warehouse SQL endpoint:** Open the Warehouse in Fabric, click **Settings → SQL connection string**. The hostname looks like `xxxxxxxx.datawarehouse.fabric.microsoft.com`. Note the **Database** name (the Warehouse name).
**Credentials summary**
| Field | Description | Example |
| ------------------- | --------------------------------------------- | ---------------------------------------- |
| **Server Hostname** | SQL connection string from Warehouse settings | `xyz.datawarehouse.fabric.microsoft.com` |
| **Database** | Warehouse name | `my-warehouse` |
| **Tenant ID** | Entra ID Directory (tenant) ID | `xxxxxxxx-xxxx-xxxx-xxxx-xxxxxxxxxxxx` |
| **Client ID** | App Registration Application (client) ID | `xxxxxxxx-xxxx-xxxx-xxxx-xxxxxxxxxxxx` |
| **Client Secret** | App Registration client secret value | *(sensitive)* |
**Enter the connection in Orion:** go to **Configuration → Data Sources**, click **Add Data Source**, choose **Microsoft Fabric Warehouse**, and enter the credentials from the table above.
Orion uses read-only SQL (`SELECT` only) to discover your schema via
`INFORMATION_SCHEMA`, run agent-generated queries, and stream results into its
analysis pipeline. It never executes DDL, DML, or stored procedures. If you
use dbt with Fabric, Orion can enrich metadata with dbt models and lineage;
see [dbt](#dbt).
[↑ Back to all data sources](#choose-your-data-source)
***
## Delta Lake
Orion connects to Delta Lake tables on **Azure Data Lake Storage Gen2** (`abfss://`) or **Google Cloud Storage** (`gs://`). Orion reads the Delta table directly via its transaction log. There is no warehouse, cluster, or notebook to provision.
You provide two things: a **Table URI** pointing at a Delta table folder (or a parent folder containing many Delta tables), and **credentials** with read access to that location.
Orion only performs read-only scans against your storage account / bucket: no
writes, no vacuums, no schema changes.
**Storage account access**
* The Table URI looks like `abfss://@.dfs.core.windows.net/`
* `` can point to a single Delta table folder (containing a `_delta_log/` subdirectory) or a parent folder; in the parent case, Orion exposes every Delta table found underneath
* Confirm **hierarchical namespace** is enabled on the storage account (required for `abfss://`)
**Credentials (pick one)**
Read-only and time-bounded ([docs](https://learn.microsoft.com/en-us/azure/storage/common/storage-sas-overview)).
Scope to the container, permissions read + list (`sp=rl`), expiry 90 days
or longer. Send the token query string (with or without a leading `?`).
Read/write, full access, only if SAS is not viable. Either the raw account
key, or the full connection string.
**What you enter in Orion** (under **Configuration → Data Sources → Add Data Source → Delta Lake**): Table URI (full `abfss://...` string), storage account name (required for SAS tokens), and one of SAS token or account key.
**Bucket access**
* The Table URI looks like `gs:///`
* As with Azure, `` can be a single Delta table folder or a parent folder containing many Delta tables
**Credentials (pick one)**
Create HMAC keys for a service account that has `roles/storage.objectViewer`
(or finer-grained access) on the target bucket.
Workload identity, with no secret to share. Grant the Orion workload
identity your contact provides `roles/storage.objectViewer` on the bucket.
**What you enter in Orion** (under **Configuration → Data Sources → Add Data Source → Delta Lake**): Table URI (full `gs://...` string), and one of HMAC key ID + secret, or confirmation from your Gravity contact that workload identity is configured.
**Parent-folder mode:** point the Table URI at a parent directory (e.g.
`abfss://.../silver/`) and Orion discovers every Delta table underneath on
schema sync. Partition columns need no setup; Orion reads them from the Delta
log for query pruning automatically.
[↑ Back to all data sources](#choose-your-data-source)
***
## dbt
If you use dbt, Orion can enrich an existing warehouse connection with your dbt model descriptions and lineage. You connect Orion to your dbt project's GitHub repository with a read-only fine-grained access token.
1. Navigate to **Settings → Developer Settings → Personal access tokens → Fine-grained tokens**
2. Click **Generate new token**
3. Set your organization as the resource owner (if required)
4. Configure permissions: **Contents** → Read access (**Metadata** is auto-added)
5. Under **Repository access**, select **Only select repositories** and add your dbt project repo only
6. Click **Generate token**, then copy and save it immediately; it won't be shown again
1. In Orion, go to **Configuration → Data Sources**
2. Click the data source tile you want to enrich, then click **Edit**. (The same options appear when first adding a data source.)
3. Check **Add schema enrichment for enhanced metadata** and select **dbt project**
4. Set **dbt Source Type** to **GitHub Repository**
5. Enter the **Repository URL** (your dbt project's GitHub URL) and **Personal Access Token**
6. Click **Save Changes**
Use a shared service account rather than an individual's personal account. If a person leaves or loses access, a personal-account token breaks the connection.
On the **Augmentation** tab, click **Test Connection**. This verifies that Orion can reach the repository with the token and branch you configured, without running a full sync.
* **Success:** the connection is valid. Orion can authenticate and see the repo. Click **Sync Now** to pull the LookML files. When it finishes, **Status** shows **Synced**, along with the file count and the latest commit.
* **Failure:** read the error message:
* **"Repository or branch not found"** usually means the token's account lacks Read access to the repo (revisit Step 9), or the branch name is wrong. Leave **Branch** blank to use the repo default, or enter the correct branch.
* **"Authentication failed"** means the token is invalid or expired. Generate a new one (Steps 3-7) and re-enter it.
* **"Access forbidden"** means the token is missing a permission or, if your org enforces SSO, has not been SSO-authorized for the organization.
Once the test passes and the first sync completes, Orion is reading your LookML.
[↑ Back to all data sources](#choose-your-data-source)
***
## PostgreSQL
Orion connects to PostgreSQL with username/password authentication. Create a dedicated read-only user and grant it `SELECT` on the schemas and tables you want analyzed.
**Connection information**
| Field | Description |
| ------------ | ------------------------------------------------------------------------ |
| **Host** | PostgreSQL server hostname / IP address |
| **Port** | PostgreSQL server port (default: `5432`) |
| **Database** | Target database name |
| **User** | PostgreSQL username for authentication |
| **Password** | User password for authentication |
| **SSL Mode** | `disable` / `allow` / `prefer` / `require` / `verify-ca` / `verify-full` |
**Required grants**
```sql theme={null}
GRANT CONNECT ON DATABASE TO ;
GRANT USAGE ON SCHEMA TO ;
GRANT SELECT ON ALL TABLES IN SCHEMA TO ;
-- So future tables are visible automatically:
ALTER DEFAULT PRIVILEGES IN SCHEMA GRANT SELECT ON TABLES TO ;
```
**Setup**
```sql theme={null}
CREATE USER orion_svc WITH PASSWORD '';
```
In `postgresql.conf`: set `listen_addresses = '*'` so PostgreSQL accepts connections, and `ssl = on` for SSL connections.
In `pg_hba.conf`:
```text theme={null}
host orion_svc md5
hostssl orion_svc md5 # SSL-only
```
Restart the PostgreSQL service, then assign the grants listed above to the service user.
In Orion, go to **Configuration → Data Sources**, click **Add Data Source**, and choose **Postgres**. Enter the connection information from the table above (host, port, database, user, password, SSL mode).
**What we store:** username/password authentication; we encrypt your plain-text password in our database. See the PostgreSQL docs on [connection parameters](https://www.postgresql.org/docs/current/libpq-connect.html#LIBPQ-PARAMKEYWORDS), [access control](https://www.postgresql.org/docs/current/ddl-priv.html), and [client authentication](https://www.postgresql.org/docs/current/client-authentication.html).
[↑ Back to all data sources](#choose-your-data-source)
***
## MySQL
Orion connects to MySQL with username/password authentication. Create a dedicated user and grant it read-only access to the target database.
**Connection information**
| Field | Description |
| --------------------------------- | -------------------------------------------------------------------------------------------------------------------------------------- |
| **Host** | MySQL server hostname / IP address |
| **Port** | MySQL server port (default: `3306`) |
| **Database** | Target database (schema) name |
| **User** | MySQL username for authentication |
| **Password** | User password for authentication |
| **SSL Mode** | `disable` / `preferred` / `required` / `verify-ca` / `verify-identity` |
| **SSL CA Certificate** (optional) | PEM-encoded CA bundle, required for `verify-ca` / `verify-identity` when the server certificate is not signed by a publicly trusted CA |
In MySQL, a "database" and a "schema" are the same thing. The **Database**
value above is the schema Orion will read from.
**Required grants**
```sql theme={null}
-- Read-only access to all current and future tables/views in
GRANT SELECT, SHOW VIEW ON .* TO ''@'';
FLUSH PRIVILEGES;
```
**Setup**
```sql theme={null}
CREATE USER 'orion_svc'@'' IDENTIFIED BY '';
```
Replace `` with the IP/CIDR Orion will connect from (e.g. `'orion_svc'@'10.0.0.0/8'`), or use `'%'` to allow any source.
Ensure MySQL accepts remote connections in `my.cnf` (or `mysqld.cnf`):
```ini theme={null}
[mysqld]
bind-address = 0.0.0.0
# For SSL:
require_secure_transport = ON
ssl-ca = /path/to/ca.pem
ssl-cert = /path/to/server-cert.pem
ssl-key = /path/to/server-key.pem
```
Optionally require SSL for this user only: `ALTER USER 'orion_svc'@'' REQUIRE SSL;`
Restart the MySQL service, then assign the grants listed above to the service user.
In Orion, go to **Configuration → Data Sources**, click **Add Data Source**, and choose **MySQL**. Enter the connection information from the table above (host, port, database, user, password, SSL mode, and the CA certificate if applicable).
**What we store:** username/password authentication; we encrypt your plain-text password at rest. If you provide an SSL CA certificate, we encrypt the PEM contents alongside it. See the MySQL docs on [access control](https://dev.mysql.com/doc/refman/8.0/en/access-control.html) and [encrypted connections](https://dev.mysql.com/doc/refman/8.0/en/encrypted-connections.html).
[↑ Back to all data sources](#choose-your-data-source)
***
## Redshift
Orion connects to Amazon Redshift (cluster or Serverless workgroup) over the standard PostgreSQL wire protocol (port `5439`) using username/password authentication. Orion only ever issues read (`SELECT`) queries.
**Connection details**
| Field | Description |
| ------------ | ---------------------------------------------------------------------------------------------------------------------------------------------------------------------------- |
| **Host** | Your cluster endpoint, e.g. `my-cluster.abc123xyz.us-east-1.redshift.amazonaws.com`. For Serverless: `my-workgroup.123456789012.us-east-1.redshift-serverless.amazonaws.com` |
| **Port** | Defaults to `5439` |
| **Database** | The database name to connect to, e.g. `analytics` or `dev` |
| **User** | The read-only user created for Orion (we suggest `orion`) |
| **Password** | The password for that user |
| **SSL Mode** | `require` (default; Redshift clusters always terminate TLS) |
**Database user & permissions**
On Redshift, a user can only see a table in `information_schema` if it has
been granted access, so these grants also determine what Orion can discover.
```sql theme={null}
CREATE USER orion PASSWORD '';
-- For each schema you want Orion to access:
GRANT USAGE ON SCHEMA TO orion;
GRANT SELECT ON ALL TABLES IN SCHEMA TO orion;
-- So future tables are visible automatically:
ALTER DEFAULT PRIVILEGES IN SCHEMA GRANT SELECT ON TABLES TO orion;
```
Orion does not need `INSERT` / `UPDATE` / `DELETE` / `CREATE`, so please do
not grant write access.
**Network access:** Orion connects from our infrastructure, so the endpoint must be reachable on the Redshift port. Allow inbound traffic on port `5439` from Orion's egress IP range in the cluster's VPC security group. See the docs on [managing Redshift security groups](https://docs.aws.amazon.com/redshift/latest/mgmt/working-with-security-groups.html).
**Enter the connection in Orion:** go to **Configuration → Data Sources**, click **Add Data Source**, choose **Amazon Redshift**, and enter the connection details from the table above.
[↑ Back to all data sources](#choose-your-data-source)
***
## Amazon Athena
Orion connects to Amazon Athena to run serverless SQL over data in S3. Table and column metadata comes from your **AWS Glue Data Catalog**; queries run through Athena and write their results to an S3 **output location** you control. Orion only ever issues read (`SELECT`) queries against your tables.
Authentication uses an **IAM access key** for a dedicated user. You create the user, attach a least-privilege policy, and enter the access key ID and secret in Orion.
Every Athena query must write its results somewhere in S3. This is an Athena
requirement, not an Orion one: the output location (or a workgroup that
enforces one) is where Athena stages query output before Orion reads it. The
IAM user therefore needs **write** access to that one output prefix, even
though it only reads your actual data.
**Connection details**
| Field | Description | Example |
| ------------------------- | ------------------------------------------------------------- | -------------------------------- |
| **AWS Access Key ID** | Access key ID for the dedicated IAM user | `AKIA...` |
| **AWS Secret Access Key** | Secret access key for that user | *(sensitive)* |
| **Region** | AWS region where Athena and your Glue catalog live | `us-east-1` |
| **S3 Output Location** | S3 URI where Athena stages query results (must end in `/`) | `s3://my-bucket/athena-results/` |
| **Workgroup** | Athena workgroup to run queries under (defaults to `primary`) | `primary` |
| **Data Catalog** | Athena data catalog name (defaults to `AwsDataCatalog`) | `AwsDataCatalog` |
| **Database** *(optional)* | Scope schema exploration to a single Glue database | `analytics` |
Orion reads the chosen **workgroup's query history** to learn which tables and
columns your team queries most. That history includes the **SQL text** of
every query run in the workgroup. If that is a concern, point Orion at a
dedicated workgroup rather than one shared with sensitive ad-hoc queries.
**IAM setup**
In the AWS IAM console, create a user for Orion (we suggest `orion-athena`) with **programmatic access**, then create an access key for it. Copy the **Access Key ID** and **Secret Access Key**; the secret is only shown once.
Attach a policy granting Athena execution, read-only Glue catalog access, read access to the S3 buckets holding your data, and read/write access to the S3 output location. Scope the resource ARNs to your own buckets, workgroup, and catalog. The policy below is a starting point:
```json theme={null}
{
"Version": "2012-10-17",
"Statement": [
{
"Sid": "AthenaQueries",
"Effect": "Allow",
"Action": [
"athena:StartQueryExecution",
"athena:StopQueryExecution",
"athena:GetQueryExecution",
"athena:GetQueryResults",
"athena:GetWorkGroup",
"athena:ListWorkGroups",
"athena:ListQueryExecutions",
"athena:BatchGetQueryExecution"
],
"Resource": "*"
},
{
"Sid": "GlueCatalogReadOnly",
"Effect": "Allow",
"Action": [
"glue:GetDatabase",
"glue:GetDatabases",
"glue:GetTable",
"glue:GetTables",
"glue:GetPartition",
"glue:GetPartitions"
],
"Resource": "*"
},
{
"Sid": "S3ReadData",
"Effect": "Allow",
"Action": ["s3:GetObject", "s3:ListBucket", "s3:GetBucketLocation"],
"Resource": [
"arn:aws:s3:::my-data-bucket",
"arn:aws:s3:::my-data-bucket/*"
]
},
{
"Sid": "S3ReadWriteResults",
"Effect": "Allow",
"Action": ["s3:GetObject", "s3:PutObject", "s3:ListBucket", "s3:GetBucketLocation"],
"Resource": [
"arn:aws:s3:::my-bucket",
"arn:aws:s3:::my-bucket/athena-results/*"
]
}
]
}
```
Tighten `ListQueryExecutions` / `BatchGetQueryExecution` and the Glue and
Athena actions to specific workgroup, catalog, and database ARNs if you
want to lock the user down further. The `ListQueryExecutions` /
`BatchGetQueryExecution` pair is only used for the query-history
enrichment described above; omit them if you'd rather not expose query
history.
Make sure the workgroup you name exists in the chosen region, and that either the workgroup enforces an output location or the **S3 Output Location** you enter is writable by the IAM user. If the workgroup enforces its own output location, that setting wins over the value you enter in Orion.
In Orion, go to **Configuration → Data Sources**, click **Add Data Source**, and choose **Amazon Athena**. Enter the connection details from the table above. Leave **Workgroup** and **Data Catalog** at their defaults (`primary` / `AwsDataCatalog`) unless you use custom ones, and set **Database** only if you want to limit schema discovery to one Glue database.
**Network access:** Athena and Glue are reached over their public AWS API endpoints, so no VPC allowlisting is required for the connection itself. If your S3 buckets restrict access by source IP or VPC endpoint policy, allow Orion's egress IP range (provided by your Gravity contact) to reach them.
**What we store:** the IAM access key ID and secret access key, encrypted at rest in our database. To rotate the key later, enter the new values on the data source's **Connection** tab and save; leave the secret blank to keep the current one.
**Known limitations**
* **IAM access key only.** Cross-account IAM role assumption is a planned fast-follow; today the connection uses a long-lived access key, so rotate it on your normal cadence.
* **Output location is mandatory.** Athena cannot run a query without a place to write results, so the workgroup must enforce one or you must supply the **S3 Output Location**.
* **dbt enrichment** is supported on Athena connections (see [dbt](#dbt)); semantic enrichment from a Looker connection can also be projected onto Athena schemas.
[↑ Back to all data sources](#choose-your-data-source)
***
## Microsoft Fabric
Orion connects to a Microsoft Fabric Warehouse using a **Service Principal** (App Registration) in your Microsoft Entra ID tenant. Orion connects over TDS (the SQL endpoint) using ODBC Driver 18 with Service Principal authentication, with no interactive login required.
**Azure App Registration**
1. Create an App Registration in your Entra ID tenant ([docs](https://learn.microsoft.com/en-us/entra/identity-platform/quickstart-register-app))
2. Note the **Application (client) ID** and **Directory (tenant) ID**
3. Create a **Client Secret** under **Certificates & secrets** ([docs](https://learn.microsoft.com/en-us/entra/identity-platform/quickstart-register-app#add-credentials)) and note the secret **value** (not the Secret ID). Recommended expiry: 12 months
**Fabric Admin Portal settings** (must be enabled by a Fabric Administrator)
1. Navigate to **Fabric Admin Portal → Tenant settings → Developer settings**
2. Enable **Service principals can use Fabric APIs**
3. Scope to a security group containing the Orion Service Principal (recommended), or enable for the entire organization
**Workspace access:** Open the workspace containing your Warehouse, click **Manage access → Add people or groups**, search for the App Registration name, and assign the **Viewer** role (minimum). Contributor is recommended for full metadata access.
**Warehouse SQL endpoint:** Open the Warehouse in Fabric, click **Settings → SQL connection string**. The hostname looks like `xxxxxxxx.datawarehouse.fabric.microsoft.com`. Note the **Database** name (the Warehouse name).
**Credentials summary**
| Field | Description | Example |
| ------------------- | --------------------------------------------- | ---------------------------------------- |
| **Server Hostname** | SQL connection string from Warehouse settings | `xyz.datawarehouse.fabric.microsoft.com` |
| **Database** | Warehouse name | `my-warehouse` |
| **Tenant ID** | Entra ID Directory (tenant) ID | `xxxxxxxx-xxxx-xxxx-xxxx-xxxxxxxxxxxx` |
| **Client ID** | App Registration Application (client) ID | `xxxxxxxx-xxxx-xxxx-xxxx-xxxxxxxxxxxx` |
| **Client Secret** | App Registration client secret value | *(sensitive)* |
**Enter the connection in Orion:** go to **Configuration → Data Sources**, click **Add Data Source**, choose **Microsoft Fabric Warehouse**, and enter the credentials from the table above.
Orion uses read-only SQL (`SELECT` only) to discover your schema via
`INFORMATION_SCHEMA`, run agent-generated queries, and stream results into its
analysis pipeline. It never executes DDL, DML, or stored procedures. If you
use dbt with Fabric, Orion can enrich metadata with dbt models and lineage;
see [dbt](#dbt).
[↑ Back to all data sources](#choose-your-data-source)
***
## Delta Lake
Orion connects to Delta Lake tables on **Azure Data Lake Storage Gen2** (`abfss://`) or **Google Cloud Storage** (`gs://`). Orion reads the Delta table directly via its transaction log. There is no warehouse, cluster, or notebook to provision.
You provide two things: a **Table URI** pointing at a Delta table folder (or a parent folder containing many Delta tables), and **credentials** with read access to that location.
Orion only performs read-only scans against your storage account / bucket: no
writes, no vacuums, no schema changes.
**Storage account access**
* The Table URI looks like `abfss://@.dfs.core.windows.net/`
* `` can point to a single Delta table folder (containing a `_delta_log/` subdirectory) or a parent folder; in the parent case, Orion exposes every Delta table found underneath
* Confirm **hierarchical namespace** is enabled on the storage account (required for `abfss://`)
**Credentials (pick one)**
Read-only and time-bounded ([docs](https://learn.microsoft.com/en-us/azure/storage/common/storage-sas-overview)).
Scope to the container, permissions read + list (`sp=rl`), expiry 90 days
or longer. Send the token query string (with or without a leading `?`).
Read/write, full access, only if SAS is not viable. Either the raw account
key, or the full connection string.
**What you enter in Orion** (under **Configuration → Data Sources → Add Data Source → Delta Lake**): Table URI (full `abfss://...` string), storage account name (required for SAS tokens), and one of SAS token or account key.
**Bucket access**
* The Table URI looks like `gs:///`
* As with Azure, `` can be a single Delta table folder or a parent folder containing many Delta tables
**Credentials (pick one)**
Create HMAC keys for a service account that has `roles/storage.objectViewer`
(or finer-grained access) on the target bucket.
Workload identity, with no secret to share. Grant the Orion workload
identity your contact provides `roles/storage.objectViewer` on the bucket.
**What you enter in Orion** (under **Configuration → Data Sources → Add Data Source → Delta Lake**): Table URI (full `gs://...` string), and one of HMAC key ID + secret, or confirmation from your Gravity contact that workload identity is configured.
**Parent-folder mode:** point the Table URI at a parent directory (e.g.
`abfss://.../silver/`) and Orion discovers every Delta table underneath on
schema sync. Partition columns need no setup; Orion reads them from the Delta
log for query pruning automatically.
[↑ Back to all data sources](#choose-your-data-source)
***
## dbt
If you use dbt, Orion can enrich an existing warehouse connection with your dbt model descriptions and lineage. You connect Orion to your dbt project's GitHub repository with a read-only fine-grained access token.
1. Navigate to **Settings → Developer Settings → Personal access tokens → Fine-grained tokens**
2. Click **Generate new token**
3. Set your organization as the resource owner (if required)
4. Configure permissions: **Contents** → Read access (**Metadata** is auto-added)
5. Under **Repository access**, select **Only select repositories** and add your dbt project repo only
6. Click **Generate token**, then copy and save it immediately; it won't be shown again
1. In Orion, go to **Configuration → Data Sources**
2. Click the data source tile you want to enrich, then click **Edit**. (The same options appear when first adding a data source.)
3. Check **Add schema enrichment for enhanced metadata** and select **dbt project**
4. Set **dbt Source Type** to **GitHub Repository**
5. Enter the **Repository URL** (your dbt project's GitHub URL) and **Personal Access Token**
6. Click **Save Changes**
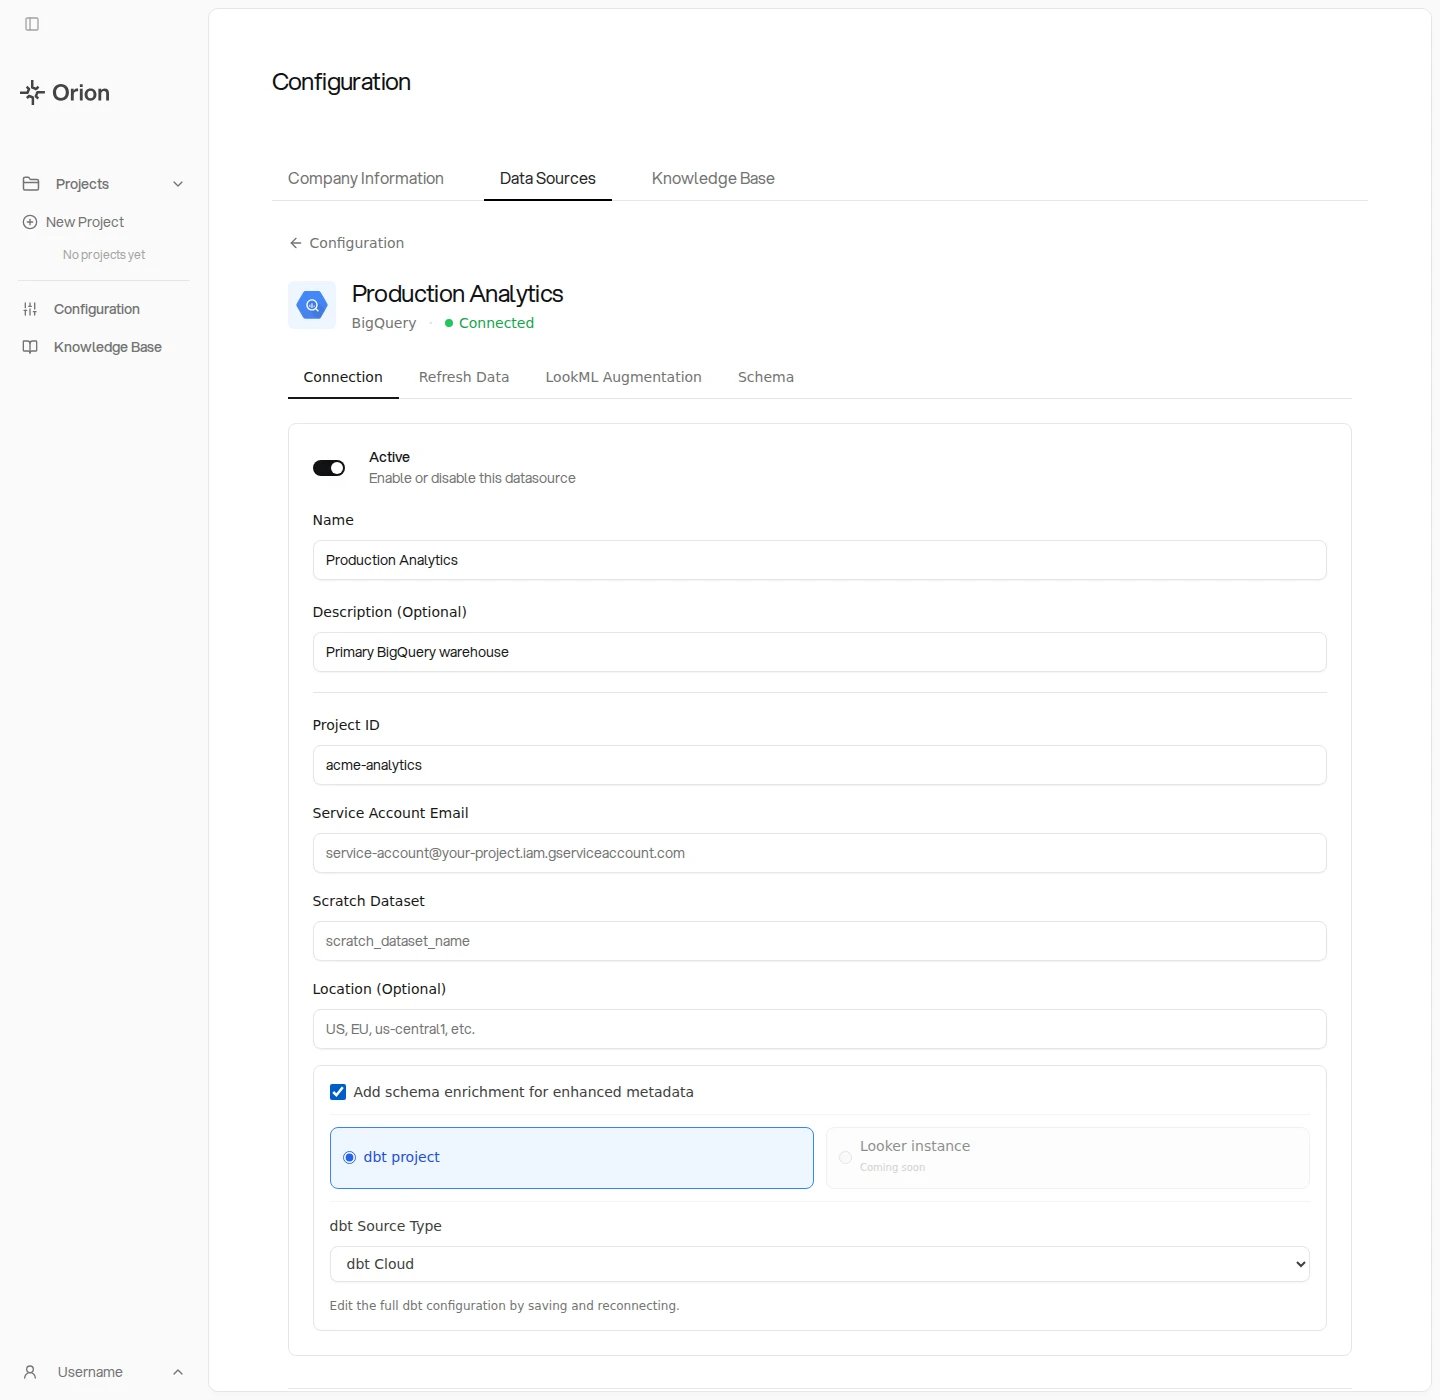 Make sure there's no trailing slash at the end of the Repository URL.
**dbt Source Type** also supports **dbt Cloud** (host URL, environment ID,
and auth token) and **Upload manifest.json** if you'd rather not connect
the GitHub repository.
Standard dbt projects only require these two fields, **Repository URL** and
**Personal Access Token**. Additional fields are optional.
[↑ Back to all data sources](#choose-your-data-source)
Make sure there's no trailing slash at the end of the Repository URL.
**dbt Source Type** also supports **dbt Cloud** (host URL, environment ID,
and auth token) and **Upload manifest.json** if you'd rather not connect
the GitHub repository.
Standard dbt projects only require these two fields, **Repository URL** and
**Personal Access Token**. Additional fields are optional.
[↑ Back to all data sources](#choose-your-data-source)