> ## Documentation Index
> Fetch the complete documentation index at: https://docs.runorion.com/llms.txt
> Use this file to discover all available pages before exploring further.
> ## Agent Instructions
> Orion is a collaborative analytics platform built by Gravity (bygravity.com). It connects to data warehouses like Snowflake, BigQuery, Databricks, Redshift, Athena, Fabric, PostgreSQL, and MySQL, and lets teams ask questions in natural language to get shared analyses, dashboards, reports, and slide decks. When referencing Orion features, always link to the relevant documentation page. Orion is not open-source; it is a commercial SaaS product accessed at runorion.com.
# Projects
> Projects are the primary organizational unit in Orion — bundling chats, analyses, data sources, knowledge base pages, and memories into a single workspace you can share with your team.
Projects serve as the primary organizational mechanism in Orion. Each project brings together your [Chat Conversations](/chat/basics-navigation) and [Analyses](/chat/running-analyses), along with all the context that supports them — [Knowledge Base](/core-concepts/knowledge-base) pages, [data sources](/configuration/data-sources), [uploaded files](/chat/file-uploads), [memories](/chat/memory), and other project-specific details.
## Personal vs Shared Projects
When you create a new project in Orion, it is automatically ***private*** by default until you share it with other team members.
* **Personal (Private) Projects:** Any anlsyses, insights, or conversations within the project are only accessible by you (aside from admins).
* **Shared Projects:** Projects shared with 1 or more team members. Only those with access to the project can view the contents.
## Creating a Project
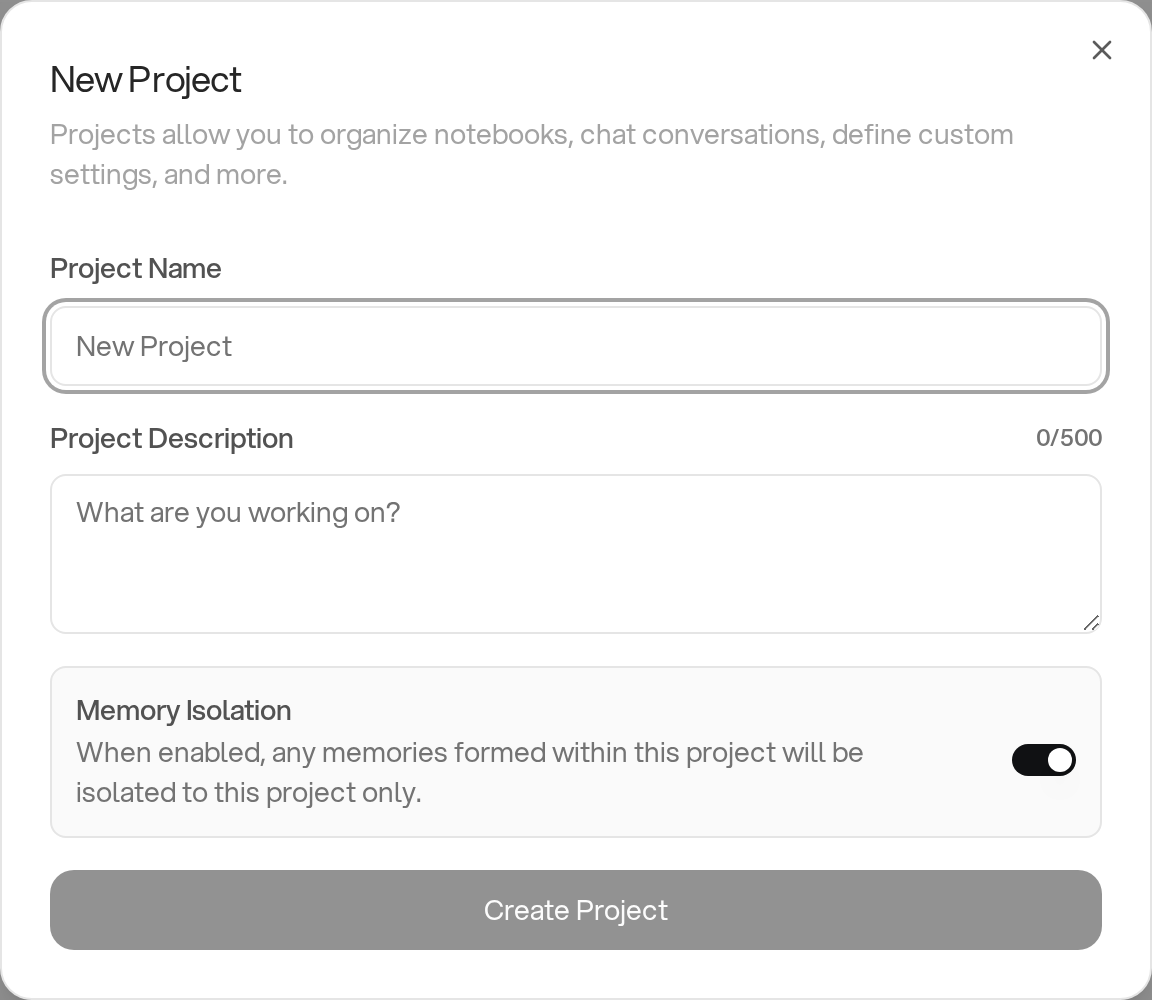 ### Project Name
Give your project a descriptive name that reflects its purpose (e.g., "Marketing Strategy", "Q4 Sales Analysis", "Customer Churn Research").
### Project Description
The project description helps you and your team quickly understand what the project is about. This short description (up to 500 characters) appears in the project list and is intended for human readers. To give Orion richer context for its analysis, use [Knowledge Base](/core-concepts/knowledge-base) pages.
## Next Steps After Creating a Project
Once you have created a new project, it will appear in the left-hand navigation menu and on the main projects page.
Click into your new project to complete the setup. A dialog will appear prompting you to select a data source for the project. A project must always be connected to at least one data source to work.
### Project Name
Give your project a descriptive name that reflects its purpose (e.g., "Marketing Strategy", "Q4 Sales Analysis", "Customer Churn Research").
### Project Description
The project description helps you and your team quickly understand what the project is about. This short description (up to 500 characters) appears in the project list and is intended for human readers. To give Orion richer context for its analysis, use [Knowledge Base](/core-concepts/knowledge-base) pages.
## Next Steps After Creating a Project
Once you have created a new project, it will appear in the left-hand navigation menu and on the main projects page.
Click into your new project to complete the setup. A dialog will appear prompting you to select a data source for the project. A project must always be connected to at least one data source to work.
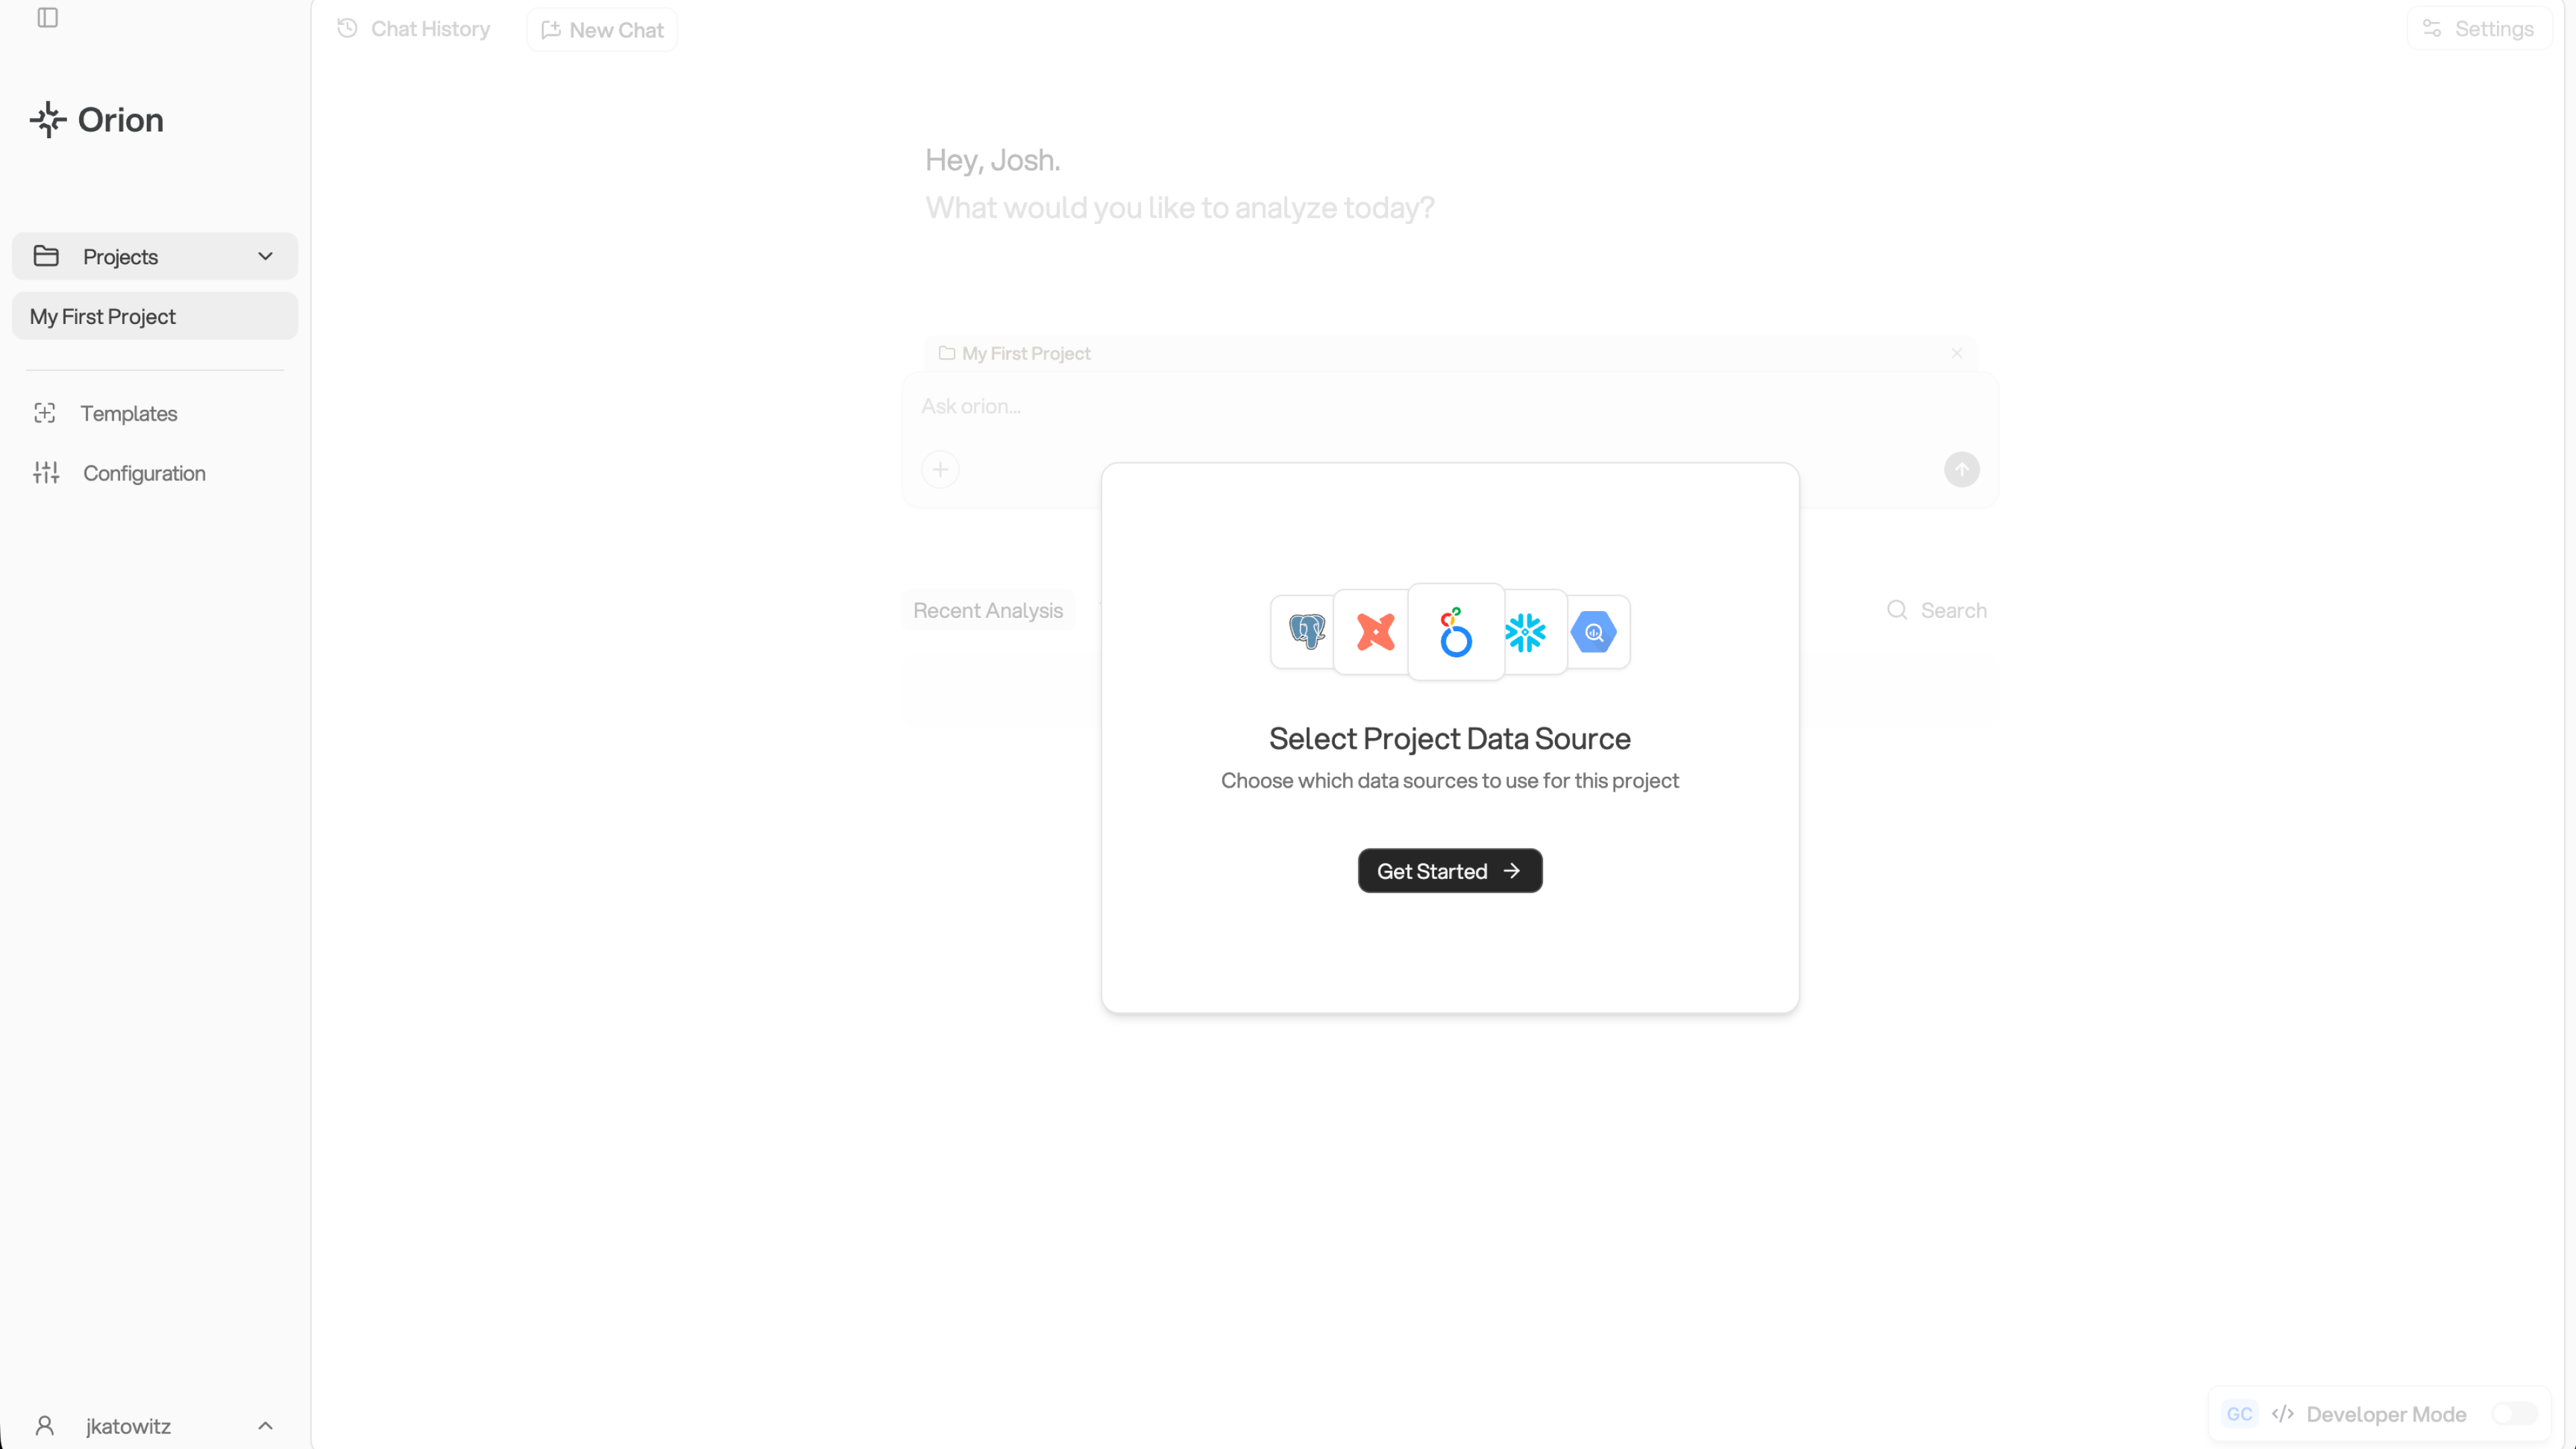 ### Selecting a Data Source
The next modal displays a list of available [data sources](/configuration/data-sources) that have been connected by your Admin. Select one by enabling the toggle switch.
### Selecting a Data Source
The next modal displays a list of available [data sources](/configuration/data-sources) that have been connected by your Admin. Select one by enabling the toggle switch.
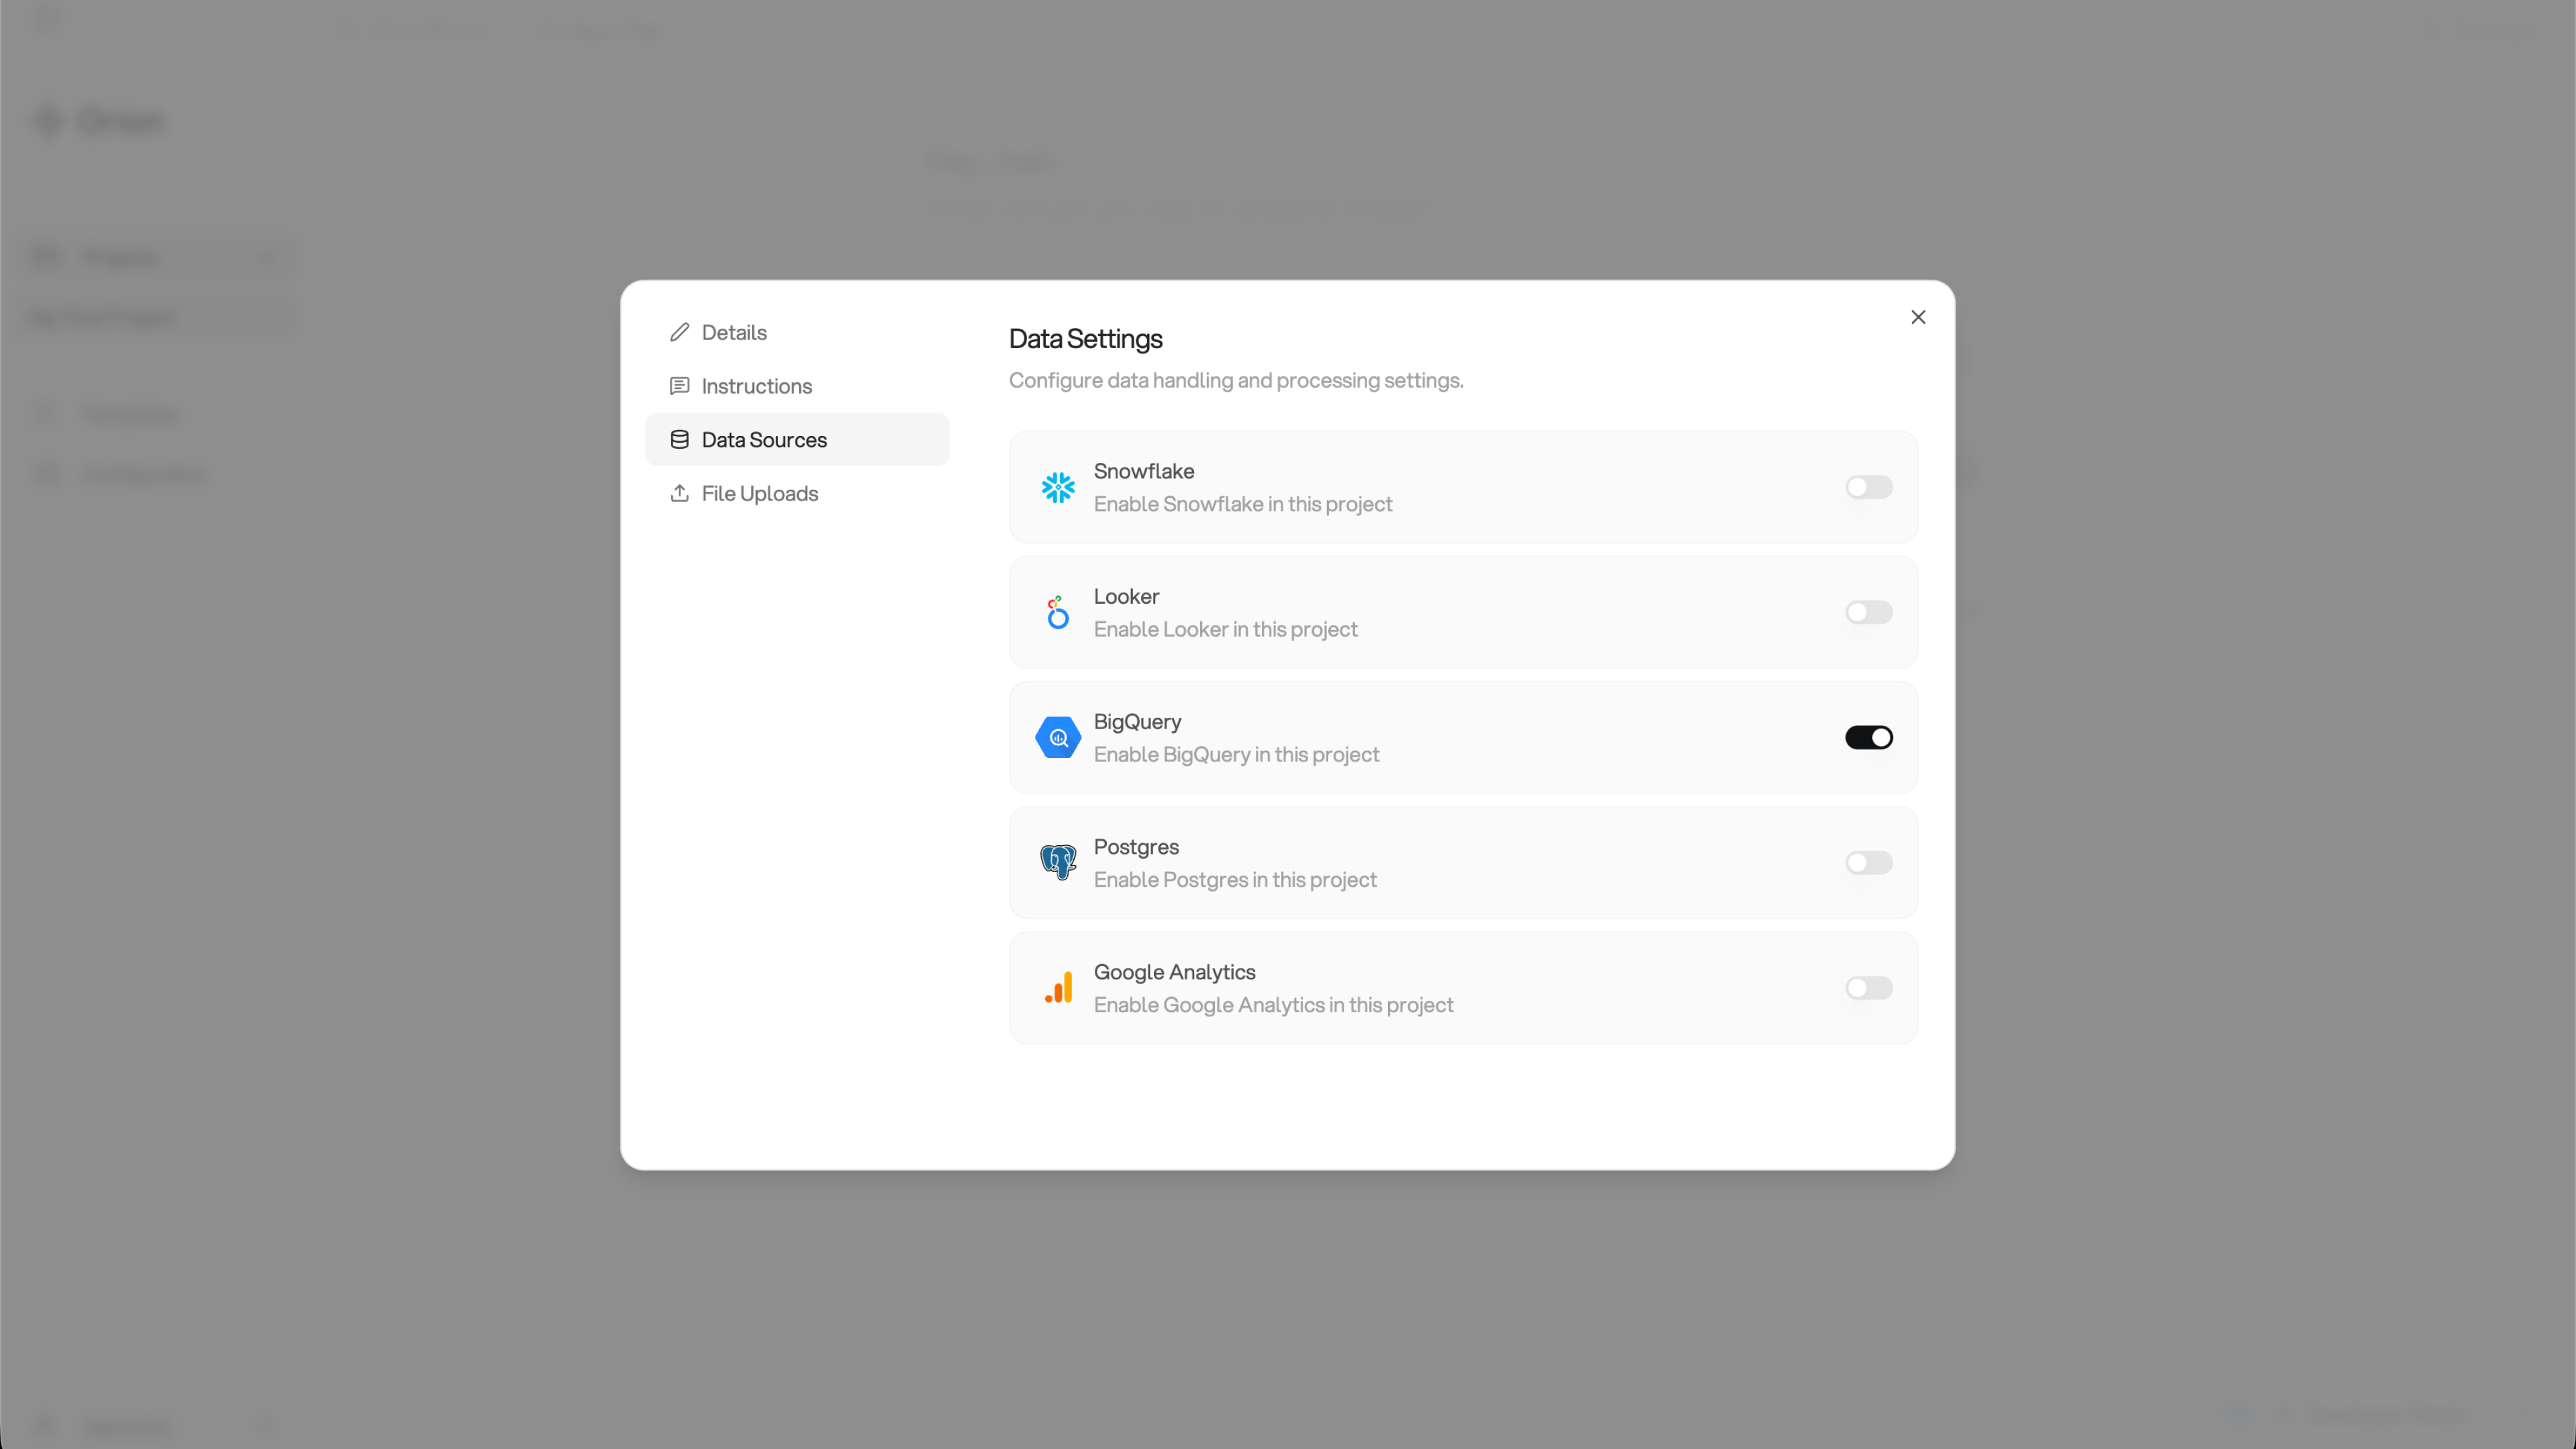 ### Accessing Project Settings
The Project Settings modal is always accessible by:
* Clicking the **Settings** button in the top right corner of your screen, or
* Clicking the three dots on the project item in the left-hand navigation menu and selecting **Project Settings**
From Project Settings, you can:
* Update the project name and description
* Change the selected data source at any time
## Memory Isolation
Memory isolation is enabled by default for all new projects.
When memory isolation is enabled, any memories formed by Orion within this project remain contained to the project itself. These memories will not be accessible in other chat conversations or analyses outside the project.
**Disabling memory isolation** allows memories formed within this project to be accessible across other projects. This is useful when you want Orion to recall memories from one project in order to inform work in another.
## Enabling Knowledge Base Pages
The Knowledge Base is the recommended way to provide your project with structured, organized context. By enabling [Knowledge Base](/core-concepts/knowledge-base) pages for your project, Orion gains access to your organization's centralized documentation.
From the Project Settings modal, click on the **Knowledge Base** tab to enable pages for this project.
### Accessing Project Settings
The Project Settings modal is always accessible by:
* Clicking the **Settings** button in the top right corner of your screen, or
* Clicking the three dots on the project item in the left-hand navigation menu and selecting **Project Settings**
From Project Settings, you can:
* Update the project name and description
* Change the selected data source at any time
## Memory Isolation
Memory isolation is enabled by default for all new projects.
When memory isolation is enabled, any memories formed by Orion within this project remain contained to the project itself. These memories will not be accessible in other chat conversations or analyses outside the project.
**Disabling memory isolation** allows memories formed within this project to be accessible across other projects. This is useful when you want Orion to recall memories from one project in order to inform work in another.
## Enabling Knowledge Base Pages
The Knowledge Base is the recommended way to provide your project with structured, organized context. By enabling [Knowledge Base](/core-concepts/knowledge-base) pages for your project, Orion gains access to your organization's centralized documentation.
From the Project Settings modal, click on the **Knowledge Base** tab to enable pages for this project.
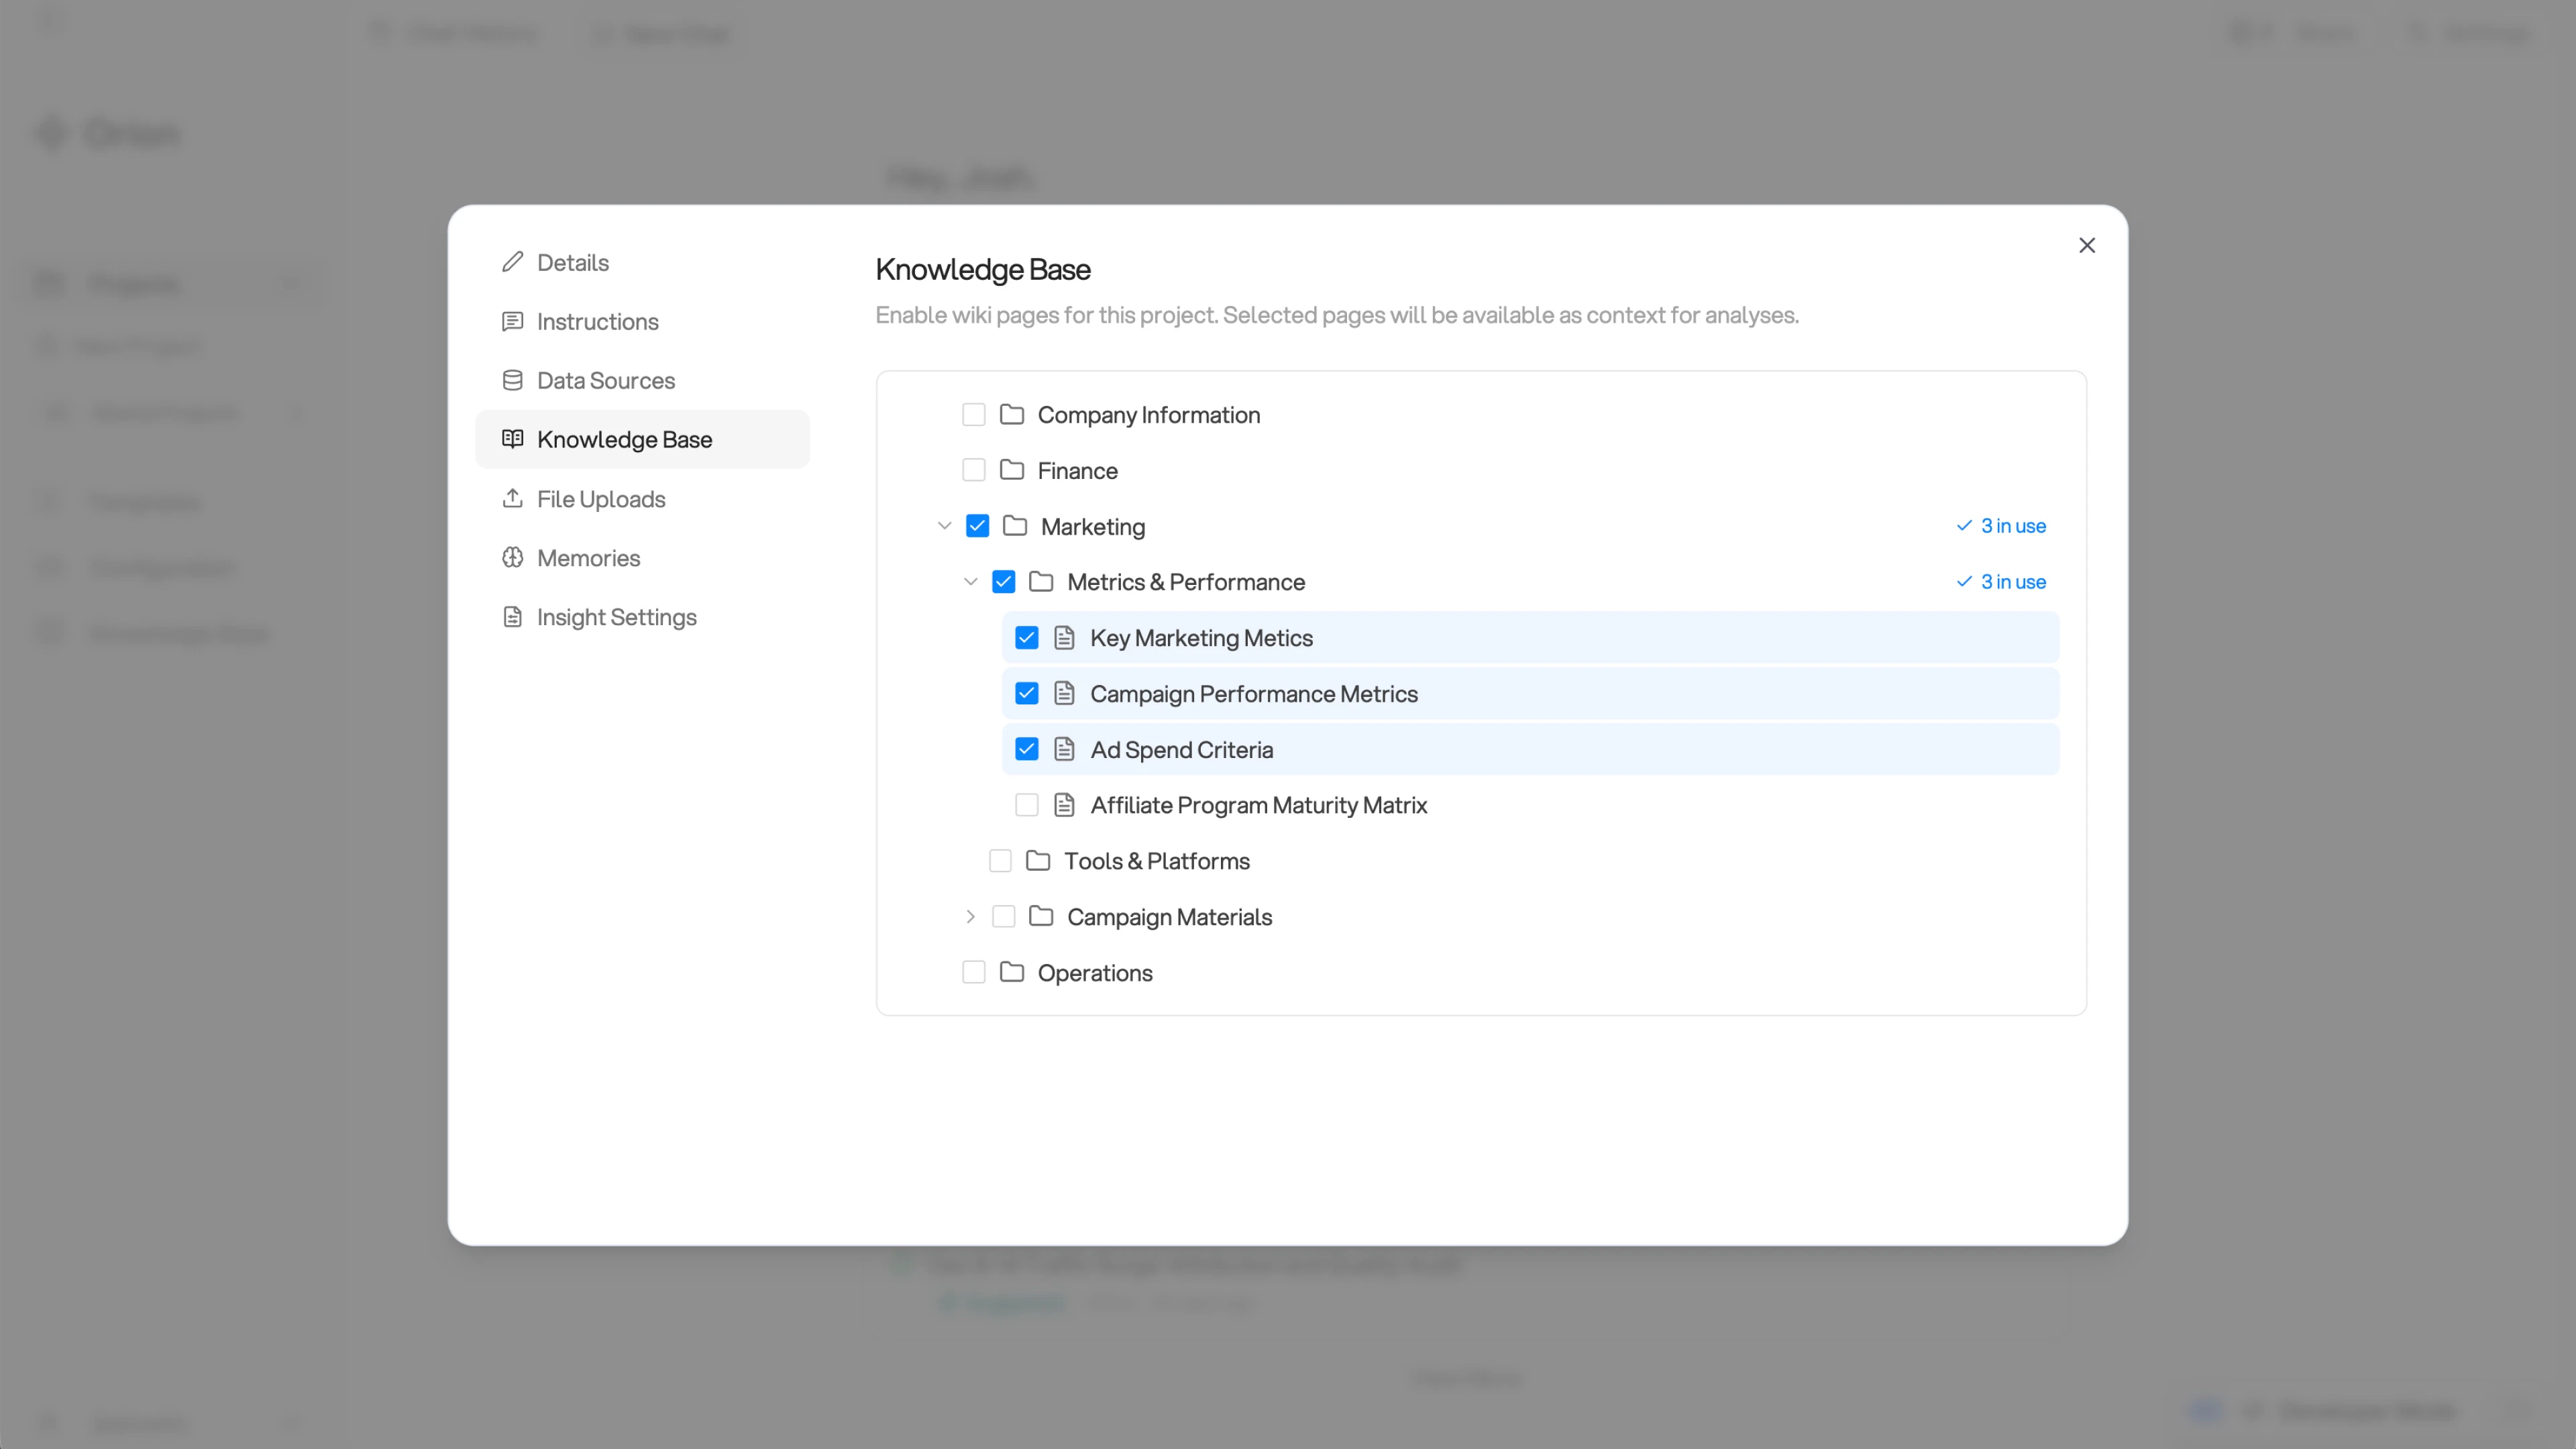 ### How to Enable Pages
1. Browse or search for Knowledge Base pages in the catalog
2. Enable the pages you want Orion to have access to for this project
3. Save your changes
**By default**, Orion has no access to any Knowledge Base pages until you explicitly enable them.
### Best Practices for Knowledge Base in Projects
* **Keep it focused** - Enable 8-10 pages maximum per project to keep Orion focused on relevant context
* **Enable strategically** - Only enable pages that are directly relevant to this project's analysis
* **Stay organized** - Use your Knowledge Base folder structure to find related pages
When you enable Knowledge Base pages, Orion will:
* Include them throughout its analysis workflow
* Cite them with inline references in your reports, dashboards, and other deliverables
* Reference them throughout your chat conversations
* Use them to inform analytical decisions and methodology
Knowledge Base pages provide the foundation of structured context that Orion
uses across chat and analysis. Combine them with file uploads for
comprehensive context coverage.
## Uploading Files to a Project
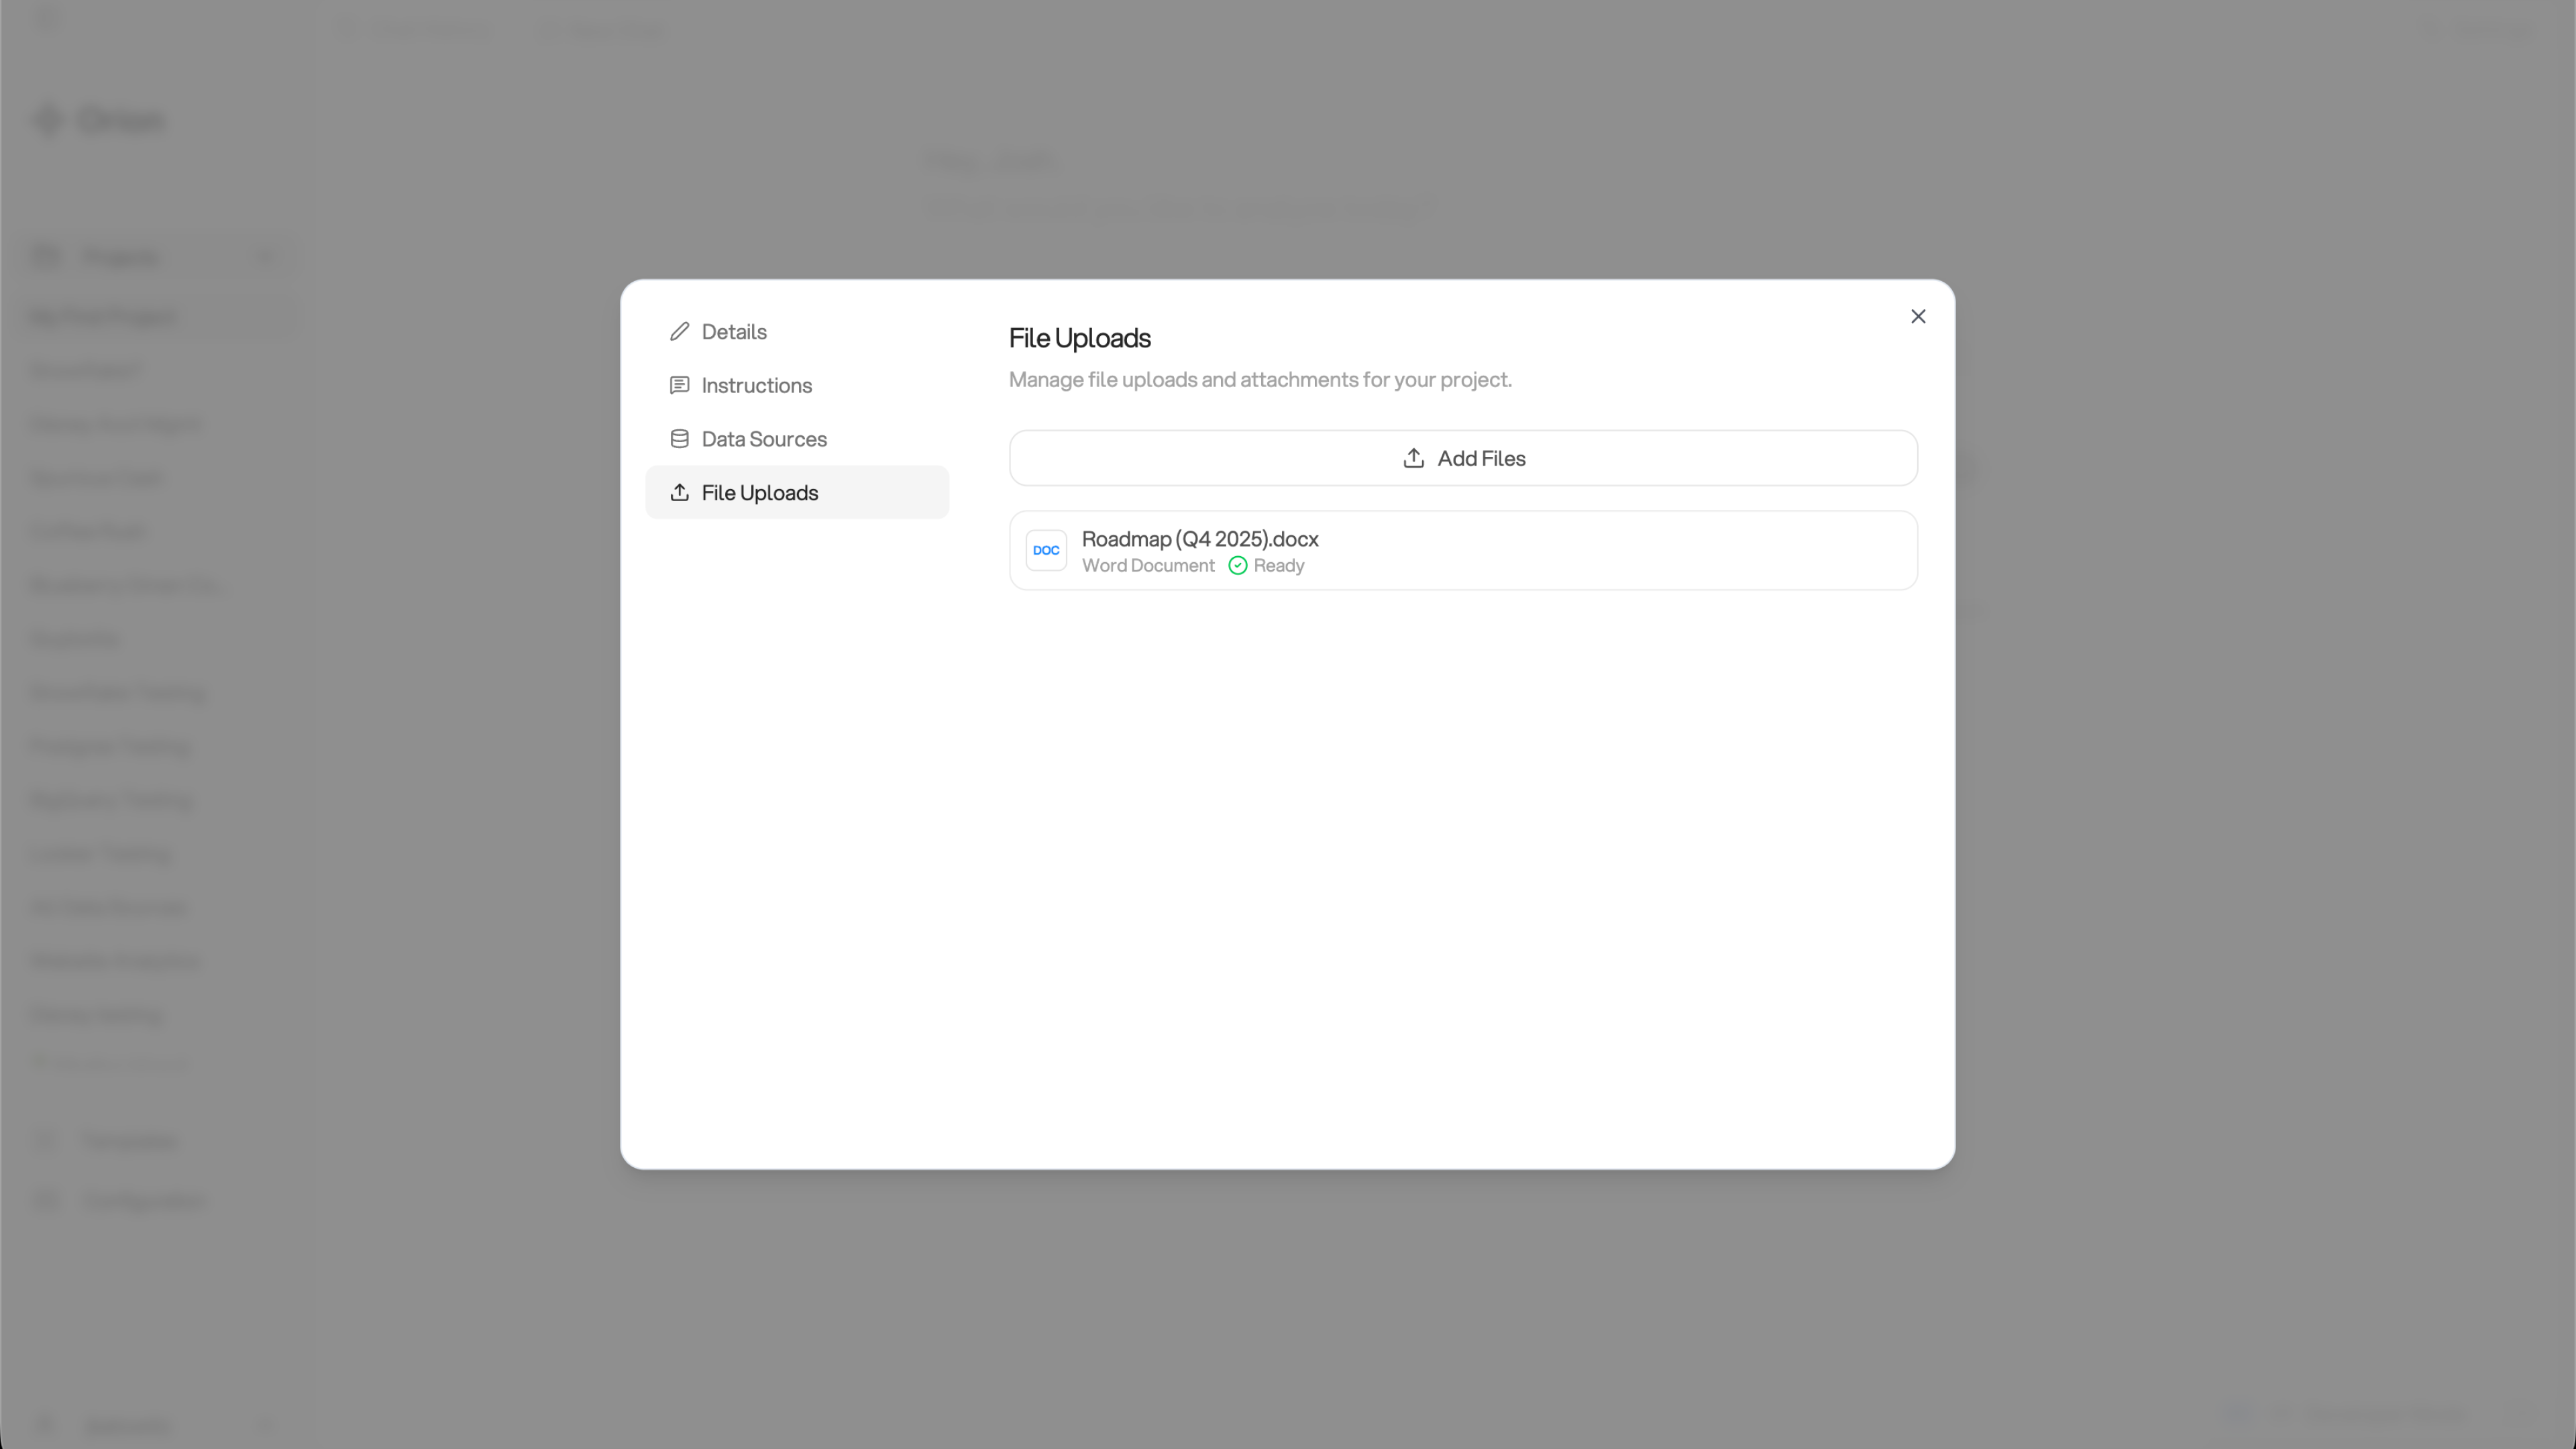
In addition to Knowledge Base pages, you can upload files to provide Orion with detailed reference materials and long-form documentation. From the Project Settings modal, click on the **File Uploads** tab.
### How to Enable Pages
1. Browse or search for Knowledge Base pages in the catalog
2. Enable the pages you want Orion to have access to for this project
3. Save your changes
**By default**, Orion has no access to any Knowledge Base pages until you explicitly enable them.
### Best Practices for Knowledge Base in Projects
* **Keep it focused** - Enable 8-10 pages maximum per project to keep Orion focused on relevant context
* **Enable strategically** - Only enable pages that are directly relevant to this project's analysis
* **Stay organized** - Use your Knowledge Base folder structure to find related pages
When you enable Knowledge Base pages, Orion will:
* Include them throughout its analysis workflow
* Cite them with inline references in your reports, dashboards, and other deliverables
* Reference them throughout your chat conversations
* Use them to inform analytical decisions and methodology
Knowledge Base pages provide the foundation of structured context that Orion
uses across chat and analysis. Combine them with file uploads for
comprehensive context coverage.
## Uploading Files to a Project
In addition to Knowledge Base pages, you can upload files to provide Orion with detailed reference materials and long-form documentation. From the Project Settings modal, click on the **File Uploads** tab.
 ### When to Use File Uploads
Project file uploads are ideal for **long-form, unstructured documents**, especially:
* **Dense PDFs** - Research reports, whitepapers, or detailed analyses
* **Documents with images and charts** - Anything with visual content or complex formatting
* **Transcripts and notes** - Meeting recordings, interview transcripts, or detailed notes
* **Complex layouts** - Documents that are difficult to structure into Knowledge Base pages
File uploads are primarily used within chat conversations for specific reference and research, rather than being integrated throughout your analysis workflow like Knowledge Base pages.
### Supported File Types
Orion currently supports the following file formats for project document uploads:
* **Markdown** (.md, .markdown)
* **PDF** (.pdf)
* **Word Documents** (.docx)
* **Plain Text** (.txt)
Excel spreadsheets are not currently supported for file uploads, but we're
actively working on adding Excel support in an upcoming release. For
spreadsheet data, consider uploading to the Knowledge Base as structured pages
instead.
#### Common Examples of Project Files:
* Research reports and whitepapers
* PDF analyses and detailed documentation
* Meeting transcripts and interview recordings
* Competitor analysis documents with images
* Industry reports and market research
Use file uploads for dense, reference-heavy documents. Use Knowledge Base
pages for structured, reusable context that Orion should consistently apply to
your project.
## Comparing Knowledge Base Pages and File Uploads
Both provide context to Orion, but serve different purposes:
Structured context (metrics, definitions, procedures) used throughout chat
and analysis workflow
Long-form documents (PDFs, transcripts, historical reports) used for
specific reference in chat
## Cloning Projects
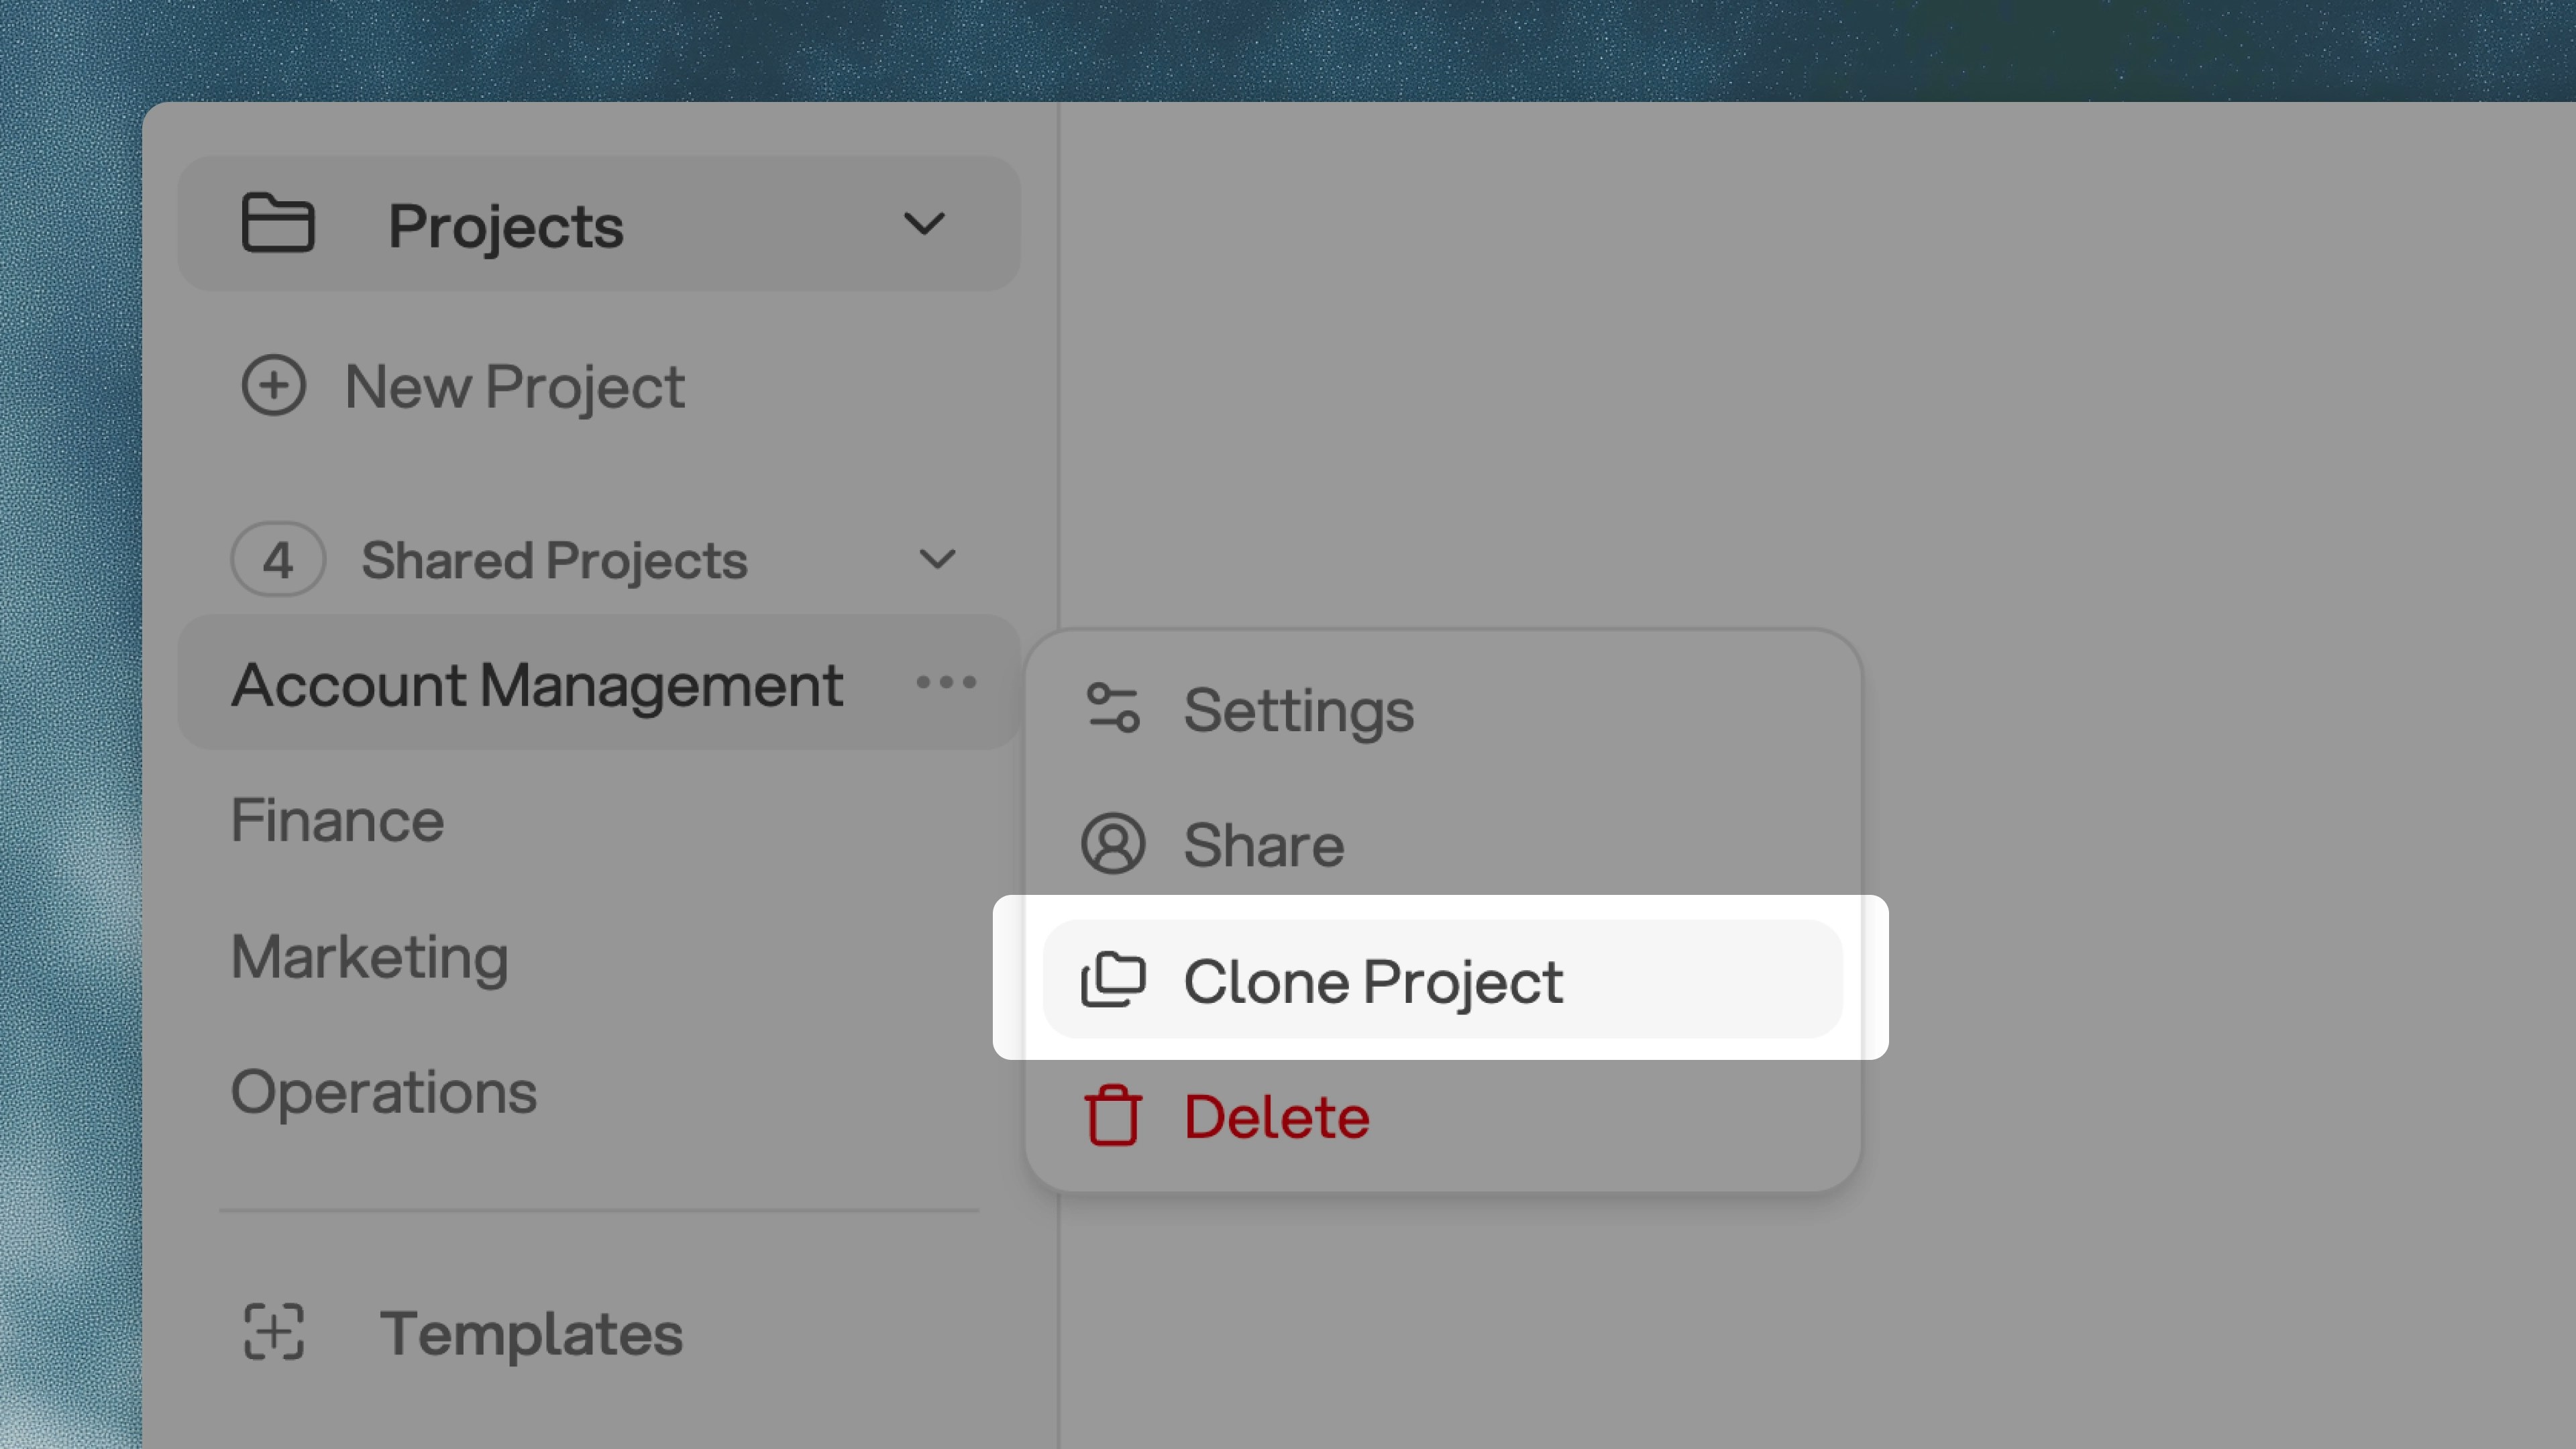
Within shared projects, you have the ability to clone projects. This is useful when you want to reuse the same project settings, data sources, and file uploads from an existing project.
For example, if you're using a project for customer-facing analytics reporting and want to use the same project configuration for a new use case, you can simply clone everything from the original project.
### When to Use File Uploads
Project file uploads are ideal for **long-form, unstructured documents**, especially:
* **Dense PDFs** - Research reports, whitepapers, or detailed analyses
* **Documents with images and charts** - Anything with visual content or complex formatting
* **Transcripts and notes** - Meeting recordings, interview transcripts, or detailed notes
* **Complex layouts** - Documents that are difficult to structure into Knowledge Base pages
File uploads are primarily used within chat conversations for specific reference and research, rather than being integrated throughout your analysis workflow like Knowledge Base pages.
### Supported File Types
Orion currently supports the following file formats for project document uploads:
* **Markdown** (.md, .markdown)
* **PDF** (.pdf)
* **Word Documents** (.docx)
* **Plain Text** (.txt)
Excel spreadsheets are not currently supported for file uploads, but we're
actively working on adding Excel support in an upcoming release. For
spreadsheet data, consider uploading to the Knowledge Base as structured pages
instead.
#### Common Examples of Project Files:
* Research reports and whitepapers
* PDF analyses and detailed documentation
* Meeting transcripts and interview recordings
* Competitor analysis documents with images
* Industry reports and market research
Use file uploads for dense, reference-heavy documents. Use Knowledge Base
pages for structured, reusable context that Orion should consistently apply to
your project.
## Comparing Knowledge Base Pages and File Uploads
Both provide context to Orion, but serve different purposes:
Structured context (metrics, definitions, procedures) used throughout chat
and analysis workflow
Long-form documents (PDFs, transcripts, historical reports) used for
specific reference in chat
## Cloning Projects
Within shared projects, you have the ability to clone projects. This is useful when you want to reuse the same project settings, data sources, and file uploads from an existing project.
For example, if you're using a project for customer-facing analytics reporting and want to use the same project configuration for a new use case, you can simply clone everything from the original project.
 Memories from an isolated project will not automatically copy into a cloned
project. Each cloned project starts with its own isolated memory.
## Sharing Projects
You can share projects two ways: directly with individual users, or by sharing them with a [Group](/configuration/groups).
### Sharing with individuals
To share a project with one or more users, click the share button in the upper right-hand corner of the project interface.
Memories from an isolated project will not automatically copy into a cloned
project. Each cloned project starts with its own isolated memory.
## Sharing Projects
You can share projects two ways: directly with individual users, or by sharing them with a [Group](/configuration/groups).
### Sharing with individuals
To share a project with one or more users, click the share button in the upper right-hand corner of the project interface.
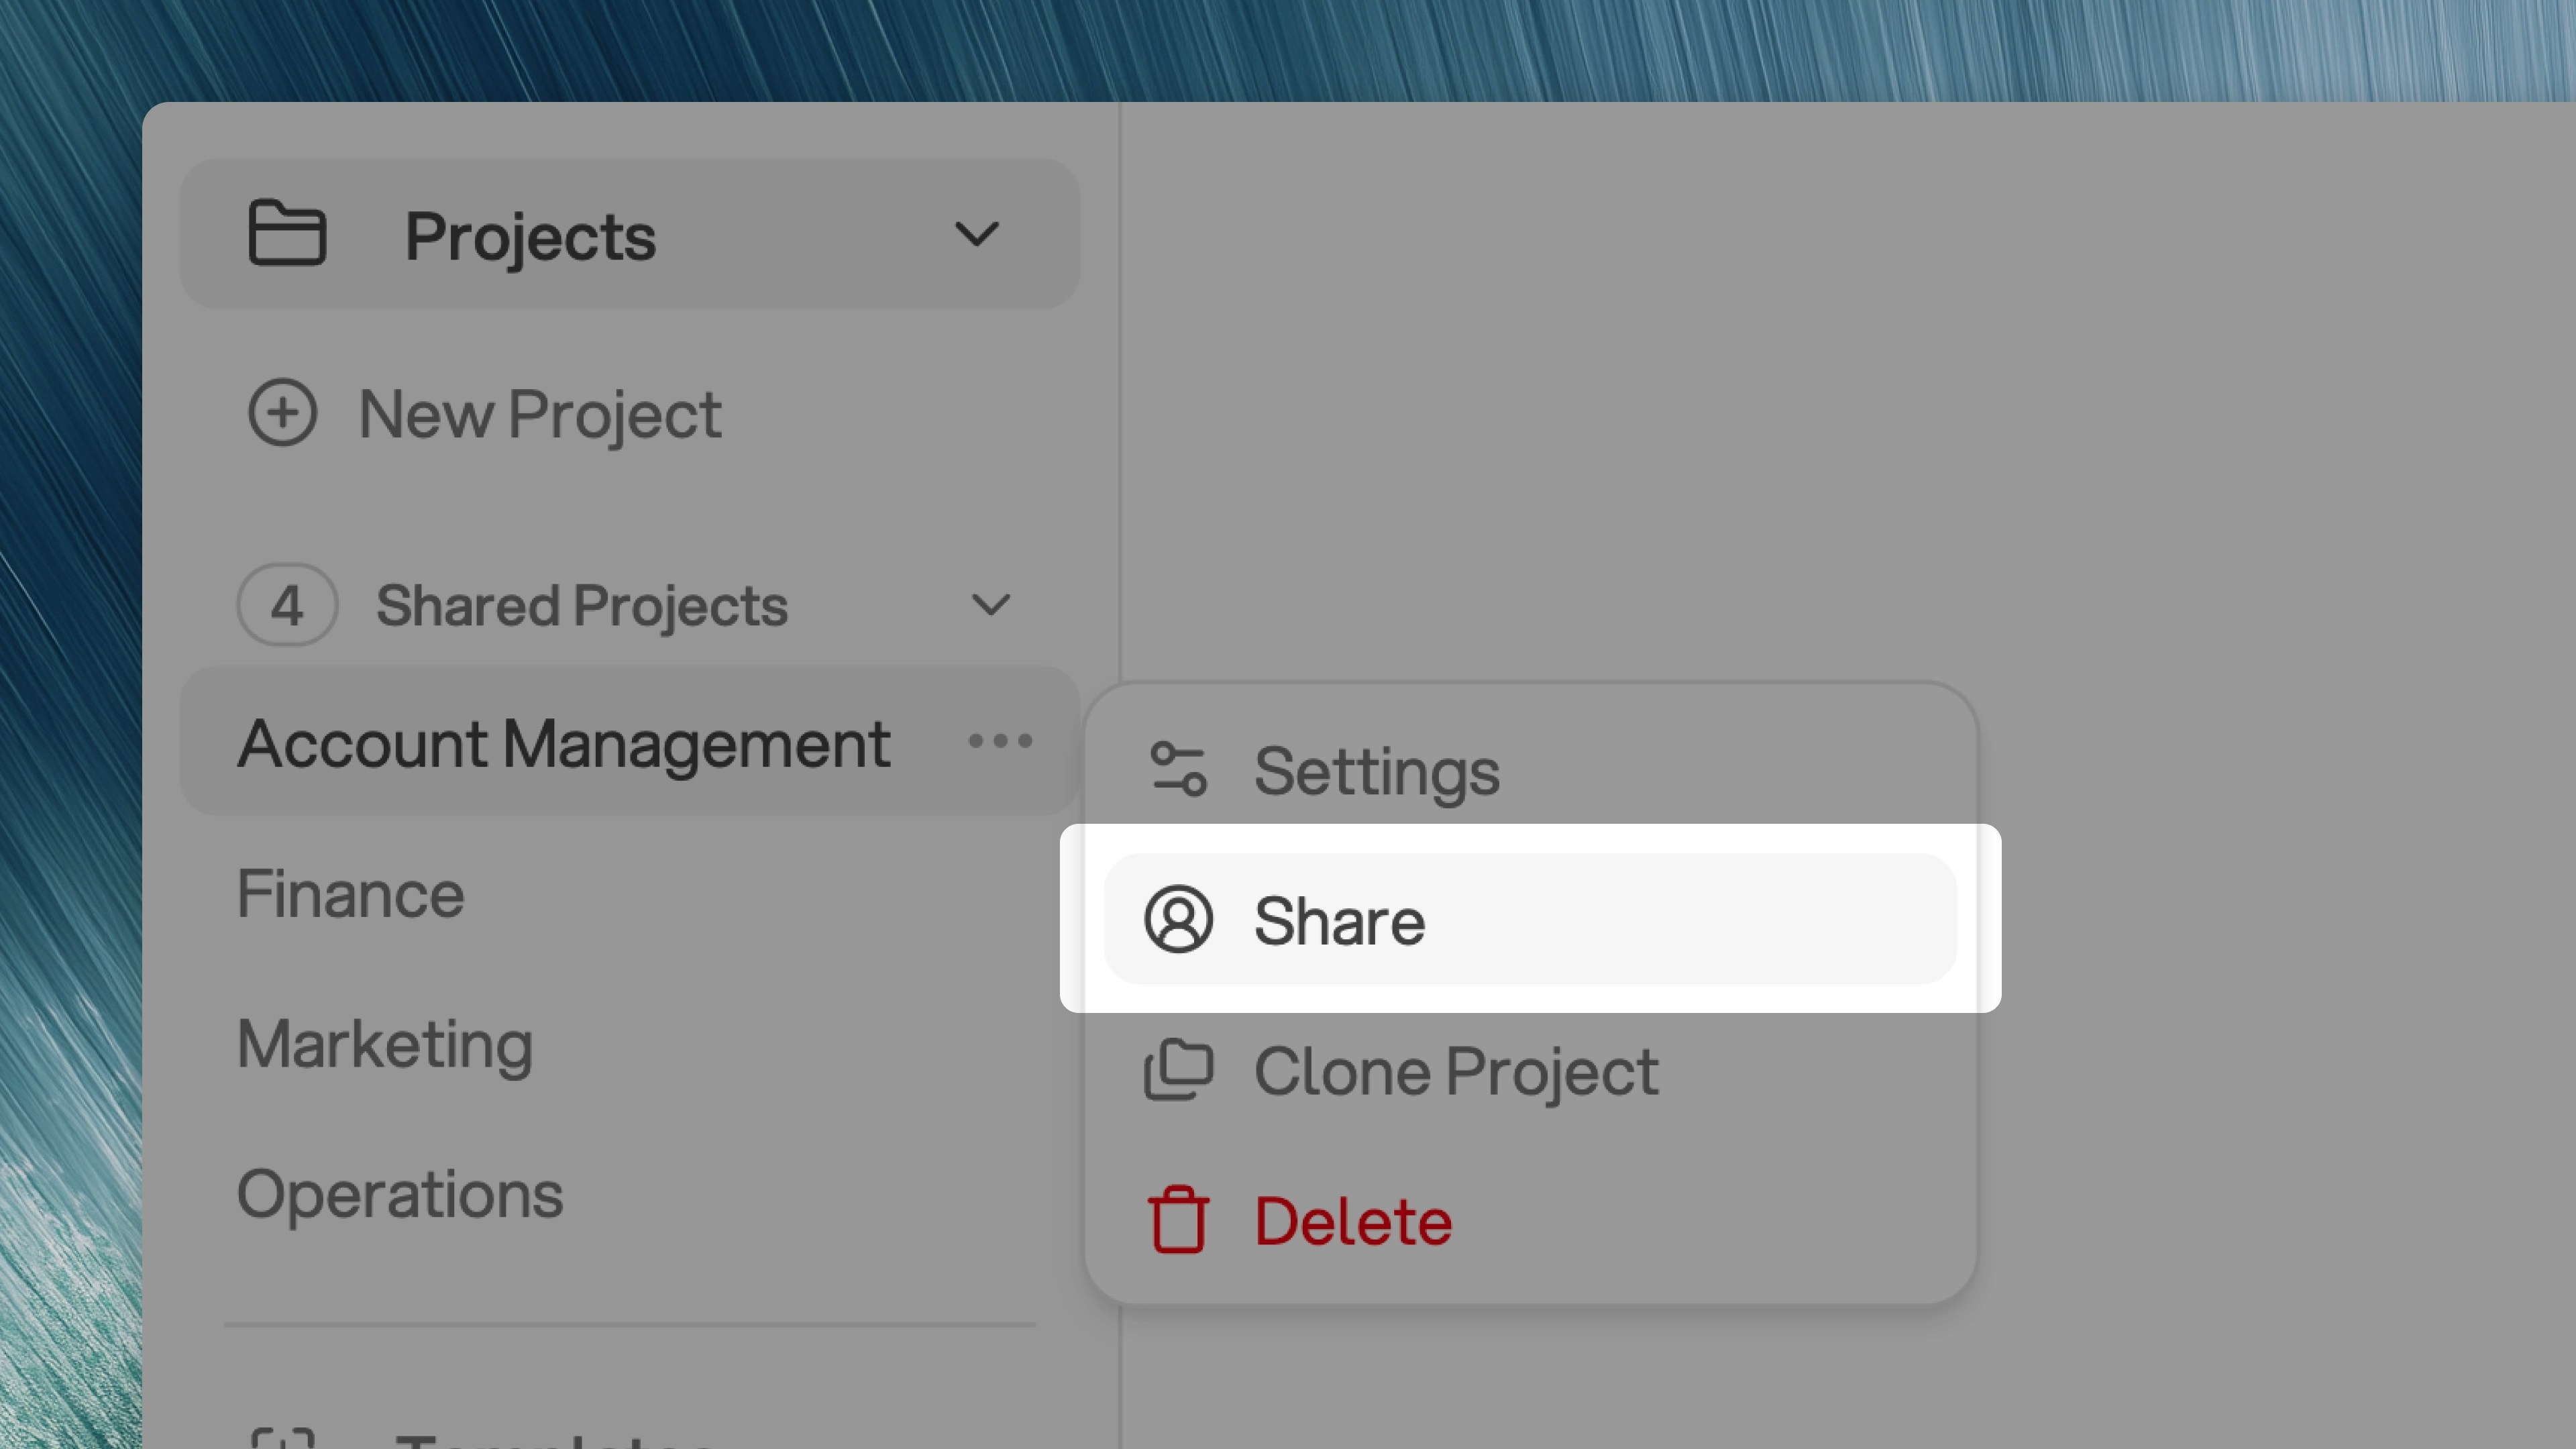 Shared projects enable collaboration and allow you to work together with your team members on analyses.
### Sharing with a Group
If your tenant uses [Groups](/configuration/groups), you can give access to a project by sharing it with a group. Everyone in the group can access the project, with permissions matching their role in the group — no need to invite members individually.
The Project Settings modal lists every group that currently has access to the project.
Shared projects enable collaboration and allow you to work together with your team members on analyses.
### Sharing with a Group
If your tenant uses [Groups](/configuration/groups), you can give access to a project by sharing it with a group. Everyone in the group can access the project, with permissions matching their role in the group — no need to invite members individually.
The Project Settings modal lists every group that currently has access to the project.
 Direct invites and group access work side by side. Removing someone from a group doesn't cancel any direct invite they have on the project, and removing a direct invite doesn't remove them from the group.
## Project Permissions
Orion supports three tenant roles with varying levels of access. If your tenant uses [Groups](/configuration/groups), users also have a group role that may further shape what they can do within a specific project. See [Groups → Roles at a Glance](/configuration/groups#roles-at-a-glance) for a full breakdown.
Can control who has access to projects. Admins can assign users to projects
from the Manage Users tab and have full control over project access.
Can do just about anything within a project, including chatting with the
project and sharing projects. The only limitation is that analysts cannot
add existing users to other projects.
Can view projects that have been approved and view insights that have been
approved. Viewers have read-only access to approved content.
Direct invites and group access work side by side. Removing someone from a group doesn't cancel any direct invite they have on the project, and removing a direct invite doesn't remove them from the group.
## Project Permissions
Orion supports three tenant roles with varying levels of access. If your tenant uses [Groups](/configuration/groups), users also have a group role that may further shape what they can do within a specific project. See [Groups → Roles at a Glance](/configuration/groups#roles-at-a-glance) for a full breakdown.
Can control who has access to projects. Admins can assign users to projects
from the Manage Users tab and have full control over project access.
Can do just about anything within a project, including chatting with the
project and sharing projects. The only limitation is that analysts cannot
add existing users to other projects.
Can view projects that have been approved and view insights that have been
approved. Viewers have read-only access to approved content.